


Contents: Low beam adjustment ⇓ High beam adjustment ⇓
Low beam adjustment
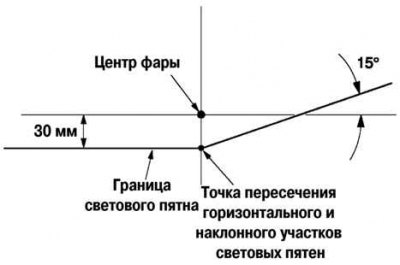
Fig. 7.22. Headlight low beam adjustment diagram
Install the headlight adjustment screen as shown in Figure 7.22.
Adjust the air pressure in your tires to the correct level.
Place the unloaded vehicle on a horizontal surface.
Place one person in the driver's seat.
Position the car straight and perpendicular to the wall.
Install the headlights at a distance of 3 m from the wall (Fig. 7.23).
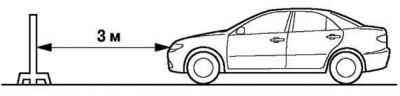
Fig. 7.23. Vehicle installation diagram
When adjusting one headlight, cover the other.
Start the engine to recharge the battery.
Turn on the low beam.
Set the headlight range control switch to position 0.
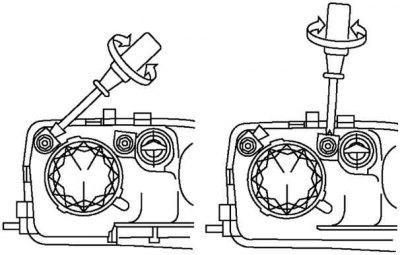
Fig. 7.24. Adjustment by turning the adjusting screws
Adjust the headlights by turning the adjusting screws as shown in Figure 7.24. First loosen the screws, then tighten them.
Note: If you tighten the adjusting screws first and then loosen them, they will come loose while the vehicle is moving, causing the headlights to be out of alignment.
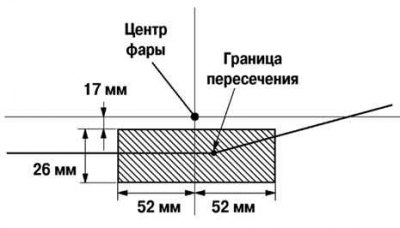
Fig. 7.25. Scheme of correct installation of light beam
By turning the adjusting screws, adjust the headlight so that the intersection point of the horizontal and inclined sections of the light spots is located in the place shown in the shaded area of Figure 7.25.
High beam adjustment
Adjust the air pressure in your tires to the correct level.
Place the unloaded vehicle on a horizontal surface.
Place one person in the driver's seat.
Position the car straight and perpendicular to the wall.
Install the headlights at a distance of 3 m from the wall.
When adjusting one headlight, cover the other.
Start the engine to recharge the battery.
Turn on the high beam headlights.
Set the headlight range control switch to position 0.
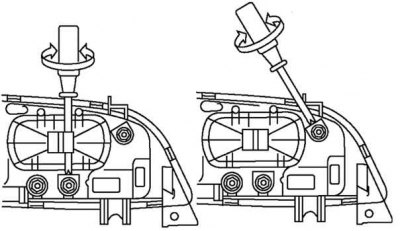
Fig. 7.26. Adjustment by turning the adjusting screws
Adjust the headlights by turning the adjusting screws as shown in Figure 7.26. First loosen the screws, then tighten them.