


External and internal elements of the body Mazda 3 (BK)

General information about the body
A characteristic feature of Mazda cars is the body design, which uses a trough-shaped floor element together with front and rear longitudinal members. They serve as a...
A characteristic feature of Mazda cars is the body design, which uses a trough-shaped floor element together with front and rear longitudinal members. They serve as a...

Body frame — characteristics and deformation zones
Fig. 8.1. Mazda 3 car body frame: 1 – body frame; 2 – front bumper reinforcement; 3 – casing panel Main characteristics The body frame is designed to increase rigidity...
Fig. 8.1. Mazda 3 car body frame: 1 – body frame; 2 – front bumper reinforcement; 3 – casing panel Main characteristics The body frame is designed to increase rigidity...

Body add-on components
Fig. 8.6. Mazda 3 car body components: 1 – trunk lid; 2 – rear bumper reinforcement; 3 – rear bumper; 4 – fuel tank filler cap; 5 – hood; 6 – radiator frame panel; 7 –...
Fig. 8.6. Mazda 3 car body components: 1 – trunk lid; 2 – rear bumper reinforcement; 3 – rear bumper; 4 – fuel tank filler cap; 5 – hood; 6 – radiator frame panel; 7 –...

Removal and installation the hood
To remove the hood hinge, remove the following items: front side direction indicators; front bumper; front combination lights; front wing panel. Disconnect the...
To remove the hood hinge, remove the following items: front side direction indicators; front bumper; front combination lights; front wing panel. Disconnect the...

Adjusting the hood position
Remove the front fender. Remove the front fender. Loosen the hood hinge adjustment bolts and close the hood. Fig. 8.8. Hood adjustment bolts Tighten the bolts (Fig....
Remove the front fender. Remove the front fender. Loosen the hood hinge adjustment bolts and close the hood. Fig. 8.8. Hood adjustment bolts Tighten the bolts (Fig....

Removal and installation the front wing panel
Disconnect the negative battery cable. Remove the front side turn signal. Remove the fender molding. Remove the front bumper. Remove the front combination light. Fig....
Disconnect the negative battery cable. Remove the front side turn signal. Remove the fender molding. Remove the front bumper. Remove the front combination light. Fig....

Removal and installation the front bumper
Disconnect the negative battery cable. Fig. 8.13. Disconnecting the bumper lock Pull back the ends of the front bumper (wheel niche) outward to release the bumper lock...
Disconnect the negative battery cable. Fig. 8.13. Disconnecting the bumper lock Pull back the ends of the front bumper (wheel niche) outward to release the bumper lock...

Removal and installation the rear bumper
Disconnect the negative cable from the battery. Remove the trunk trim. Remove the fasteners and slightly bend the side trim of the trunk (right) Remove the fasteners and...
Disconnect the negative cable from the battery. Remove the trunk trim. Remove the fasteners and slightly bend the side trim of the trunk (right) Remove the fasteners and...

Removal and installation an electrically adjustable exterior mirror
Disconnect the negative battery cable. Remove the interior trim. Remove the front door trim. Disconnect the power outside mirror connector. Remove the screws and mirror...
Disconnect the negative battery cable. Remove the interior trim. Remove the front door trim. Disconnect the power outside mirror connector. Remove the screws and mirror...

Disassembling and assembling the electrically operated exterior mirror
Fig. 8.51. Disassembling the electric rearview mirror Press on area A of the mirror so that area B moves towards you (Fig. 8.51). Insert a screwdriver into the slot and...
Fig. 8.51. Disassembling the electric rearview mirror Press on area A of the mirror so that area B moves towards you (Fig. 8.51). Insert a screwdriver into the slot and...

Main characteristics of the seats
There are three types of seats: seat with manual adjustment and lifting mechanism (from the driver's side); manually adjustable seat without lifting mechanism (from the...
There are three types of seats: seat with manual adjustment and lifting mechanism (from the driver's side); manually adjustable seat without lifting mechanism (from the...

Front seats — description
Fig. 8.56. Front seats: 1 – seat with servo-driven adjustment mechanism (from the driver's side); 2 – Manually adjustable seat with lifting mechanism (from the driver's...
Fig. 8.56. Front seats: 1 – seat with servo-driven adjustment mechanism (from the driver's side); 2 – Manually adjustable seat with lifting mechanism (from the driver's...

Rear seats — description
Fig. 8.57. Rear seats: 1 – rear seat (sedan); 2 – rear seat (hatchback); 3 – isofix mount; 4 – tie-down fastening (sedan); 5 – Tether mount (hatchback); 6 – remote...
Fig. 8.57. Rear seats: 1 – rear seat (sedan); 2 – rear seat (hatchback); 3 – isofix mount; 4 – tie-down fastening (sedan); 5 – Tether mount (hatchback); 6 – remote...
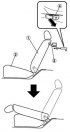
Folding the rear seat
A remote lever or button (hatchback only) allows the seat to be automatically folded down to expand the cargo area. When folding the seat backs, please note the...
A remote lever or button (hatchback only) allows the seat to be automatically folded down to expand the cargo area. When folding the seat backs, please note the...
This section is available on: russian, bulgarian, belarusian, ukrainian, serbian, croatian, romanian, polish, slovak, hungarian
Link in different formats to this section
TEXTHTMLBB Code
- User manual
- Vehicle description
- Keys, locks and alarms
- Controls and instruments
- Air conditioning and heater
- Seat adjustment
- Security systems
- Driving and operation
- Faults en route
- Maintenance
- Power unit
- Engine device (gasoline)
- Engine repair (gasoline)
- Diesel engine (Z6)
- Lubrication system
- Cooling system
- Fuel system
- Exhaust system
- Engine electrical equipment
- Engine management system
- Transmission
- Clutch
- Mechanical gearbox
- Automatic gearbox
- Drive mechanism
- Chassis
- Suspension and wheels
- Steering
- Brake system
- Body
- Body elements
- Doors and windows
- Air conditioning and heater
- Electrical equipment
- Equipment and devices
- Power devices
- Lighting system
- Windshield wipers and washers
- Equipment checks