


Car engine lubrication system Mazda 3 (BK)

General information about the engine lubrication system
The lubrication system operates under pressure, the oil passes through the oil filter. Mazda engines are equipped with an environmentally friendly oil filter with a...
The lubrication system operates under pressure, the oil passes through the oil filter. Mazda engines are equipped with an environmentally friendly oil filter with a...

Oil pump — description
The oil pump is installed in the front engine cover. The crankshaft drives the inner rotor with a chain and an oil pump sprocket. An efficient and compact oil pump with...
The oil pump is installed in the front engine cover. The crankshaft drives the inner rotor with a chain and an oil pump sprocket. An efficient and compact oil pump with...
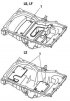
Oil pan — description
Two types of oil pans are used - one made of aluminum alloy, which reduces the overall weight of the car, and a pan made of multilayer steel. Silicone sealant is used to...
Two types of oil pans are used - one made of aluminum alloy, which reduces the overall weight of the car, and a pan made of multilayer steel. Silicone sealant is used to...

Oil filter — description
The oil filter is attached to the right of the oil level sensor (from the oil pan side) on the cylinder block. The filter housing is made of plastic. The oil pressure...
The oil filter is attached to the right of the oil level sensor (from the oil pan side) on the cylinder block. The filter housing is made of plastic. The oil pressure...

Oil Spray Nozzle Valve — Description
Fig. 2.45. Oil spray nozzle valve: 1 – nozzle; 2 – valve body; 3 – spring; 4 – oil; 5 – oil channel; 6 – check ball valve The oil spray nozzle valves are installed in...
Fig. 2.45. Oil spray nozzle valve: 1 – nozzle; 2 – valve body; 3 – spring; 4 – oil; 5 – oil channel; 6 – check ball valve The oil spray nozzle valves are installed in...

Operation of oil spray nozzle valves
Fig. 2.46. Location of installation of oil spray nozzle valves: 1 – oil spray nozzle valve; 2 – cylinder block; 3 – crankshaft The oil pressure acts on the check ball...
Fig. 2.46. Location of installation of oil spray nozzle valves: 1 – oil spray nozzle valve; 2 – cylinder block; 3 – crankshaft The oil pressure acts on the check ball...

Checking oil pressure
Warning! A hot engine and oil can cause serious burns. Stop the engine and wait until the engine and engine oil have cooled before checking. Remove the lower engine...
Warning! A hot engine and oil can cause serious burns. Stop the engine and wait until the engine and engine oil have cooled before checking. Remove the lower engine...

Engine oil change
Place the vehicle on a level surface. Warm up the engine to normal operating temperature. Stop the engine and wait 5 minutes. Remove the oil dipstick. Make sure the oil...
Place the vehicle on a level surface. Warm up the engine to normal operating temperature. Stop the engine and wait 5 minutes. Remove the oil dipstick. Make sure the oil...

Replacing the oil filter
Remove the oil filter drain plug. Fig. 2.202. Oil filter: 1 – sealing ring; 2 – oil filter cover Loosen the oil filter cap 2 turns and drain the engine oil (fig. 2.202)....
Remove the oil filter drain plug. Fig. 2.202. Oil filter: 1 – sealing ring; 2 – oil filter cover Loosen the oil filter cap 2 turns and drain the engine oil (fig. 2.202)....

Removal and installation the oil cooler
Remove the lower engine cover. Drain the coolant ( see further ). Remove the oil filter. Fig. 2.204. Removing the oil cooler: 1 – water hose; 2 – oil cooler housing...
Remove the lower engine cover. Drain the coolant ( see further ). Remove the oil filter. Fig. 2.204. Removing the oil cooler: 1 – water hose; 2 – oil cooler housing...

Removal and installation the oil pan
Stop the engine and wait until the engine and engine oil have cooled down. Disconnect the negative battery cable. Remove the bottom protective cover. Drain the engine...
Stop the engine and wait until the engine and engine oil have cooled down. Disconnect the negative battery cable. Remove the bottom protective cover. Drain the engine...

Removal and installation the oil pump
Disconnect the negative battery cable. Drain the engine oil. Remove the oil pan. Remove the mesh oil filter. Remove the oil pump chain guide. Remove the oil pump chain...
Disconnect the negative battery cable. Drain the engine oil. Remove the oil pan. Remove the mesh oil filter. Remove the oil pump chain guide. Remove the oil pump chain...

Installing an oil filter (diesel)
Warning! Remove and install all components only on a cold engine, otherwise, serious burns or serious injury may occur. Warning! A jacked up but unsecured vehicle is...
Warning! Remove and install all components only on a cold engine, otherwise, serious burns or serious injury may occur. Warning! A jacked up but unsecured vehicle is...

Disassembly, inspection and assembly of the oil pump (diesel)
Disassembly Remove the oil pump cover Remove the inner and outer rotors. Remove the plug and plunger spring. Remove the control plunger. Remove the oil pump housing....
Disassembly Remove the oil pump cover Remove the inner and outer rotors. Remove the plug and plunger spring. Remove the control plunger. Remove the oil pump housing....

Checking oil pressure (diesel)
Warning! A hot engine and oil can cause serious burns. Stop the engine and wait until the engine and engine oil have cooled before checking. Remove the lower engine...
Warning! A hot engine and oil can cause serious burns. Stop the engine and wait until the engine and engine oil have cooled before checking. Remove the lower engine...

Engine oil change (diesel)
Place the vehicle on a level surface. Warm up the engine to normal operating temperature. Stop the engine and wait 5 minutes. Remove the oil dipstick. Fig. 2.288....
Place the vehicle on a level surface. Warm up the engine to normal operating temperature. Stop the engine and wait 5 minutes. Remove the oil dipstick. Fig. 2.288....

Removal and installation the oil pan (diesel)
Fig. 2.290. Oil pan: 1 – oil pan; 2 – mesh oil filter; 3 – sealing ring Removal Remove the battery cover. Disconnect the negative cable from the battery. Remove the...
Fig. 2.290. Oil pan: 1 – oil pan; 2 – mesh oil filter; 3 – sealing ring Removal Remove the battery cover. Disconnect the negative cable from the battery. Remove the...
This section is available on: russian, bulgarian, belarusian, ukrainian, serbian, croatian, romanian, polish, slovak, hungarian
More sections on repairs of other Mazda models
• Power unit: Lubrication system Mazda Familia 6 (1989-1994)
• Power unit: Lubrication system Mazda Capella 4 (1987-1992)
• Power unit: Lubrication system Mazda6 GG (2002-2008)
• Power unit: Lubrication system Mazda CX-5KE (2012-2017)
• Power unit: Lubrication system Mazda 121 (3) (1996-2003)
• Power unit: Lubrication system Mazda Familia 6 (1989-1994)
• Power unit: Lubrication system Mazda Capella 4 (1987-1992)
• Power unit: Lubrication system Mazda6 GG (2002-2008)
• Power unit: Lubrication system Mazda CX-5KE (2012-2017)
• Power unit: Lubrication system Mazda 121 (3) (1996-2003)
Link in different formats to this section
TEXTHTMLBB Code
- User manual
- Vehicle description
- Keys, locks and alarms
- Controls and instruments
- Air conditioning and heater
- Seat adjustment
- Security systems
- Driving and operation
- Faults en route
- Maintenance
- Power unit
- Engine device (gasoline)
- Engine repair (gasoline)
- Diesel engine (Z6)
- Lubrication system
- Cooling system
- Fuel system
- Exhaust system
- Engine electrical equipment
- Engine management system
- Transmission
- Clutch
- Mechanical gearbox
- Automatic gearbox
- Drive mechanism
- Chassis
- Suspension and wheels
- Steering
- Brake system
- Body
- Body elements
- Doors and windows
- Air conditioning and heater
- Electrical equipment
- Equipment and devices
- Power devices
- Lighting system
- Windshield wipers and washers
- Equipment checks