


Caution! Be careful not to spill clutch fluid on painted surfaces. If this happens, wash off the fluid immediately with water.
Note: Do not mix different brands of clutch fluid.
Note: Do not reuse drained clutch fluid.
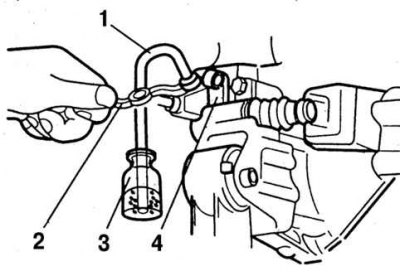
Fig. 3.2. Bleeding the hydraulic clutch release drive: 1 – transparent tube; 2 – open-end wrench; 3 – glass container with brake fluid; 4 – working cylinder
Any hydraulic system will operate properly if the air is removed from it.
When bleeding, add only clean fluid recommended by the manufacturer. Never reuse fluid that has leaked from the hydraulic clutch release system.
If fluids of different grades are accidentally mixed in the hydraulic system, remove the fluid, flush with clean fluid of the required grade and install new O-rings.
If there are constant fluid leaks from the hydraulic drive or air gets into it, determine the cause and location of the leak and eliminate the damage.
Before bleeding, remove the clutch hydraulic fluid reservoir cap.
Use a suction pump to suck the liquid out of the tank.
Remove the clutch slave cylinder bleeder cap and install a vinyl hose over the bleeder.
Place the other end of the vinyl hose into the container.
Pump the clutch pedal slowly several times.
With the clutch pedal depressed, loosen the nipple using a special tool to release the fluid.
Tighten the bleed screw to stop fluid from escaping.
Repeat the bleeding procedure several times until only clear liquid comes out of the tube.
Tighten the bleed screw.
Tightening torque: 5.9–8.8 Nm.
Add fluid to the tank up to the MAX mark.
Install the lid.
Check that the clutch is working properly.