


Contents: Anti-theft system ⇓ Installing the code ⇓ Cancel code ⇓ Disabling the anti-theft lock mode ⇓
Note: If you still cannot reprogram the immobilizer, check the number of working keys.
Replace the key or perform the reprogramming procedure with added keys.
To make a duplicate key or replace an immobilizer element (key and/or PCM unit), the customer must bring all keys to the dealer.
This is because the pre-programmed key IDs are erased from the PCM memory when reprogrammed.
You cannot transfer the PCM from another vehicle. Otherwise, the engine will not start.
Do not replace the PCM with a new one for troubleshooting purposes. The key ID and code word will be programmed into the new unit and cannot be used for other vehicles later, even if you find out that the old unit is OK.
The immobilizer cannot be disabled.
Make sure all registered keys allow the engine to start after the reprogramming procedure. Wait at least 5 seconds before using the next key.
When a client does not need to register more than two keys, the following operations can be terminated after registering two keys.
Anti-theft system
Triggering conditions
If the anti-theft system has been activated, any of the following conditions will cause the system to operate:
- the battery cable is disconnected;
- the battery is discharged;
- the audio unit connectors are disconnected.
If the system has been activated, then after power is supplied to the audio unit, it will only function after entering a pre-set code.
If the anti-theft system has been activated, then to return the system to its original state, you must perform the "Turning off the anti-theft lock mode" procedure.

Installing the code
Please perform each procedure (1-3) within 10 seconds, otherwise the code setting procedure will be terminated.
1. Turn the ignition switch to the ACC position, and then turn off the audio unit.
2. First press the AUTO-M button, then simultaneously press the channel 6 button for about 2 seconds until "CODE" appears on the display.
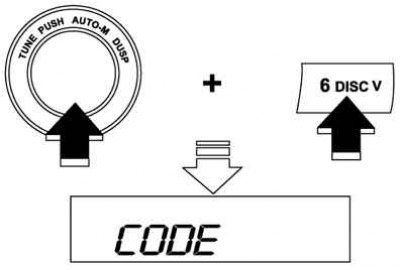
Fig. 7.72. Coding scheme 1
3. Press the AUTO-M button again, then simultaneously press the channel 6 button until rectangles appear on the display.
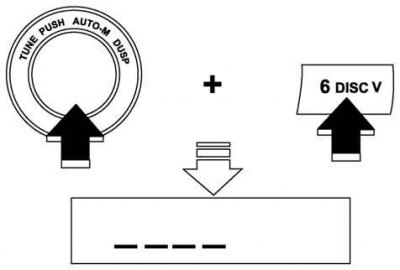
Fig. 7.73. Coding scheme 2
4. Select a personal code and write it down before entering. If you enter a number and then forget it, the audio unit will not function when the module power is turned off.
5. Channel selection buttons 1–4 are used to enter the selected code. Button 1 sets the first digit of the code, 2 – the second, 3 – the third, 4 – the last digit. Enter the number within 10 seconds. If the display indication disappears, repeat the procedures starting from the first.
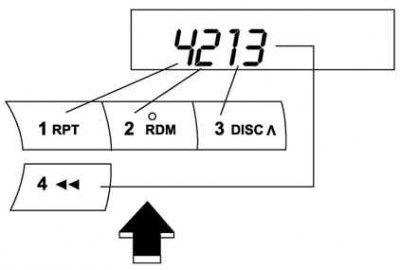
Fig. 7.74. Coding scheme 3
Note: Procedure 6 must be performed within 10 s after procedure 5.
6. While the code is displayed, press the AUTO-M button, then simultaneously press the channel 6 button for about 2 seconds. The "CODE" indication will be displayed on the display for about 5 seconds. After the indication disappears, the code number will be set.
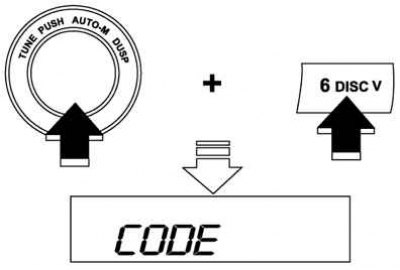
Fig. 7.75. Coding scheme 4
7. If "Err" (error) appears on the display, repeat the procedure from step 1. If the error in entering the code is repeated three times, turn the ignition switch to the LOCK position and repeat the procedure from step 1.
Cancel code
Please perform each procedure (1-3) within 10 seconds, otherwise the code setting procedure will be terminated.
1. Turn the ignition switch to the ACC position, and then turn off the audio unit.
2. First press the AUTO-M button, then simultaneously press the channel 6 button for about 2 seconds until "CODE" appears on the display.
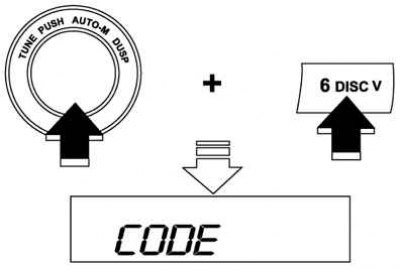
Fig. 7.76. Scheme of cancellation of coding 1
3. Press the AUTO-M button again, then simultaneously press the channel 6 button until rectangles appear on the display.
4. Channel selection buttons 1–4 are used to enter the current code. Button 1 sets the first digit of the code, 2 – the second, 3 – the third, 4 – the last digit. Enter the number within 10 seconds. If the display indication disappears, repeat the procedures starting from the first.
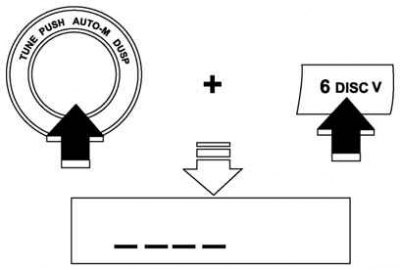
Fig. 7.77. Scheme of cancellation of coding 2
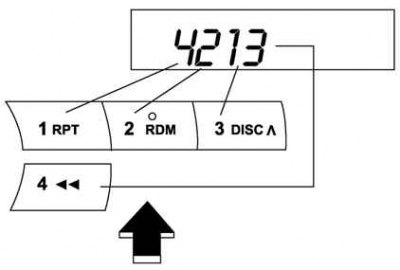
Fig. 7.78. Scheme of cancellation of coding 3
Note: Procedure 5 must be performed within 10 s after procedure 4.
5. While the code is displayed, press the AUTO-M button, then simultaneously press the channel 6 button for about 2 seconds. The "CODE" indication will be displayed on the display for about 5 seconds. After the indication disappears, the code number will be deleted.
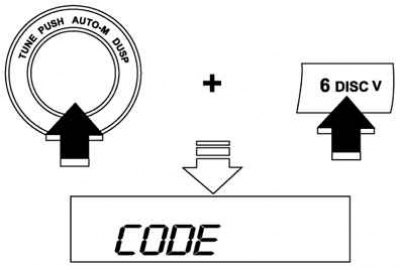
Fig. 7.79. Scheme of cancellation of coding 4
6. If the display shows "Err" (error), repeat the procedure from 4.
Disabling the anti-theft lock mode
Please enter a valid code to deactivate the anti-theft system and restore normal operation of the audio unit.
1. Turn the ignition switch to the ACC position. (The display will flash "CODE".)
2. First press the AUTO-M button, then simultaneously press the channel 6 button for about 2 seconds until "CODE" appears on the display.
Note: Procedure 3 must be performed within 10 s after procedure 2.
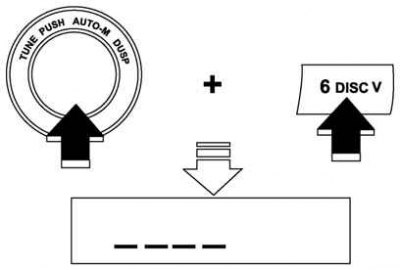
Fig. 7.80. Anti-theft lock mode diagram 1
3. Channel selection buttons 1–4 are used to enter the selected code. Button 1 sets the first digit of the code, 2 – the second, 3 – the third, 4 – the last digit. Enter the number within 10 seconds. If the display indication disappears, repeat the procedures starting from the first.
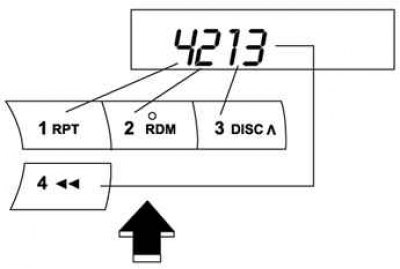
Fig. 7.81. Anti-theft lock mode diagram 2
Attention! Three consecutive errors, including setting the ignition switch to the LOCK position and turning off the audio unit, activate the anti-theft system, after which it will be impossible to restore normal operation of the audio unit.
4. While the code is displayed, press the AUTO-M button, then simultaneously press the channel 6 button for about 2 seconds. "CODE" will be displayed on the display for about 5 seconds.
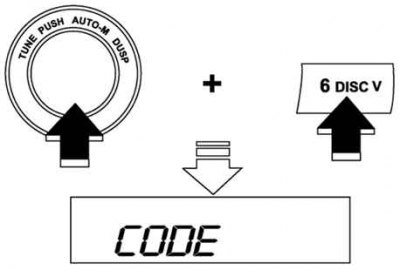
Fig. 7.82. Anti-theft lock mode diagram 3
5. If "Err" (error) appears on the display, repeat the procedure from step 1.