MazBook.ru
English Русский
Български
Беларускі
Український
Српски
Hrvatski
Română
Polski
Slovenský
Magyar
• Bookmark • Sitemap • Contacts •   
Cars Opel Cars Ford Cars Volkswagen Cars Audi Cars Kia Cars Renault Cars Peugeot


Familia Capella Mazda3 Mazda6 CX-? Others Articles
Mazda3 BK (2003-2009)

Removal and installation a fuel injector (diesel) (Mazda 3 BK)

  • Home
  • Mazda 3
  • Mazda3 BK (2003-2009)
  • Power unit
  • Fuel system
  • Removal and installation a fuel injector (diesel)
0
Contents: Removal ⇓ Installation ⇓

Removal


Remove the battery cover.

Disconnect the negative cable from the battery.

Remove the air filter.

Disconnect the fuel injector connector.

Remove the quick release connector.

Remove the fuel distributor.
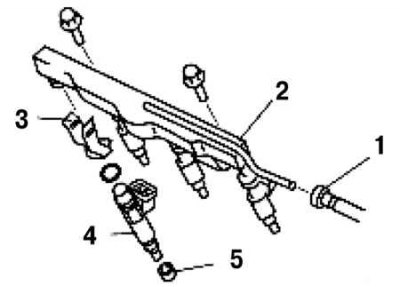
Fig. 2.324. Fuel injector and fuel distributor: 1 – quick release connector; 2 – fuel distributor;…

Fig. 2.324. Fuel injector and fuel distributor: 1 – quick release connector; 2 – fuel distributor; 3 – fuel injector clamp; 4 – fuel injector; 5 – insulator
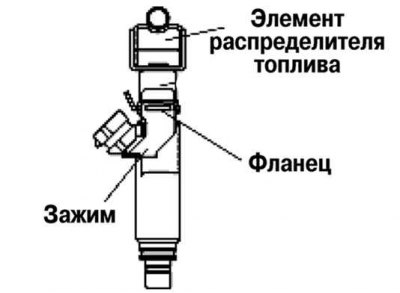
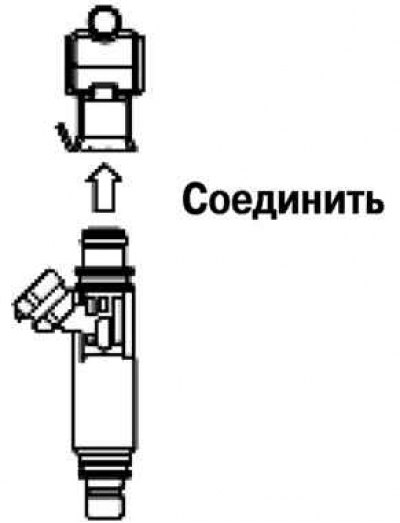
Fig. 2.325. Fuel injector

Fig. 2.325. Fuel injector

Caution! If the fuel injector flange or coated fuel distributor element is damaged, it may cause fuel leakage. To prevent damage, remove the fuel injector clamp carefully (fig. 2.325).


Using a deformed fuel injector clamp may cause improper installation of the fuel injector and fuel leakage. Replace the clamp with a new one after removing the fuel injector.


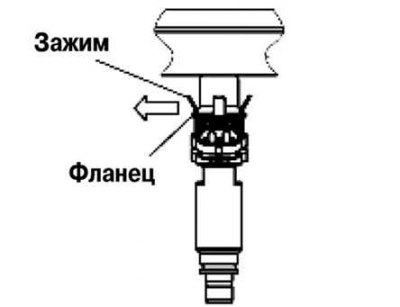
Fig. 2.326. First stage of removing the fuel injector clamp

Fig. 2.326. First stage of removing the fuel injector clamp


Separate one side of the fuel injector clamp from the fuel injector flange (fig. 2.326).

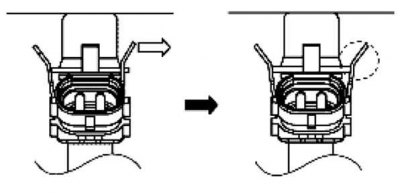
Fig. 2.327. Second stage of removing the fuel injector clamp

Fig. 2.327. Second stage of removing the fuel injector clamp


While holding the side of the fuel injector clamp removed in the first step to prevent it from snapping back in, remove the other side of the fuel injector clamp (fig. 2.327).

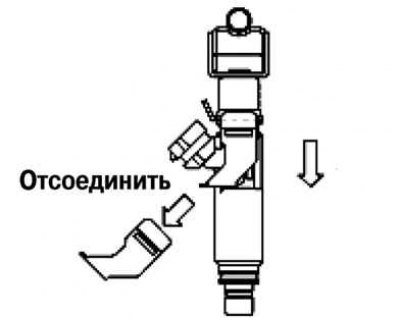
Fig. 2.328. Final removal of the fuel injector clamp

Fig. 2.328. Final removal of the fuel injector clamp


Remove the fuel injector clamp by sliding it in the axial direction (fig. 2.328).

Installation


Apply a small amount of clean oil to the new O-ring.

Caution! A damaged sealing ring may cause fuel leakage. Be careful not to damage the sealing ring when installing the fuel injector.


Caution! If there are foreign objects on the fuel injector connection part, the fuel injector and fuel distributor may be damaged. To prevent damage, clean the connection part before connecting the fuel injector.


Fig. 2.329. Installing the fuel injector

Fig. 2.329. Installing the fuel injector


Install the fuel injector directly into the hole (fig. 2.329).

Check that the fuel injector rotates smoothly.

If not, reinstall the fuel injector.

Install the new fuel injector clamp onto the fuel injector and install the support piece onto the bottom of the fuel injector connector.
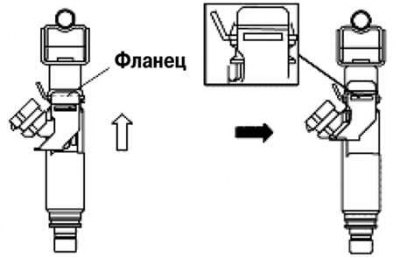
Fig. 2.330. Installing the fuel injector clamp

Fig. 2.330. Installing the fuel injector clamp


Insert the fuel injector flange into the fuel injector clamp groove and slide the fuel injector clamp over the injector, making sure the fuel injector clamp groove is parallel to the fuel injector flange (fig. 2.330).

Make sure the fuel injector flange is fully seated in the groove.
This article is available at: russian, bulgarian, belarusian, ukrainian, serbian, croatian, romanian, polish, slovak, hungarian
This text was checked by: Evdokia Filimonova
Share with friends on social networks:

Previous
Mazda3 BK » Fuel system
Next

Checking for fuel leaks after installing the pump unit (diesel)
Removal and installation of the fuel pump unit (diesel)
Checking and adjusting the throttle cable (diesel)
Removal and installation the fuel control pedal (diesel)
Removal and installation the idle speed control valve (diesel)
Intake system components (diesel)
More articles on repairing other Mazda models
Draining diesel engine fuel filter sediment / replacing fuel filter Mazda Familia 6 (1989-1994)
Diagnostics of diesel engine fuel system faults Mazda Capella 5 (1991-1997)
Recommended fuel Mazda6 GG (2002-2008)
Fuel filter (diesel engines) Mazda CX-5KE (2012-2017)
Technical data of the diesel fuel injection system Mazda 121 (3) (1996-2003)
Link in different formats to this article
Comments and feedback from visitors
No comments yet


How much will 20 + 38 ?


Mazda3 BK (2003-2009) 
  • User manual
  • Vehicle description
  • Keys, locks and alarms
  • Controls and instruments
  • Air conditioning and heater
  • Seat adjustment
  • Security systems
  • Driving and operation
  • Faults en route
  • Maintenance
  • Power unit
  • Engine device (gasoline)
  • Engine repair (gasoline)
  • Diesel engine (Z6)
  • Lubrication system
  • Cooling system
  • Fuel system
  • Exhaust system
  • Engine electrical equipment
  • Engine management system
  • Transmission
  • Clutch
  • Mechanical gearbox
  • Automatic gearbox
  • Drive mechanism
  • Chassis
  • Suspension and wheels
  • Steering
  • Brake system
  • Body
  • Body elements
  • Doors and windows
  • Air conditioning and heater
  • Electrical equipment
  • Equipment and devices
  • Power devices
  • Lighting system
  • Windshield wipers and washers
  • Equipment checks
MazBook.ru © 2018–2026 · Mobile version · Articles and news · Sitemap: EN BG BY UA RS HR RO PL SK HU · Feedback · Site search · Add to bookmarks Familia 5 (BF) · Familia 6 (BG) · Capella 3 (GC) · Capella 3 and 4 (GC) · Capella 4 (GD) · Capella 5 (GE) · Capella 6 (GF) · Mazda3 BK · Mazda6 GG · CX-5KE · Mazda 121 (3) · Mazda BT-50 (1) ·
By continuing to use the site, you agree to the use of cookies 🔐