
MazBook.ru
English Русский
Български
Беларускі
Український
Српски
Hrvatski
Română
Polski
Slovenský
Magyar
• Bookmark • Sitemap • Contacts •   
Cars Opel Cars Ford Cars Volkswagen Cars Audi Cars Kia Cars Renault Cars Peugeot


Familia Capella Mazda3 Mazda6 CX-? Others Articles
Mazda6 GG (2002-2008)

Removal and installation the selector lever (Mazda 6 GG)

  • Home
  • Mazda 6
  • Mazda6 GG (2002-2008)
  • Transmission
  • Automatic gearbox
  • Removal and installation the selector lever
0
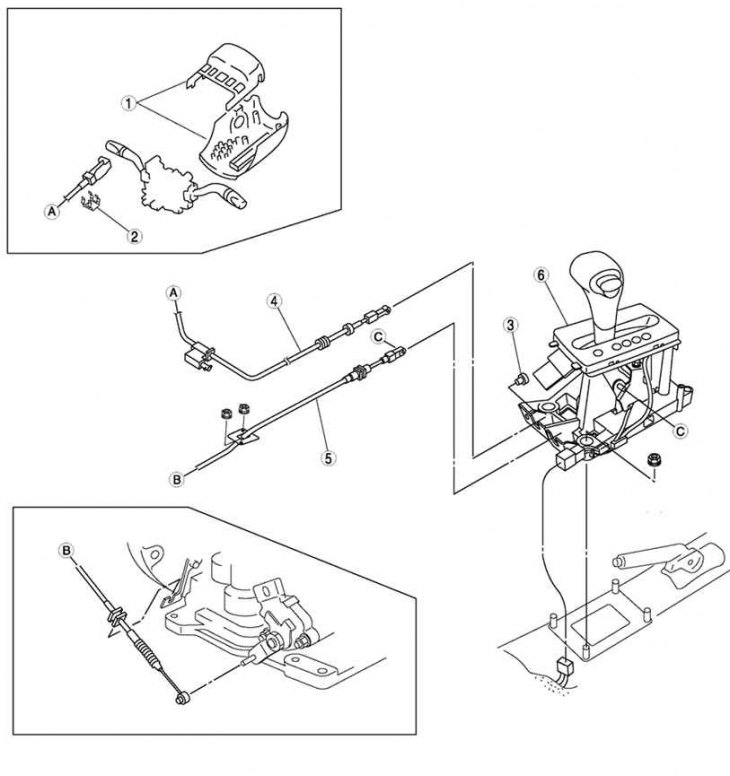
Fig. 3.88. Automatic transmission shift mechanism: 1 – steering column trim (with key locking…

Fig. 3.88. Automatic transmission shift mechanism: 1 – steering column trim (with key locking mechanism); 2 – clamp (with key locking mechanism); 3 – clamp (with key locking mechanism); 4 – locking cable (with key locking mechanism); 5 – gear selection cable; 6 – throttle selector lever


The automatic transmission shift mechanism is shown in Fig. 3.88.

Disconnect the negative battery cable.

Remove the battery and its tray.

Remove the air filter.

Remove the console.

Remove the instrument panel.

Remove the stability control module.
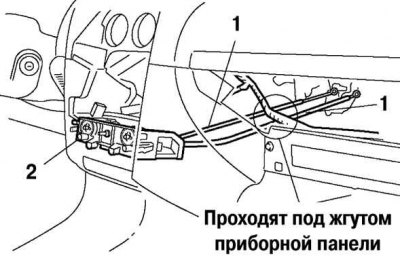
Fig. 3.89. Removing the air conditioning control unit: 1- air damper control cables; 2 – air…

Fig. 3.89. Removing the air conditioning control unit: 1- air damper control cables; 2 – air conditioning unit


The primary source is the website [www.mazbook.ru]

Remove the air conditioning control unit (Fig. 3.89).


Remove the rear air duct.

Remove the steering column trim.

Disconnect the clamps and remove the lock cable and gear selector cable.

Note: Perform installation in the order shown in Figure 3.88. Specific removal and installation procedures are described later in this section.
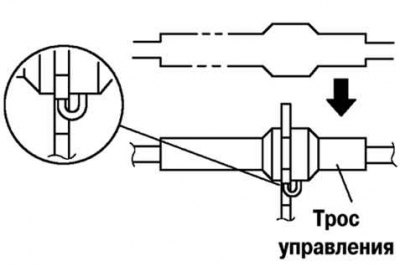

Fig. 3.90. Gear selection cable installation diagram

Fig. 3.90. Gear selection cable installation diagram


To install the gear selector cable, you must first install it on the bracket as shown in Figure 3.90.

Before replacing the gear selector cable, check that the selector lever is in position P.
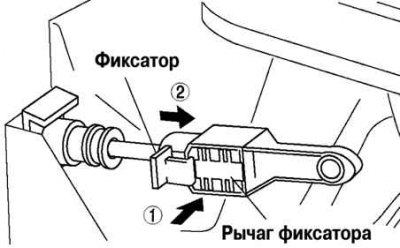
Fig. 3.91. Locking the gear selection cable retainer (from the selector lever side)

Fig. 3.91. Locking the gear selection cable retainer (from the selector lever side)


Lock the gear selector cable lock (from the selector lever side) in the order shown in Figure 3.91.
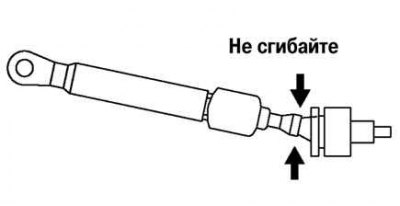
Fig. 3.92. Checking the manual shift shaft

Fig. 3.92. Checking the manual shift shaft


Check that the manual shift shaft is in position P (Fig. 3.92).

Caution! When installing the gear selector cable, keep it straight. Bending the gear selector cable as shown in Figure 3.92 will damage the cable, which may cause the cable to become loose when shifting.
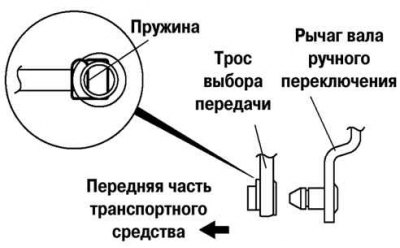

Fig. 3.93. Correct installation of the selector lever on the manual shift shaft lever

Fig. 3.93. Correct installation of the selector lever on the manual shift shaft lever


Note: Install the selector lever onto the manual shift shaft lever so that the spring on the gear selector cable end faces the front of the vehicle (Fig. 3.93).


Install the selector lever onto the manual shift shaft lever so that the gear selector cable is not loaded.

Make sure the end of the manual shift shaft lever comes out of the gear selector cable end.

Install the gear selector cable into the bracket.
This article is available at: russian, bulgarian, belarusian, ukrainian, serbian, croatian, romanian, polish, slovak, hungarian
This text was checked by: Evdokia Filimonova
Share with friends on social networks:

Previous
Mazda6 GG » Automatic gearbox
Next

Adjusting the gear shift switch
Adjusting the gear selector cable
Checking the selector lever
Checking the locking cable
Checking the ignition key lock
Installing the locking cable
More articles on repairing other Mazda models
Adjusting the gear selector cable Mazda Familia 5 (1985-1989)
Selector lever — removal and installation Mazda Capella 6 (1997-2005, petrol)
Locking the range selector lever (automatic transmission) Mazda3 BK (2003-2009)
Removal and installation the selector lever assembly Mazda CX-5KE (2012-2017)
Removal and installation the parking brake lever Mazda 121 (3) (1996-2003)
Link in different formats to this article
Comments and feedback from visitors
No comments yet


How much will 19 + 20 ?


Mazda6 GG (2002-2008) 
  • User manual
  • Vehicle description
  • Keys, locks and alarms
  • Controls and instruments
  • Air conditioning and heater
  • Seat adjustment
  • Security systems
  • Driving and operation
  • Faults en route
  • Maintenance
  • Power unit
  • Engine device
  • Engine repair
  • Lubrication system
  • Cooling system
  • Fuel system
  • Exhaust system
  • Electrical equipment of engines
  • Control system
  • Transmission
  • Clutch
  • Mechanical gearbox
  • Automatic gearbox
  • Drive shafts and hubs
  • Chassis
  • Suspension and wheels
  • Steering
  • Brake system
  • Body
  • Exterior (external elements)
  • Interior (internal elements)
  • Doors and windows
  • Air conditioning and heater
  • Electrical equipment
  • Equipment and devices
  • Power devices
  • Lighting system
  • Windshield wipers and washers
MazBook.ru © 2018–2026 · Mobile version · Articles and news · Sitemap: EN BG BY UA RS HR RO PL SK HU · Feedback · Site search · Add to bookmarks Familia 5 (BF) · Familia 6 (BG) · Capella 3 (GC) · Capella 3 and 4 (GC) · Capella 4 (GD) · Capella 5 (GE) · Capella 6 (GF) · Mazda3 BK · Mazda6 GG · CX-5KE · Mazda 121 (3) · Mazda BT-50 (1) ·
By continuing to use the site, you agree to the use of cookies 🔐