


Vehicle controls and instruments Mazda 6 (GG)

Vehicle controls
Fig. 1.45. Mazda 6 controls: 1 – Electric window control panel; 2 – central light switch, turn signal control lever; 3 – instrument panel; 4 – airbags; 5 – windshield...
Fig. 1.45. Mazda 6 controls: 1 – Electric window control panel; 2 – central light switch, turn signal control lever; 3 – instrument panel; 4 – airbags; 5 – windshield...

Instrument cluster
Fig. 1.46. Instrument cluster of the Mazda 6: 1 – coolant temperature indicator; 2 – tachometer; 3 – Automatic transmission range engagement indicator; 4 – speedometer;...
Fig. 1.46. Instrument cluster of the Mazda 6: 1 – coolant temperature indicator; 2 – tachometer; 3 – Automatic transmission range engagement indicator; 4 – speedometer;...

Speedometer (speed indicator)
Fig. 1.47. Speedometer The speedometer shows the speed of the car (Fig. 1.47).
Fig. 1.47. Speedometer The speedometer shows the speed of the car (Fig. 1.47).

Odometer (daily mileage counter)
Fig. 1.48. Odometer: 1 – trip mileage indicator; 2 – odometer readings; 3 – switch button The odometer shows the total mileage of the car. By successive pressings of the...
Fig. 1.48. Odometer: 1 – trip mileage indicator; 2 – odometer readings; 3 – switch button The odometer shows the total mileage of the car. By successive pressings of the...

Odometer reading switching modes
Fig. 1.49. Odometer mode switching diagram One of the values of the distance traveled is recorded by the trip odometer A, and the second by the trip odometer B. For...
Fig. 1.49. Odometer mode switching diagram One of the values of the distance traveled is recorded by the trip odometer A, and the second by the trip odometer B. For...

Tachometer (engine speed indicator)
The tachometer shows the engine crankshaft speed in units of 1000 min⁻¹ (Fig. 1.50). Fig. 1.50. Tachometer Attention! It is prohibited to exceed the permissible engine...
The tachometer shows the engine crankshaft speed in units of 1000 min⁻¹ (Fig. 1.50). Fig. 1.50. Tachometer Attention! It is prohibited to exceed the permissible engine...

Coolant temperature gauge
Fig. 1.51. Coolant temperature gauge The device is designed to monitor the temperature of the engine coolant (Fig. 1.51). If the temperature gauge arrow is near the "H"...
Fig. 1.51. Coolant temperature gauge The device is designed to monitor the temperature of the engine coolant (Fig. 1.51). If the temperature gauge arrow is near the "H"...

Fuel level indicator in the tank
Fig. 1.52. Fuel level indicator in the tank The fuel level indicator in the tank shows the approximate amount of fuel in the tank (Fig. 1.52). Fill the fuel tank in a...
Fig. 1.52. Fuel level indicator in the tank The fuel level indicator in the tank shows the approximate amount of fuel in the tank (Fig. 1.52). Fill the fuel tank in a...

Instrument cluster illumination
Fig. 1.53. Operation diagram of the instrument cluster backlight controller With the external lighting devices turned on, rotate the control knob to set the required...
Fig. 1.53. Operation diagram of the instrument cluster backlight controller With the external lighting devices turned on, rotate the control knob to set the required...
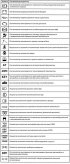
Signaling devices and indicators, sound warning signals
Fig. 1.54. Light indicators and signaling devices of the Mazda 6 instrument cluster The instrument cluster has various built-in alarms and indicators that perform the...
Fig. 1.54. Light indicators and signaling devices of the Mazda 6 instrument cluster The instrument cluster has various built-in alarms and indicators that perform the...

Display of the safety belt warning light that is not attached
Driver's seat If the driver's seat belt is not fastened and the vehicle speed exceeds approximately 20 km/h, the light indicator will flash and the buzzer will sound. If...
Driver's seat If the driver's seat belt is not fastened and the vehicle speed exceeds approximately 20 km/h, the light indicator will flash and the buzzer will sound. If...

Sound alarms
Audible warning light for airbag and seat belt pretensioner system malfunction If a malfunction is detected in the airbag/pretensioner seat belt system and visual...
Audible warning light for airbag and seat belt pretensioner system malfunction If a malfunction is detected in the airbag/pretensioner seat belt system and visual...

Emergency light signaling
Fig. 1.57. Location of the emergency alarm button When stopping a vehicle on or near the roadway, as well as in all cases stipulated by the Traffic Regulations, turn on...
Fig. 1.57. Location of the emergency alarm button When stopping a vehicle on or near the roadway, as well as in all cases stipulated by the Traffic Regulations, turn on...

Central steering column switch for exterior lighting
Fig. 1.58. Versions A and B of the central steering column switch for external lighting Option A (without "AUTO" position) Turn the main switch handle away from you or...
Fig. 1.58. Versions A and B of the central steering column switch for external lighting Option A (without "AUTO" position) Turn the main switch handle away from you or...

Light sensor
Fig. 1.59. Location of the light sensor: 1 – sensor The light sensor also functions as a rain sensor in the automatic windscreen wiper control system (Fig. 1.59). If the...
Fig. 1.59. Location of the light sensor: 1 – sensor The light sensor also functions as a rain sensor in the automatic windscreen wiper control system (Fig. 1.59). If the...
Headlights with xenon lamps
For low beam headlights, xenon lamps are used, which provide a wide beam of bright white light. If the headlights flicker or the brightness of the light has decreased,...
For low beam headlights, xenon lamps are used, which provide a wide beam of bright white light. If the headlights flicker or the brightness of the light has decreased,...

High-low beam headlight switching modes
Fig. 1.60. Headlight switching modes Press the lever away from you to turn on the high beam. To switch the headlights back to the low beam, press the lever towards you...
Fig. 1.60. Headlight switching modes Press the lever away from you to turn on the high beam. To switch the headlights back to the low beam, press the lever towards you...

Direction indicator control lever
Fig. 1.63. Direction indicator control lever operation diagram Press the lever down (when turning left) or up (when turning right) to the fixed position (Fig. 1.63). The...
Fig. 1.63. Direction indicator control lever operation diagram Press the lever down (when turning left) or up (when turning right) to the fixed position (Fig. 1.63). The...

Light switch for front fog lights
Fog lights improve visibility in fog and also make the vehicle more visible to other road users. The fog lights can be switched on in any position of the central light...
Fog lights improve visibility in fog and also make the vehicle more visible to other road users. The fog lights can be switched on in any position of the central light...

Rear fog lamp light switch
The rear fog light makes the car more visible in fog. Option A (with front fog lights) The rear fog light can only be switched on when the front headlights are switched...
The rear fog light makes the car more visible in fog. Option A (with front fog lights) The rear fog light can only be switched on when the front headlights are switched...
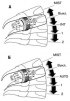
Windscreen wipers
The windshield wiper can only operate when the ignition switch is in the "ON" position (ignition on). Warning! Since the wiper blades may freeze to the windshield, the...
The windshield wiper can only operate when the ignition switch is in the "ON" position (ignition on). Warning! Since the wiper blades may freeze to the windshield, the...

Windscreen wiper with adjustable pause in intermittent mode
Fig. 1.67. Control circuit with adjustable pause in intermittent operation mode: 1 – pause ring regulator Set the windscreen wiper control lever to the "INT" position...
Fig. 1.67. Control circuit with adjustable pause in intermittent operation mode: 1 – pause ring regulator Set the windscreen wiper control lever to the "INT" position...

Windscreen washers
Warning! Fill the windshield washer reservoir only with a special liquid intended for the washer, or with clean water. It is dangerous to use low-freeze coolant as a...
Warning! Fill the windshield washer reservoir only with a special liquid intended for the washer, or with clean water. It is dangerous to use low-freeze coolant as a...

Rear window cleaner
Fig. 1.70. Rear window wiper operating mode The rear window wiper can only operate when the ignition switch is in the "ON" position (ignition on) (Fig. 1.70). Turn on...
Fig. 1.70. Rear window wiper operating mode The rear window wiper can only operate when the ignition switch is in the "ON" position (ignition on) (Fig. 1.70). Turn on...

Rear window washer (hatchback vehicles)
To turn on the rear window washer, turn the switch handle to the position . The washer is switched off when the switch handle is released. There are two positions of the...
To turn on the rear window washer, turn the switch handle to the position . The washer is switched off when the switch handle is released. There are two positions of the...
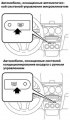
Rear window defroster
The electric rear window heater is designed to remove frost, water condensation and thin ice crust. The rear window heater can only operate when the ignition switch is...
The electric rear window heater is designed to remove frost, water condensation and thin ice crust. The rear window heater can only operate when the ignition switch is...
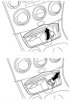
Cigarette lighter and ashtray
The cigarette lighter can only function when the ignition switch is in the "ACC" position (auxiliary consumers of electricity) or "ON" (ignition on). Fig. 1.73. Location...
The cigarette lighter can only function when the ignition switch is in the "ACC" position (auxiliary consumers of electricity) or "ON" (ignition on). Fig. 1.73. Location...
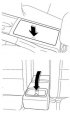
Front and rear cup holders
Fig. 1.75. Location of front and rear cup holders To use the cup holder, open the cover on the center console by pressing on the edge of the cover. The rear cup holders...
Fig. 1.75. Location of front and rear cup holders To use the cup holder, open the cover on the center console by pressing on the edge of the cover. The rear cup holders...

Storage compartment in the control panel
Fig. 1.76. Storage compartment in the control panel To use the storage compartment, open the lid (Fig. 1.76).
Fig. 1.76. Storage compartment in the control panel To use the storage compartment, open the lid (Fig. 1.76).

Box for gloves and small luggage
Fig. 1.77. Box for gloves and small luggage: 1 – handle To open the glove box lid, pull the latch handle towards you. Insert the key (auxiliary key) into the lock and...
Fig. 1.77. Box for gloves and small luggage: 1 – handle To open the glove box lid, pull the latch handle towards you. Insert the key (auxiliary key) into the lock and...

Storage compartment in the center console
Fig. 1.78. Opening the lid of the storage compartment in the center console Small items can be placed in the tray located under the cover of the storage compartment in...
Fig. 1.78. Opening the lid of the storage compartment in the center console Small items can be placed in the tray located under the cover of the storage compartment in...
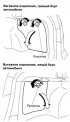
Side compartment
Fig. 1.79. Side compartments in the car trunk The Mazda 6 has additional storage compartments located in the side sections of the trunk. To open the side compartment...
Fig. 1.79. Side compartments in the car trunk The Mazda 6 has additional storage compartments located in the side sections of the trunk. To open the side compartment...

Luggage compartment niche (station wagons)
Fig. 1.80. Luggage compartment niche The Mazda 6 wagon has an additional niche in the luggage compartment. To use the niche located under the luggage compartment floor,...
Fig. 1.80. Luggage compartment niche The Mazda 6 wagon has an additional niche in the luggage compartment. To use the niche located under the luggage compartment floor,...

Sun visors
Fig. 1.81. Sun visor adjustment diagram: 1 – visor To use the sun visor, lower it down or move it to the side (Fig. 1.81). To use the vanity mirror, lower the sun visor.
Fig. 1.81. Sun visor adjustment diagram: 1 – visor To use the sun visor, lower it down or move it to the side (Fig. 1.81). To use the vanity mirror, lower the sun visor.
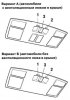
Interior lighting lamps
Lighting system when getting into and out of the car The lighting system when entering/leaving the vehicle ensures that the upper interior light is switched on (the...
Lighting system when getting into and out of the car The lighting system when entering/leaving the vehicle ensures that the upper interior light is switched on (the...

Individual lighting lampshades
Fig. 1.83. Individual lighting lampshade Individual lighting lamps are switched on and off independently of each other by pressing the corresponding switches (Fig. 1.83).
Fig. 1.83. Individual lighting lampshade Individual lighting lamps are switched on and off independently of each other by pressing the corresponding switches (Fig. 1.83).

Door sill lights
Fig. 1.84. Location of the threshold lighting lamp: 1 – lampshade They are switched on when any door of the vehicle is opened or when the lighting system is switched on...
Fig. 1.84. Location of the threshold lighting lamp: 1 – lampshade They are switched on when any door of the vehicle is opened or when the lighting system is switched on...

Electric windows
Before turning on the window lift to close the window, make sure that the window opening is clear and that no passenger can get parts of their body caught in the glass....
Before turning on the window lift to close the window, make sure that the window opening is clear and that no passenger can get parts of their body caught in the glass....

Opening and closing power windows from outside the vehicle
All windows can be opened or closed from outside the vehicle after the doors and trunk/liftgate are closed. The windows can be opened or closed from outside the vehicle...
All windows can be opened or closed from outside the vehicle after the doors and trunk/liftgate are closed. The windows can be opened or closed from outside the vehicle...

Exterior rear view mirrors
Before you start driving, check the adjustment of all rear-view mirrors. Adjusting mirrors while driving can distract you from driving and monitoring the traffic...
Before you start driving, check the adjustment of all rear-view mirrors. Adjusting mirrors while driving can distract you from driving and monitoring the traffic...

Adjusting the rear view mirrors
1. Move the switch button to the left or right depending on which mirror you want to adjust (left or right). Fig. 1.90. Rear view mirror adjustment diagram 2. Adjust the...
1. Move the switch button to the left or right depending on which mirror you want to adjust (left or right). Fig. 1.90. Rear view mirror adjustment diagram 2. Adjust the...

Electric folding mirrors
The ignition switch must be in the "ACC" position (auxiliary consumers of electricity) or "ON" (ignition on). To fold the mirrors, press the switch button. Fig. 1.91....
The ignition switch must be in the "ACC" position (auxiliary consumers of electricity) or "ON" (ignition on). To fold the mirrors, press the switch button. Fig. 1.91....

Manual folding of rear view mirrors
Fig. 1.92. Manually folding the rearview mirror Fold the outside rearview mirrors so that they are located along the sides of the vehicle (Fig. 1.92). Attention! Before...
Fig. 1.92. Manually folding the rearview mirror Fold the outside rearview mirrors so that they are located along the sides of the vehicle (Fig. 1.92). Attention! Before...

Interior rear view mirror
Fig. 1.93. Interior rearview mirror adjustment diagram Before starting to drive the car, adjust the rearview mirror so that it symmetrically reflects the view through...
Fig. 1.93. Interior rearview mirror adjustment diagram Before starting to drive the car, adjust the rearview mirror so that it symmetrically reflects the view through...

Reducing the glare of headlights
To reduce the blinding effect of headlights of cars driving behind you, you can switch the mirror from normal (day) to night position. Fig. 1.94. Reducing the glare of...
To reduce the blinding effect of headlights of cars driving behind you, you can switch the mirror from normal (day) to night position. Fig. 1.94. Reducing the glare of...

Information display
Fig. 1.95. Information display of the Mazda 6 The type of information display depends on the vehicle version (Fig. 1.95). The information display performs the following...
Fig. 1.95. Information display of the Mazda 6 The type of information display depends on the vehicle version (Fig. 1.95). The information display performs the following...
Time indication
The display shows the current time if the ignition switch is in the "ON" position (ignition on) or "ASS" (auxiliary consumers of electricity). If the trip computer data...
The display shows the current time if the ignition switch is in the "ON" position (ignition on) or "ASS" (auxiliary consumers of electricity). If the trip computer data...

Ambient air temperature indicator
Manual climate control system The display shows the ambient temperature when the ignition switch is in the "ON" position (ignition on). Automatic climate control system...
Manual climate control system The display shows the ambient temperature when the ignition switch is in the "ON" position (ignition on). Automatic climate control system...
Parking brake system actuator lever
Always set the parking brake and check that the shift lever is in the "P" (Park) position before leaving the driver's seat or the vehicle (cars with automatic...
Always set the parking brake and check that the shift lever is in the "P" (Park) position before leaving the driver's seat or the vehicle (cars with automatic...
Brake system malfunction indicator or parking brake indicator
Parking brake indicator The indicator comes on when the parking brake is applied if the ignition switch is in the "START" (starter) or "ON" position (ignition on). The...
Parking brake indicator The indicator comes on when the parking brake is applied if the ignition switch is in the "START" (starter) or "ON" position (ignition on). The...
Checking the operation of the parking brake
Tighten the parking brake lever firmly. Make sure the lever travel is the specified number of clicks (check the ratchet clicks by ear). Lever stroke length: 7-8 clicks....
Tighten the parking brake lever firmly. Make sure the lever travel is the specified number of clicks (check the ratchet clicks by ear). Lever stroke length: 7-8 clicks....

Steering wheel adjustment
Fig. 1.112. Steering wheel adjustment diagram To adjust the steering wheel in the longitudinal direction and inclination angle, do the following: (fig. 1.112). 1. Stop...
Fig. 1.112. Steering wheel adjustment diagram To adjust the steering wheel in the longitudinal direction and inclination angle, do the following: (fig. 1.112). 1. Stop...

Removable antenna
Fig. 1.113. Removing and installing the antenna To remove the antenna, unscrew it by turning it counterclockwise. To reinstall the antenna, screw it into the holder by...
Fig. 1.113. Removing and installing the antenna To remove the antenna, unscrew it by turning it counterclockwise. To reinstall the antenna, screw it into the holder by...
This section is available on: russian, bulgarian, belarusian, ukrainian, serbian, croatian, romanian, polish, slovak, hungarian
More sections on repairs of other Mazda models
• Power unit: Control system Mazda Capella 6 (1997-2005, petrol)
• User manual: Controls and instruments Mazda3 BK (2003-2009)
• Power unit: Control system Mazda Capella 6 (1997-2005, petrol)
• User manual: Controls and instruments Mazda3 BK (2003-2009)
Link in different formats to this section
TEXTHTMLBB Code
- User manual
- Vehicle description
- Keys, locks and alarms
- Controls and instruments
- Air conditioning and heater
- Seat adjustment
- Security systems
- Driving and operation
- Faults en route
- Maintenance
- Power unit
- Engine device
- Engine repair
- Lubrication system
- Cooling system
- Fuel system
- Exhaust system
- Electrical equipment of engines
- Control system
- Transmission
- Clutch
- Mechanical gearbox
- Automatic gearbox
- Drive shafts and hubs
- Chassis
- Suspension and wheels
- Steering
- Brake system
- Body
- Exterior (external elements)
- Interior (internal elements)
- Doors and windows
- Air conditioning and heater
- Electrical equipment
- Equipment and devices
- Power devices
- Lighting system
- Windshield wipers and washers