
MazBook.ru
English Русский
Български
Беларускі
Український
Српски
Hrvatski
Română
Polski
Slovenský
Magyar
• Bookmark • Sitemap • Contacts •   
Cars Opel Cars Ford Cars Volkswagen Cars Audi Cars Kia Cars Renault Cars Peugeot


Familia Capella Mazda3 Mazda6 CX-? Others Articles
Mazda6 GG (2002-2008)

Removal and installation the rear upper arm (Mazda 6 GG)

  • Home
  • Mazda 6
  • Mazda6 GG (2002-2008)
  • Chassis
  • Suspension and wheels
  • Removal and installation the rear upper arm
0
Contents: Removal ⇓ Installation ⇓
Caution: Performing the following procedures without first removing the ABS wheel speed sensor may cause an open circuit in the wiring harness if the harness is accidentally tightened.


Caution: Remove the ABS wheel speed sensor before performing the following operations (from the hub side) and fix it in a suitable place where the sensor will not be damaged by mistake during maintenance.


Removal
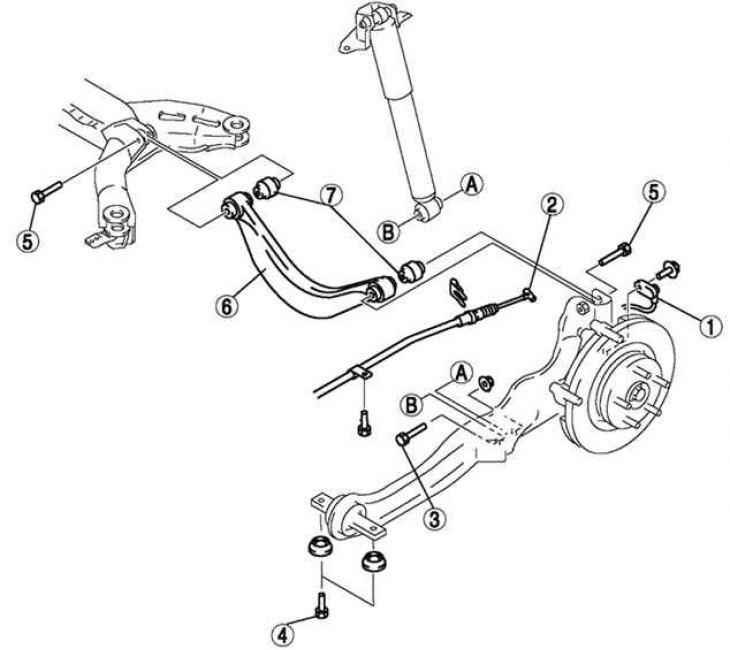


Fig. 4.38. Rear upper arm: 1 – Anti-lock braking system wheel speed sensor; 2 – parking brake…

Fig. 4.38. Rear upper arm: 1 – Anti-lock braking system wheel speed sensor; 2 – parking brake cable; 3 – bolt (lower part of the rear shock absorber); 4 – bolt (front part of the longitudinal rod); 5 – bolt (rear upper control arm); 6 – rear upper arm; 7 – rear upper arm bushing


Remove the anti-lock brake system wheel speed sensor.

Disconnect the parking brake cable.
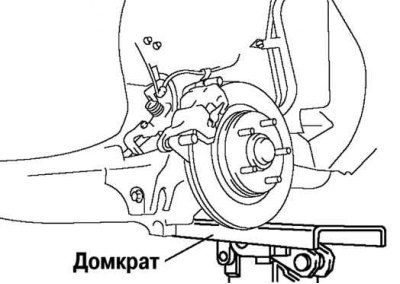
Fig. 4.39. Installing the jack under the longitudinal traction

Fig. 4.39. Installing the jack under the longitudinal traction


Support the longitudinal rod with a jack (Fig. 4.39).

Loosen the bolts on the inner and outer sides of the tie rod.
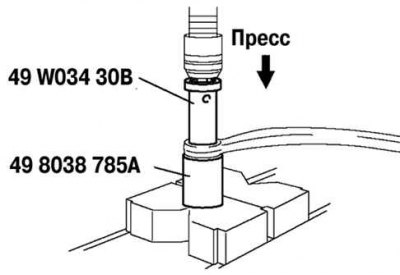
Fig. 4.40. Pressing out the upper arm bushing

Fig. 4.40. Pressing out the upper arm bushing


Press out the upper arm bushing using special tools (Fig. 4.40).

Installation
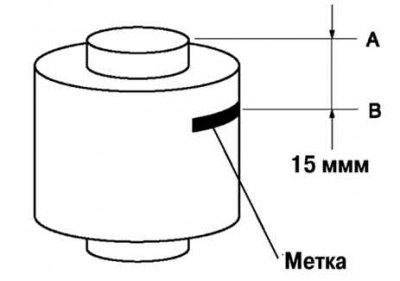


Fig. 4.41. Marking the new bushing

Fig. 4.41. Marking the new bushing


The article is copied from the website [MAZbook.ru]

Mark the new bushing as shown in Figure 4.41.
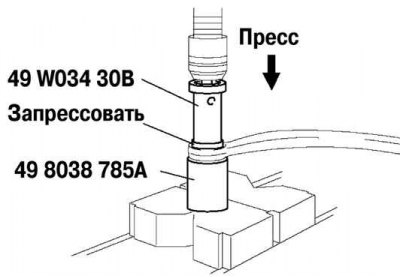
Fig. 4.42. Pressing in a new upper arm bushing

Fig. 4.42. Pressing in a new upper arm bushing


Press the bushing in according to the marking using special tools (Fig. 4.42).
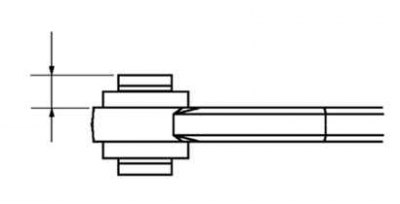
Fig. 4.43. Checking the height of the pressed bushing

Fig. 4.43. Checking the height of the pressed bushing


Check that the distance AB is 14.0–16.0 mm (Fig. 4.43).

Install the remaining components in the reverse order of removal.
This article is available at: russian, bulgarian, belarusian, ukrainian, serbian, croatian, romanian, polish, slovak, hungarian
This text was checked by: Evdokia Filimonova
Share with friends on social networks:

Previous
Mazda6 GG » Suspension and wheels
Next

Removal and installation the rear coil spring
Removal, checking and installation the rear shock absorber
Rear wheel alignment adjustment
Rear wheel camber adjustment
Rear Suspension Components
More articles on repairing other Mazda models
Detailed technical specifications of the rear suspension Mazda Familia 5 (1985-1989)
Access to the rear seats Mazda Capella 3 (1982-1992, petrol)
Removal and installation the rear upper arm Mazda3 BK (2003-2009)
Upper arm rear suspension — front wheel drive (2WD) versions Mazda CX-5KE (2012-2017)
Rear suspension — design description Mazda 121 (3) (1996-2003)
Link in different formats to this article
Comments and feedback from visitors
No comments yet


How much will 35 + 39 ?


Mazda6 GG (2002-2008) 
  • User manual
  • Vehicle description
  • Keys, locks and alarms
  • Controls and instruments
  • Air conditioning and heater
  • Seat adjustment
  • Security systems
  • Driving and operation
  • Faults en route
  • Maintenance
  • Power unit
  • Engine device
  • Engine repair
  • Lubrication system
  • Cooling system
  • Fuel system
  • Exhaust system
  • Electrical equipment of engines
  • Control system
  • Transmission
  • Clutch
  • Mechanical gearbox
  • Automatic gearbox
  • Drive shafts and hubs
  • Chassis
  • Suspension and wheels
  • Steering
  • Brake system
  • Body
  • Exterior (external elements)
  • Interior (internal elements)
  • Doors and windows
  • Air conditioning and heater
  • Electrical equipment
  • Equipment and devices
  • Power devices
  • Lighting system
  • Windshield wipers and washers
MazBook.ru © 2018–2026 · Mobile version · Articles and news · Sitemap: EN BG BY UA RS HR RO PL SK HU · Feedback · Site search · Add to bookmarks Familia 5 (BF) · Familia 6 (BG) · Capella 3 (GC) · Capella 3 and 4 (GC) · Capella 4 (GD) · Capella 5 (GE) · Capella 6 (GF) · Mazda3 BK · Mazda6 GG · CX-5KE · Mazda 121 (3) · Mazda BT-50 (1) ·
By continuing to use the site, you agree to the use of cookies 🔐