


Contents: Manual control of raising and…⇓ Two-stage window lowering function ⇓ Disabling the two-stage window…⇓ Activating the two-stage window…⇓ Anti-pinch glass function ⇓ Operation of electric windows with…⇓ Electric window lock switch ⇓
Before turning on the window lift to close the window, make sure that the window opening is clear and no passenger can get parts of their body caught in the glass. Closing windows with electric windows can be dangerous. If the rising glass catches a passenger's hand, head or neck, they can be seriously injured or even killed.
This warning applies especially to children.
Warning! When leaving young children unattended in the car, always remove the ignition key from the lock. Children may unknowingly turn on the electric windows.
Caution: Before closing the windows, make sure that none of the passengers can get their hands or fingers caught in the window opening.
Warning! It is recommended that all passengers be instructed on safety precautions when using electric windows, with particular attention to ensuring the safety of children.
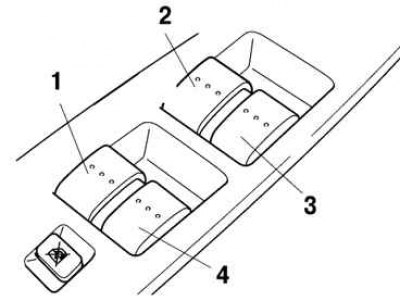
Fig. 1.85. Main window switches: 1 – window lifter of the left rear door; 2 – driver's door window lifter; 3 – right front door window lift; 4 – right rear door window lift
Note: To avoid blowing the electrical fuse and damaging the power window system, do not operate more than three power windows at the same time.
The electric window of each passenger door can be controlled by the corresponding switch located on the door armrest. To do this, it is necessary that the window lock button located on the window control panel on the driver's door armrest is not pressed.
The passenger door windows can be opened or closed using the corresponding master switches installed on the window control panel on the driver's door armrest.
The main switches located on the driver's door panel, as well as the switches located on the passenger doors, allow you to perform the following functions:
- manually raising and lowering windows;
- automatic raising and lowering of windows;
- two-stage glass lowering.
Manual control of raising and lowering of windows (Fig. 1.86).
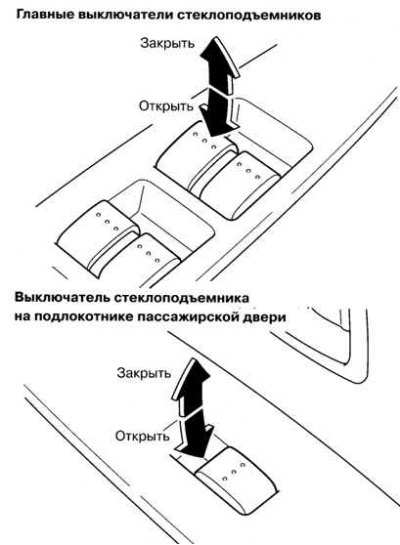
Fig. 1.86. Manual window raising and lowering control diagram
To lower the glass to the desired position, press the switch button down and hold it while the glass is lowered. To raise the glass to the desired position, lightly press the switch button up and hold it while the glass is raised.
To fully open the window in automatic mode, press the switch button all the way down and then release it. To fully close the window in automatic mode, lift the switch button all the way up and then release it.
You can stop the glass in any intermediate position during the automatic lifting or lowering process. To do this, briefly press the switch button down or up, respectively, and then release the button.
If the battery is disconnected from the vehicle's electrical system during vehicle maintenance or for other reasons, the automatic operation of the electric windows will be disrupted: the windows will not open or close completely. The main window switches located on the driver's door do not allow the automatic operation of the passenger door electric windows to be restored. To restore normal automatic operation of the electric windows, perform the following operations on each passenger door.
- a. Turn the ignition switch to the "ON" position (ignition on);
- b. Press the power window switch and open the window fully;
- c. Lift the switch key and close the window completely. Continue holding the key down for about 2 seconds after the glass reaches its uppermost position.
After completing the above operations on each passenger door, the windows can be fully opened and closed automatically using the corresponding power window master switches located on the power window control panel on the driver's door.
Two-stage window lowering function
With the window completely closed, press the switch button lightly – the glass will lower by about 3 cm and stop. If you continue to press and hold the button in the pressed position, the glass will continue to lower.
Note: A short press of the power window switch with the window fully closed lowers the window by approximately 3 cm and provides sufficient ventilation for the vehicle interior.
Disabling the two-stage window lowering function
To disable the two-stage window lowering function on each passenger door, perform the following steps using the power window master switches:
- a. Turn the ignition switch to the "ON" position (ignition on) and within five seconds press the key twice all the way down, then twice all the way up;
- b. Turn the ignition switch to the "LOCK" position (blocking);
- c. Within 40 seconds after this, turn the ignition switch to the "ON" position (ignition on). Then, within five seconds, press the key twice all the way down, then twice all the way up.
The two-stage window lowering function will not be cancelled if all the above operations are not completed within the set time or the sequence of operations is changed during the process. To repeat the function cancellation procedure, turn the ignition switch to the "LOCK" position (blocking) and repeat the procedure.
(The original article is on: mazbook.ru)
Activating the two-stage window lowering function
To reactivate this function, repeat all the operations provided for disabling the two-stage window lowering function.
Anti-pinch glass function
If during the process of lifting (in automatic mode or when operating the window lift manually) the glass will pinch the passenger's hand or head or any other object, it will stop and partially drop down.
Warning! Be careful that the glass does not pinch anything near the uppermost position, and be careful when manually holding the switch button in the glass-up position. It is dangerous to be pinched by the glass when it is almost at the uppermost position or when the switch button is manually held down. In such cases, the glass-pinch protection function does not work. If the glass pinches your fingers, this can result in serious injury.
Depending on the vehicle's driving conditions, the window may stop and partially lower when closing if it experiences jolts similar to the loads caused by objects being jammed in the window opening.
If the safety function is triggered and it is not possible to completely close the window in automatic mode, press the switch button upwards and hold it down until the window closes.
Operation of electric windows with ignition off
The power windows can operate with the doors closed for approximately 40 seconds after the ignition switch is turned from the "ON" position (ignition on) to the "ACC" position (auxiliary consumers of electricity) or "LOCK" (blocking). If you open any door, the electric windows will not work.
Electric window lock switch
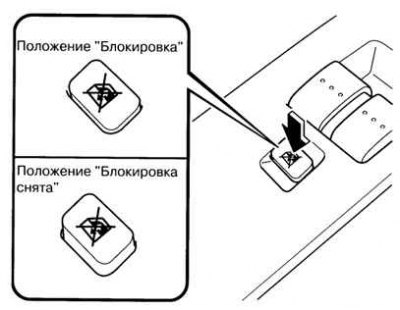
Fig. 1.87. Electric window lock switch operation diagram
If the power window lock button is not pressed, the power windows can be controlled using the corresponding door switches (Fig. 1.87).
If the window lock button is pressed, only the driver's door window can be operated.
When the power window lock button is pressed, the power window switch keys do not illuminate (only the driver's door window switch backlight remains on). The key backlight is difficult to see in bright ambient light.