
MazBook.ru
English Русский
Български
Беларускі
Український
Српски
Hrvatski
Română
Polski
Slovenský
Magyar
• Bookmark • Sitemap • Contacts •   
Cars Opel Cars Ford Cars Volkswagen Cars Audi Cars Kia Cars Renault Cars Peugeot


Familia Capella Mazda3 Mazda6 CX-? Others Articles
Mazda3 BK (2003-2009)

Removal, checking and installation the rear shock absorber (Mazda 3 BK)

  • Home
  • Mazda 3
  • Mazda3 BK (2003-2009)
  • Chassis
  • Suspension and wheels
  • Removal, checking and installation the rear shock absorber
0
Contents: Removal ⇓ Examination ⇓ Installation ⇓
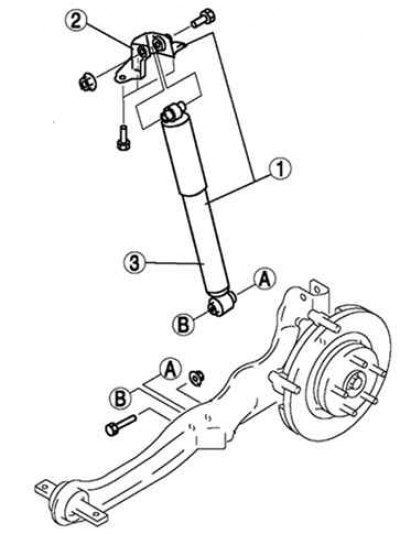
Fig. 4.27. Rear shock absorber: 1 – rear shock absorber and bracket; 2 – bracket; 3 – rear shock…

Fig. 4.27. Rear shock absorber: 1 – rear shock absorber and bracket; 2 – bracket; 3 – rear shock absorber strut


Removal


Remove the rear shock absorber and bracket.

Examination


Check the shock absorber for damage and oil leaks.

Check the rubber bushing for any signs of damage or wear.

Extend and retract the shock absorber piston rod at least three times. Make sure that the resistance force does not change and there is no unusual noise.

Original material on the website (mazbook.ru)

If this is not the case, replace the shock absorber.

Press the shock absorber piston rod down and release it.

Make sure the plunger extends fully at normal speed.

Installation
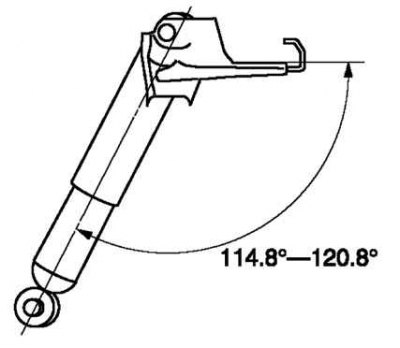


Fig. 4.28. Installing the rear shock absorber bracket

Fig. 4.28. Installing the rear shock absorber bracket


Install the bracket as shown in Figure 4.28.
This article is available at: russian, bulgarian, belarusian, ukrainian, serbian, croatian, romanian, polish, slovak, hungarian
This text was checked by: Evdokia Filimonova
Share with friends on social networks:

Previous
Mazda3 BK » Suspension and wheels
Next

Rear suspension — description
Removal, checking and installation the front upper arm
Removal, checking and installation the front stabilizer
Removal, checking and installation the front shock absorber and spring
Front suspension — description
Removal and installation the rear coil spring
Removal and installation the rear upper arm
Control and adjustment data for front wheel installation (vehicle…
Wheel and tire sizes
More articles on repairing other Mazda models
Checking the shock absorber Mazda Familia 6 (1989-1994)
Rear door shock absorber — removal and installation Mazda Capella 3 (1982-1992, petrol)
Removal, checking and installation the rear shock absorber Mazda6 GG (2002-2008)
Checking and disposing of the rear shock absorber Mazda CX-5KE (2012-2017)
Disassembling the rear shock absorber strut Mazda 121 (3) (1996-2003)
Link in different formats to this article
Comments and feedback from visitors
No comments yet


How much will 39 + 33 ?


Mazda3 BK (2003-2009) 
  • User manual
  • Vehicle description
  • Keys, locks and alarms
  • Controls and instruments
  • Air conditioning and heater
  • Seat adjustment
  • Security systems
  • Driving and operation
  • Faults en route
  • Maintenance
  • Power unit
  • Engine device (gasoline)
  • Engine repair (gasoline)
  • Diesel engine (Z6)
  • Lubrication system
  • Cooling system
  • Fuel system
  • Exhaust system
  • Engine electrical equipment
  • Engine management system
  • Transmission
  • Clutch
  • Mechanical gearbox
  • Automatic gearbox
  • Drive mechanism
  • Chassis
  • Suspension and wheels
  • Steering
  • Brake system
  • Body
  • Body elements
  • Doors and windows
  • Air conditioning and heater
  • Electrical equipment
  • Equipment and devices
  • Power devices
  • Lighting system
  • Windshield wipers and washers
  • Equipment checks
MazBook.ru © 2018–2026 · Mobile version · Articles and news · Sitemap: EN BG BY UA RS HR RO PL SK HU · Feedback · Site search · Add to bookmarks Familia 5 (BF) · Familia 6 (BG) · Capella 3 (GC) · Capella 3 and 4 (GC) · Capella 4 (GD) · Capella 5 (GE) · Capella 6 (GF) · Mazda3 BK · Mazda6 GG · CX-5KE · Mazda 121 (3) · Mazda BT-50 (1) ·
By continuing to use the site, you agree to the use of cookies 🔐