
MazBook.ru
English Русский
Български
Беларускі
Український
Српски
Hrvatski
Română
Polski
Slovenský
Magyar
• Bookmark • Sitemap • Contacts •   
Cars Opel Cars Ford Cars Volkswagen Cars Audi Cars Kia Cars Renault Cars Peugeot


Familia Capella Mazda3 Mazda6 CX-? Others Articles
CX-5KE (2012-2017)

Upper trim of the B-pillar (Mazda CX-5KE)

  • Home
  • Mazda CX-?
  • CX 5 KE (2012-2017)
  • Body
  • Interior (internal elements)
  • Upper trim of the B-pillar
0
1. Remove the following parts:
  • Front door sill trim.
  • Rear door sill trim.
  • Lower trim of the B-pillar.
  • Upper adjustable seat belt anchor cover.
  • Front seat upper belt anchor mounting bolts.

2. Partially unscrew the door seals.

3. Grasping the shaded areas in the figure, pull the upper trim of the B-pillar in the direction of the arrow (1), disconnecting clips A, pins B and C.
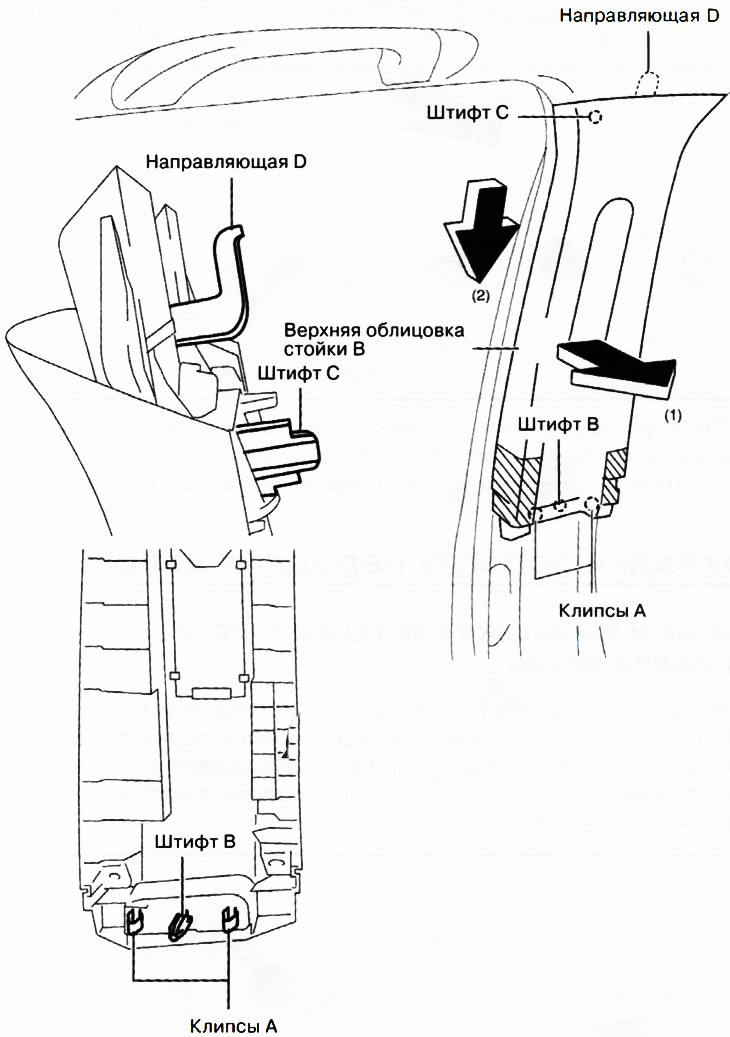
3. Grasping the shaded areas in the figure, pull the upper trim of the B-pillar in the direction of…


4. Remove the upper trim of the B-pillar in the direction of the arrow (2) in the figure, disconnecting the guide D.

Caution: If clips A, pins B and C are removed with force, guide D may be damaged. Carefully remove clips A, pins B and C to avoid damaging guide D.


5. Installation is carried out in the reverse order of removal.
This article is available at: russian, bulgarian, belarusian, ukrainian, serbian, croatian, romanian, polish, slovak, hungarian
This text was checked by: Evgeny Mereshnikov
Share with friends on social networks:

Previous
CX-5KE » Interior (internal elements)
Next

Removal and installation the lower trim of the B-pillar
Removal and installation the A-pillar trim
Removal and installation the front console
Removal and installation side walls
Removal and installation the rear console
Removal and installation the C-pillar trim
Removal and installation the D-pillar trim
Removal and installation the front side trim
Removal and installation the front door sill trim
Rear door sill trims
More articles on repairing other Mazda models
Door trim / window lifter / door glass Mazda Familia 6 (1989-1994)
Door Trim Panel (Late Models) — removal and installation Mazda Capella 3 (1982-1992, petrol)
Removal, checking and installation the front upper arm Mazda3 BK (2003-2009)
Removal, checking and installation the front upper arm Mazda6 GG (2002-2008)
Removal and installation door trim Mazda 121 (3) (1996-2003)
Link in different formats to this article
Comments and feedback from visitors
No comments yet


How much will 47 + 25 ?


CX-5KE (2012-2017) 
  • General information
  • Introduction to the guide
  • User manual
  • Maintenance
  • Power unit
  • Petrol engines 2.0 l
  • Petrol engines 2.5 l
  • Diesel engines 2.2 l
  • Cooling system
  • Lubrication system
  • Supply system
  • Control system
  • Intake and exhaust system
  • Engine electrical equipment
  • Transmission
  • Clutch
  • Mechanical gearbox
  • Automatic gearbox
  • Transfer case
  • Drive shafts and cardan
  • Chassis
  • Wheels and tires
  • Front suspension
  • Rear suspension
  • Brake system
  • Steering
  • Body
  • Exterior (external elements)
  • Interior (internal elements)
  • Security systems
  • Heating and air conditioning
  • Electrical equipment
  • Equipment and devices
  • Electrical circuits
MazBook.ru © 2018–2026 · Mobile version · Articles and news · Sitemap: EN BG BY UA RS HR RO PL SK HU · Feedback · Site search · Add to bookmarks Familia 5 (BF) · Familia 6 (BG) · Capella 3 (GC) · Capella 3 and 4 (GC) · Capella 4 (GD) · Capella 5 (GE) · Capella 6 (GF) · Mazda3 BK · Mazda6 GG · CX-5KE · Mazda 121 (3) · Mazda BT-50 (1) ·
By continuing to use the site, you agree to the use of cookies 🔐