
MazBook.ru
English Русский
Български
Беларускі
Український
Српски
Hrvatski
Română
Polski
Slovenský
Magyar
• Bookmark • Sitemap • Contacts •   
Cars Opel Cars Ford Cars Volkswagen Cars Audi Cars Kia Cars Renault Cars Peugeot


Familia Capella Mazda3 Mazda6 CX-? Others Articles
Mazda6 GG (2002-2008)

Replacing the front brake pads (Mazda 6 GG)

  • Home
  • Mazda 6
  • Mazda6 GG (2002-2008)
  • Chassis
  • Brake system
  • Replacing the front brake pads
0
Contents: Visual inspection of pad thickness ⇓ Removal brake pads ⇓
When the cylinder body is open, do not press the brake pedal, otherwise the piston will jump out. Do not damage the piston dust boot and do not allow oil to get on the brake disc. Always replace the pads together with the gaskets. If the gaskets show signs of rust or peeling of the rubber coating, replace them with new ones. Unscrew the connecting bolt only when disassembling and replacing the caliper assembly. In these cases, hang the cylinder body on a wire so as not to stretch the brake hose. Run in the friction surfaces of the brakes in case of boring or replacing drums or discs, after replacing the brake pads or friction linings, and also if the pedal begins to "fall through" after a short run.

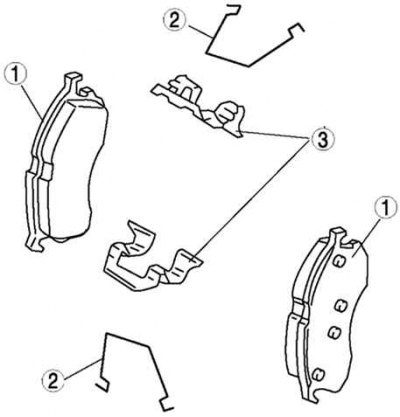
Fig. 6.38. Front brake pads: 1 – brake pads; 2 – tension springs; 3 – clamping plates

Fig. 6.38. Front brake pads: 1 – brake pads; 2 – tension springs; 3 – clamping plates


Visual inspection of pad thickness
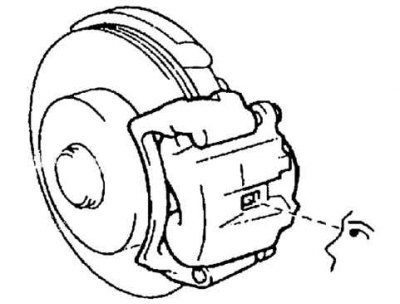


Fig. 6.39. Visual inspection of brake pad thickness

Fig. 6.39. Visual inspection of brake pad thickness


Check the thickness of the pads. To do this, lift the car, remove the wheel and look through the inspection hole in the cylinder body (Fig. 6.39).
  • Minimum thickness of brake pads: 1 mm.
  • Wear limit: 2.0 mm.

Removal brake pads


Caution: When replacing brake pads, always replace the inner and outer linings and lining caps as a set.


Drain the brake fluid.

Remove the front wheel and temporarily secure the wheel rim with two nuts.

Loosen the bolt and disconnect the brake hose bracket.
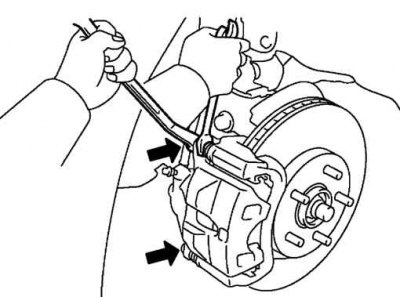
Fig. 6.40. Loosening the caliper mounting bolts

Fig. 6.40. Loosening the caliper mounting bolts


Holding the guide pins, unscrew the caliper mounting bolts (Fig. 6.40).
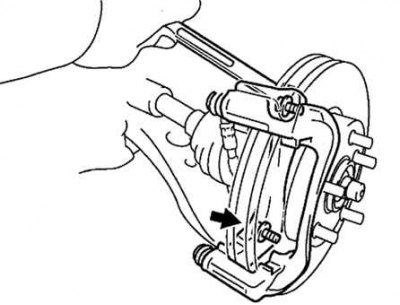
Fig. 6.41. Removing the caliper housing

Fig. 6.41. Removing the caliper housing


Unscrew the caliper housing mounting bolts and remove the caliper (Fig. 6.41).
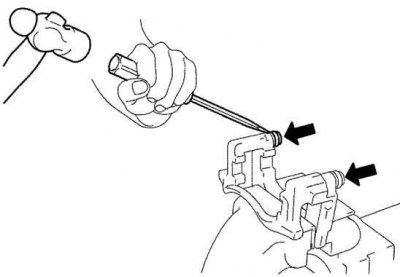


Fig. 6.42. Removing the guide pin dust boots

Fig. 6.42. Removing the guide pin dust boots


Holding the caliper in a vice with soft jaws, use a screwdriver and hammer to remove the guide pin dust boots (Fig. 6.42).
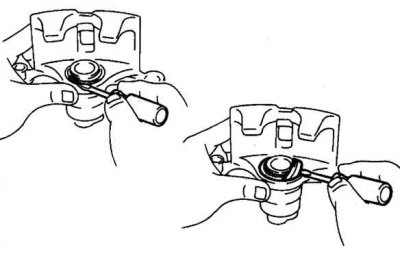
Fig. 6.43. Removing the brake cylinder boot

Fig. 6.43. Removing the brake cylinder boot


Using a screwdriver, remove the brake cylinder boot spring ring and boot (Fig. 6.43).

Place a rag between the piston and the cylinder.
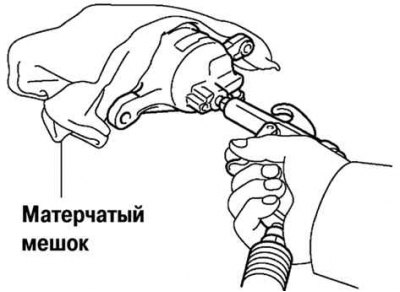
Fig. 6.44. Removing the piston from the cylinder

Fig. 6.44. Removing the piston from the cylinder


Using compressed air, remove the piston from the cylinder (Fig. 6.44).
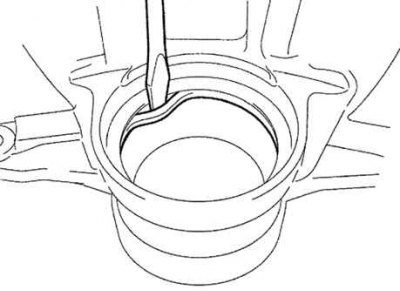
Fig. 6.45. Removing the oil seal

Fig. 6.45. Removing the oil seal


Using a screwdriver, remove the seal (Fig. 6.45).
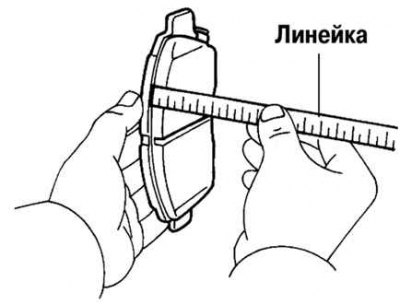
Fig. 6.46. Measuring the thickness of brake shoe linings

Fig. 6.46. Measuring the thickness of brake shoe linings


Measure the thickness of the brake shoe linings with a ruler (Fig. 6.46).
  • Standard thickness: 12 mm.
  • Minimum thickness: 1.0 mm.

If the minimum pad thickness is not as specified, replace the pads.

Press the piston completely into the cylinder using a special tool.

Install the brake disc pad.

(Article is based on website data: MazBook)
This article is available at: russian, bulgarian, belarusian, ukrainian, serbian, croatian, romanian, polish, slovak, hungarian
This text was checked by: Evdokia Filimonova
Share with friends on social networks:

Previous
Mazda6 GG » Brake system
Next

Checking the brake disc and brake components
Removal and installation the front brake disc
Disassembly and assembly of the master cylinder
Checking the liquid level sensor
Removal and installation the master brake cylinder
Checking the parking brake system
Removal, checking and installation the rear ABS wheel speed sensor
More articles on repairing other Mazda models
Replacing the front brake pads Mazda Familia 5 (1985-1989)
Replacing disc brake pads Mazda Capella 3 and 4 (1982-1992)
Replacing the front brake pads Mazda3 BK (2003-2009)
Replacing the front brake pads Mazda CX-5KE (2012-2017)
Removal and installation front brake pads Mazda 121 (3) (1996-2003)
Link in different formats to this article
Comments and feedback from visitors
No comments yet


How much will 26 + 37 ?


Mazda6 GG (2002-2008) 
  • User manual
  • Vehicle description
  • Keys, locks and alarms
  • Controls and instruments
  • Air conditioning and heater
  • Seat adjustment
  • Security systems
  • Driving and operation
  • Faults en route
  • Maintenance
  • Power unit
  • Engine device
  • Engine repair
  • Lubrication system
  • Cooling system
  • Fuel system
  • Exhaust system
  • Electrical equipment of engines
  • Control system
  • Transmission
  • Clutch
  • Mechanical gearbox
  • Automatic gearbox
  • Drive shafts and hubs
  • Chassis
  • Suspension and wheels
  • Steering
  • Brake system
  • Body
  • Exterior (external elements)
  • Interior (internal elements)
  • Doors and windows
  • Air conditioning and heater
  • Electrical equipment
  • Equipment and devices
  • Power devices
  • Lighting system
  • Windshield wipers and washers
MazBook.ru © 2018–2026 · Mobile version · Articles and news · Sitemap: EN BG BY UA RS HR RO PL SK HU · Feedback · Site search · Add to bookmarks Familia 5 (BF) · Familia 6 (BG) · Capella 3 (GC) · Capella 3 and 4 (GC) · Capella 4 (GD) · Capella 5 (GE) · Capella 6 (GF) · Mazda3 BK · Mazda6 GG · CX-5KE · Mazda 121 (3) · Mazda BT-50 (1) ·
By continuing to use the site, you agree to the use of cookies 🔐