MazBook.ru
English Русский
Български
Беларускі
Український
Српски
Hrvatski
Română
Polski
Slovenský
Magyar
• Bookmark • Sitemap • Contacts •   
Cars Opel Cars Ford Cars Volkswagen Cars Audi Cars Kia Cars Renault Cars Peugeot


Familia Capella Mazda3 Mazda6 CX-? Others Articles
CX-5KE (2012-2017)

Removal and installation ABS wheel sensors (Mazda CX-5KE)

  • Home
  • Mazda CX-?
  • CX 5 KE (2012-2017)
  • Chassis
  • Brake system
  • Removal and installation ABS wheel sensors
0
Contents: Front ABS wheel sensors ⇓ Rear ABS wheel sensors ⇓ Checking the output parameters of…⇓ Visual inspection of the installed…⇓ Checking the gap in the ABS wheel…⇓

Front ABS wheel sensors


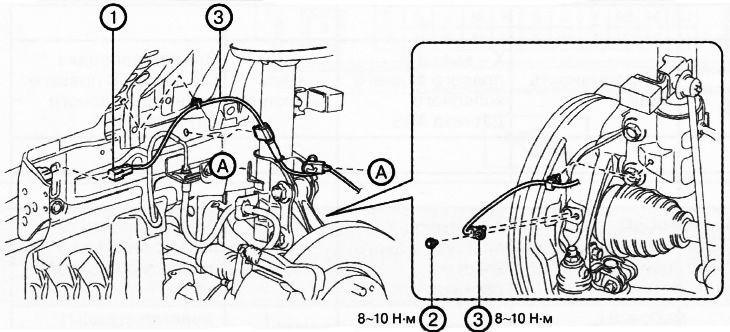
1. Connector.

1. Connector.
2. Bolt.
3. Wheel ABS sensor.


1. Remove the mudguard.

2. Disconnect the ABS wheel sensor connector.

3. Loosen the mounting bolt and remove the ABS wheel sensor.

4. Installation is carried out in the reverse order of removal.

5. After installation, make sure that the ABS wheel sensor is not twisted.

Rear ABS wheel sensors


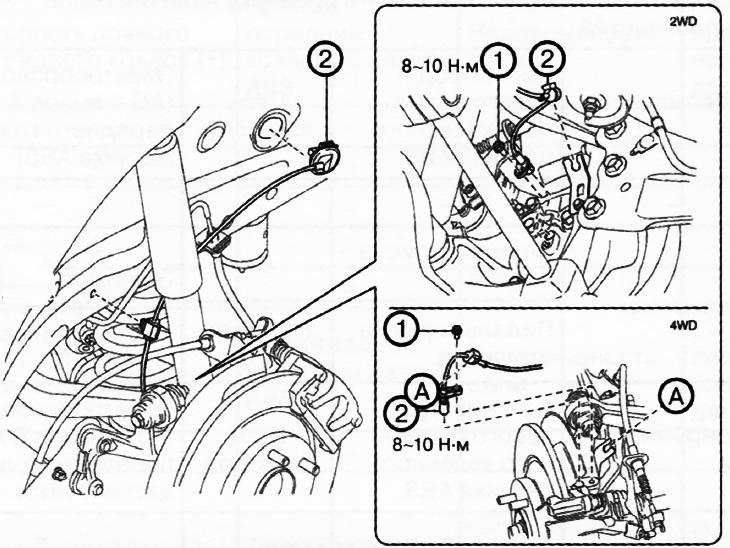
1. Bolt.

1. Bolt.
2. Rear wheel ABS sensor.


1. Remove the trunk panel.

2. Remove the trunk trim edge.

3. Remove the rear door sill.

4. Remove the side trim of the trunk.


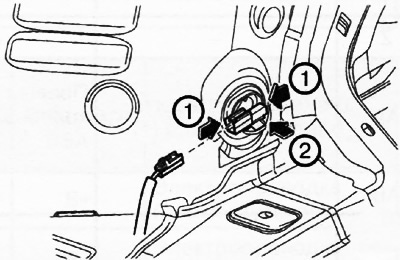
5. Disconnect the rear ABS wheel sensor connector.

6. Compress the rear ABS wheel sensor tabs and remove the sensor from the outside of the vehicle.

6. Compress the rear ABS wheel sensor tabs and remove the sensor from the outside of the vehicle.


7. Pull back the mudguard and remove the rear ABS wheel sensor by unscrewing the mounting bolt.

8. Installation is carried out in the reverse order of removal.

9. After installation, make sure that the ABS wheel sensor is not twisted.

Checking the output parameters of the ABS wheel sensor


Caution: Checking the resistance with any testers or ohmmeters may damage the ABS wheel sensor. Use only the M-MDS diagnostic tool to check the ABS wheel sensor output.


1. Turn off the ignition.

2. Connect the M-MDS device to the DLC-2 diagnostic connector.

3. Select the following parameters:
  • WSPD_SEN_LF (left Front Wheel Sensor)
  • WSPD_SEN_RF (right front wheel sensor)
  • WSPD_SEN_LR (left rear ABS wheel-speed sensor)
  • WSPD_SEN_RR (right rear ABS wheel-speed sensor)

4. Start the engine and drive the car.

5. Check that the M-MDS display shows the same speed as the speedometer. If any deviation is found, replace the corresponding ABS wheel sensor with a new one.

Visual inspection of the installed ABS wheel sensor


Check the ABS wheel sensors for the following:


  • Excessive play in ABS wheel sensor
  • ABS wheel sensor deformation
  • Deformation or damage to the ABS wheel sensor rotor

If any defects are found, replace the damaged component with a new one.

Checking the gap in the ABS wheel sensor


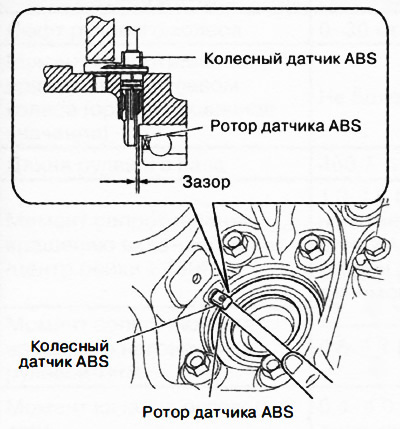
Front ABS wheel sensors


1. Remove the ABS wheel sensor from the vehicle.

2. Remove the wheel hub with the steering knuckle assembly.

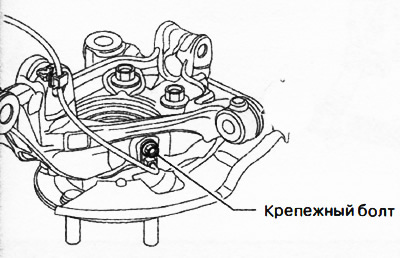
3. Install the ABS wheel sensor on the removed wheel hub with the steering knuckle and tighten to a torque of 8-10 Nm.

3. Install the ABS wheel sensor on the removed wheel hub with the steering knuckle and tighten to a…


4. Using a set of flat feeler gauges, measure the gap between the rotor and the ABS sensor.

4. Using a set of flat feeler gauges, measure the gap between the rotor and the ABS sensor.


5. If the measured value is not within the norm (0.87-1.53 mm), check the following parameters and, if necessary, replace the sensor with a new one:


  • Deformation or damage to the ABS sensor rotor.
  • Deformation or damage to the ABS sensor.
  • Presence of foreign material on the sensor or rotor.

6. Remove the ABS wheel sensor from the wheel hub.

7. Install the wheel hub with the steering knuckle assembly.

8. Install the ABS wheel sensor.

9. Check the alignment angles of the front wheels of the vehicle.

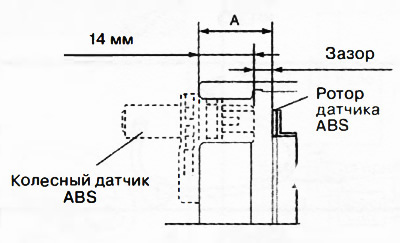
Rear wheel sensors (versions with front-wheel drive 2WD)


1. Remove the rear ABS wheel sensor.

2. Measure the distance between the wheel sensor mounting surface and the rotor. This is dimension A.

2. Measure the distance between the wheel sensor mounting surface and the rotor. This is dimension…


3. Calculate the gap between the ABS wheel sensor and the rotor using the following formula:
  • Gap (mm) = A - 14

4. Make sure that the obtained gap value corresponds to the norm (0.28-1.17 mm). If this is not the case, replace the sensor with a new one.

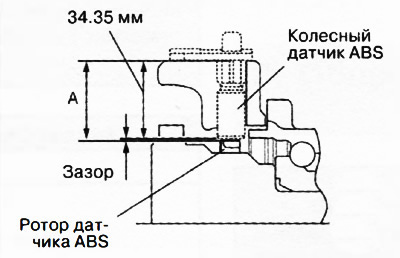
Rear wheel sensors (4WD versions)


1. Remove the ABS wheel sensor.

2. Measure the distance between the wheel sensor mounting surface and the rotor. This is dimension A.

2. Measure the distance between the wheel sensor mounting surface and the rotor. This is dimension…


3. Calculate the gap between the ABS wheel sensor using the following formula:
  • Gap (mm) = A - 34.35

4. Make sure that the obtained gap value corresponds to the norm (0.3-1.4 mm). If this is not the case, replace the sensor with a new one.
This article is available at: russian, bulgarian, belarusian, ukrainian, serbian, croatian, romanian, polish, slovak, hungarian
This text was checked by: Evgeny Mereshnikov
Share with friends on social networks:

Previous
CX-5KE » Brake system
Next

Initialization procedure for the dynamic stabilization system sensors
DSC hydro-electronic control unit
Checking the Parking Brake Switch
Parking brake cables
Parking brake lever
Checking the brake fluid pressure sensor
Special tools and accessories
More articles on repairing other Mazda models
Detailed technical specifications of the wheel drive Mazda Familia 5 (1985-1989)
Key left in steering wheel lock reminder signal Mazda Capella 3 (1982-1992, petrol)
Solar radiation sensor and temperature sensors Mazda3 BK (2003-2009)
Solar radiation sensor and temperature sensors Mazda6 GG (2002-2008)
Front Wheel Speed Sensors — Removal and Installation Mazda BT-50 (1) (2006-2011)
Link in different formats to this article
Comments and feedback from visitors
No comments yet


How much will 46 + 36 ?


CX-5KE (2012-2017) 
  • General information
  • Introduction to the guide
  • User manual
  • Maintenance
  • Power unit
  • Petrol engines 2.0 l
  • Petrol engines 2.5 l
  • Diesel engines 2.2 l
  • Cooling system
  • Lubrication system
  • Supply system
  • Control system
  • Intake and exhaust system
  • Engine electrical equipment
  • Transmission
  • Clutch
  • Mechanical gearbox
  • Automatic gearbox
  • Transfer case
  • Drive shafts and cardan
  • Chassis
  • Wheels and tires
  • Front suspension
  • Rear suspension
  • Brake system
  • Steering
  • Body
  • Exterior (external elements)
  • Interior (internal elements)
  • Security systems
  • Heating and air conditioning
  • Electrical equipment
  • Equipment and devices
  • Electrical circuits
MazBook.ru © 2018–2026 · Mobile version · Articles and news · Sitemap: EN BG BY UA RS HR RO PL SK HU · Feedback · Site search · Add to bookmarks Familia 5 (BF) · Familia 6 (BG) · Capella 3 (GC) · Capella 3 and 4 (GC) · Capella 4 (GD) · Capella 5 (GE) · Capella 6 (GF) · Mazda3 BK · Mazda6 GG · CX-5KE · Mazda 121 (3) · Mazda BT-50 (1) ·
By continuing to use the site, you agree to the use of cookies 🔐