
MazBook.ru
English Русский
Български
Беларускі
Український
Српски
Hrvatski
Română
Polski
Slovenský
Magyar
• Bookmark • Sitemap • Contacts •   
Cars Opel Cars Ford Cars Volkswagen Cars Audi Cars Kia Cars Renault Cars Peugeot


Familia Capella Mazda3 Mazda6 CX-? Others Articles
CX-5KE (2012-2017)

Glow plugs (diesel engines) (Mazda CX-5KE)

  • Home
  • Mazda CX-?
  • CX 5 KE (2012-2017)
  • Power unit
  • Engine electrical equipment
  • Glow plugs (diesel engines)
0
Contents: Checking glow plugs ⇓ Removal and installation glow plugs ⇓

Checking glow plugs


1. Disconnect the glow plug wires.

2. Measure the resistance between the glow plug terminal and the housing ground. If the measured value is not within the norm, replace the glow plug with a new one.

Note: Glow plug nominal resistance: 1.0 ohm (at 20°C).


Removal and installation glow plugs
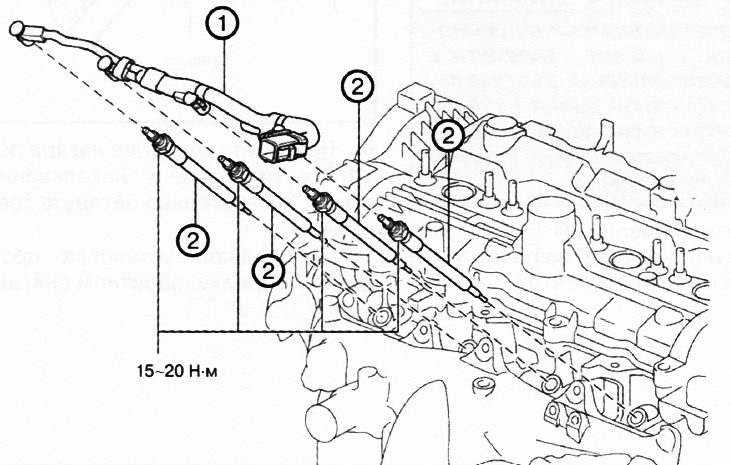


1. Glow plug wiring.

1. Glow plug wiring.
2. Glow plugs.


Caution: Do not use a glow plug that has been dropped from a height of more than 10 cm, even if there is no visible damage and the glow plug resistance is within the norm.


1. Disconnect the negative battery terminal.

2. Remove the engine cover.

3. Remove the components shown in the figure and set aside.
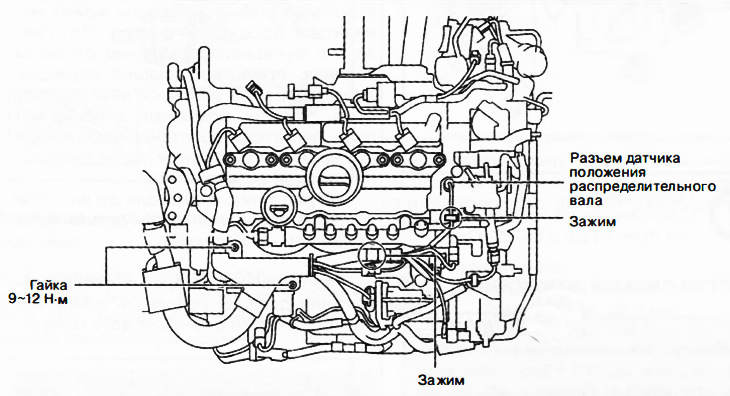
3. Remove the components shown in the figure and set aside.


4. Remove the intake manifold insulator.


5. Disconnect the wiring tip from the glow plug as shown in the figure.
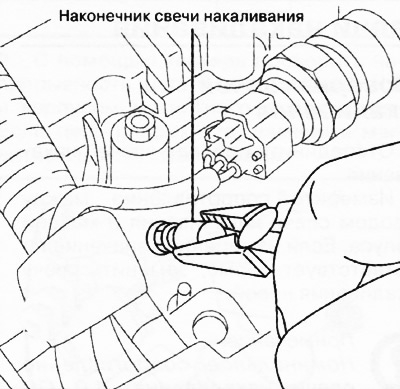
5. Disconnect the wiring tip from the glow plug as shown in the figure.


6. Loosen the glow plug with a wrench a few turns, then unscrew the plug manually.

Caution: Soot deposited on the glow plug can damage the glow plug and engine. Before installing the glow plug, remove any soot from the glow plug and mounting hole.


7. Limit the drill (∅ 5.0-5.2 mm) or percussion drill (∅ 5.2-5.4 mm) at a distance of 119-121 mm from the edge with electrical tape.
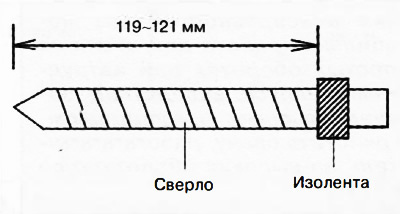
7. Limit the drill (∅ 5.0-5.2 mm) or percussion drill (∅ 5.2-5.4 mm) at a distance of 119-121 mm…


8. Turn the drill by hand to remove carbon deposits from the glow plug mounting hole.
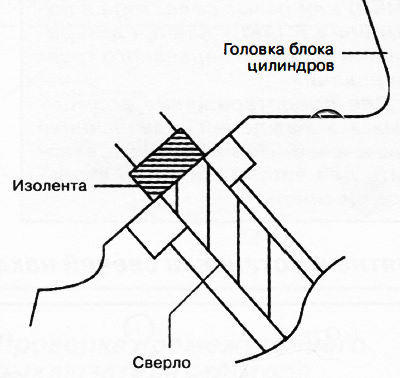
8. Turn the drill by hand to remove carbon deposits from the glow plug mounting hole.


9. Repeat the carbon removal process with a pen.


10. Screw in the glow plug by hand and tighten it completely with a wrench.

11. Further installation is carried out in the reverse order of removal.
This article is available at: russian, bulgarian, belarusian, ukrainian, serbian, croatian, romanian, polish, slovak, hungarian
This text was checked by: Evgeny Mereshnikov
Share with friends on social networks:

Previous
CX-5KE » Engine electrical equipment
Next

Spark plugs
Ignition coils
Checking the intermediate starter switch
Checking the starter
Disassembling and assembling the starter
Pre-heating control unit
Cruise control switch
More articles on repairing other Mazda models
Fuel system of carburetor engines Mazda Familia 5 (1985-1989)
For owners of cars with diesel engines Mazda Capella 5 (1991-1997)
General description of engines of models L8, LF and L3 Mazda3 BK (2003-2009)
General description of engines of models L8, LF and L3 Mazda6 GG (2002-2008)
Checking the pre-heating system and removing and installing glow plugs Mazda 121 (3) (1996-2003)
Link in different formats to this article
Comments and feedback from visitors
No comments yet


How much will 36 + 49 ?


CX-5KE (2012-2017) 
  • General information
  • Introduction to the guide
  • User manual
  • Maintenance
  • Power unit
  • Petrol engines 2.0 l
  • Petrol engines 2.5 l
  • Diesel engines 2.2 l
  • Cooling system
  • Lubrication system
  • Supply system
  • Control system
  • Intake and exhaust system
  • Engine electrical equipment
  • Transmission
  • Clutch
  • Mechanical gearbox
  • Automatic gearbox
  • Transfer case
  • Drive shafts and cardan
  • Chassis
  • Wheels and tires
  • Front suspension
  • Rear suspension
  • Brake system
  • Steering
  • Body
  • Exterior (external elements)
  • Interior (internal elements)
  • Security systems
  • Heating and air conditioning
  • Electrical equipment
  • Equipment and devices
  • Electrical circuits
MazBook.ru © 2018–2026 · Mobile version · Articles and news · Sitemap: EN BG BY UA RS HR RO PL SK HU · Feedback · Site search · Add to bookmarks Familia 5 (BF) · Familia 6 (BG) · Capella 3 (GC) · Capella 3 and 4 (GC) · Capella 4 (GD) · Capella 5 (GE) · Capella 6 (GF) · Mazda3 BK · Mazda6 GG · CX-5KE · Mazda 121 (3) · Mazda BT-50 (1) ·
By continuing to use the site, you agree to the use of cookies 🔐