MazBook.ru
English Русский
Български
Беларускі
Український
Српски
Hrvatski
Română
Polski
Slovenský
Magyar
• Bookmark • Sitemap • Contacts •   
Cars Opel Cars Ford Cars Volkswagen Cars Audi Cars Kia Cars Renault Cars Peugeot


Familia Capella Mazda3 Mazda6 CX-? Others Articles
Mazda 121 (3) (1996-2003) Mazda BT-50 (1) (2006-2011)

Checking the pre-heating system and removing and installing glow plugs (Mazda 121 (3))

  • Home
  • Mazda
  • 121 JASM (1996-2003)
  • Power unit
  • Fuel injection (diesel)
  • Checking the pre-heating system and removing and installing glow plugs
0
Contents: Checking the voltage supply ⇓ Checking/replacing glow plugs ⇓ Glow plugs with burnt-out glow rods ⇓
When difficulties arise when starting the engine, you first need to measure the compression in the engine. If its value is very low, the engine will not start at low temperatures. Measuring compression is described in the chapter "Engine".

Checking the voltage supply


Connect a test lamp between the glow plug of the fourth cylinder and the vehicle ground.

Turn the ignition key to position II. The control lamp should light at the same time. If the lamp does not light, then the voltage supply circuit must be checked in accordance with the electrical equipment diagram.

Caution: The ignition key must not remain in position II for more than 15 seconds.


Checking/replacing glow plugs


Disconnect the negative cable from the battery with the ignition off.

Note: This will erase the data in the electronic memory units. See the instructions in the chapter "Electrical equipment".


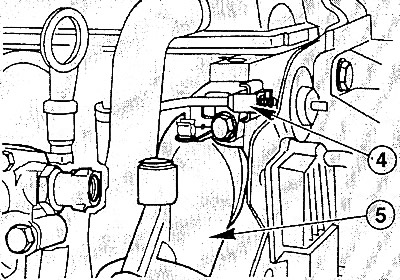
Unscrew the bolt, disconnect the glow plug wire from the holder (4) and insulate it with electrical…


Unscrew the bolt, disconnect the glow plug wire from the holder (4) and insulate it with electrical tape. (5 - vacuum pump).
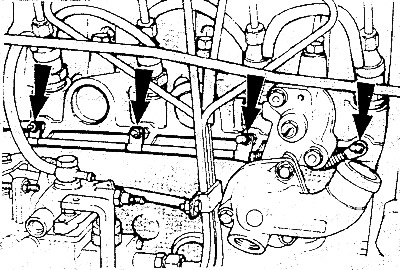


Remove the connecting wire and the glow plug busbar.


Remove the connecting wire and the glow plug busbar.

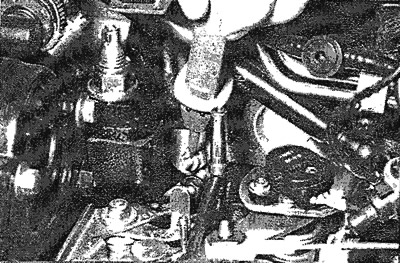
Connect the voltage tester to the positive terminal of the battery and apply the other lead of the…


Connect the voltage tester to the positive terminal of the battery and apply the other lead of the tester to each glow plug in turn. If the LED of the tester lights up, then there is contact and the glow plug is OK.

The LED does not light: the glow plug is faulty and needs to be replaced. The tightening torque of the glow plug is 30 Nm.

Caution: The tightening torque must not be exceeded, as this will reduce the annular gap between the glow rod and the threaded part, and the glow plug will fail prematurely. If the glow rod burns out, pay attention to the instructions (see below).


Connect the busbar wire. Tighten the nuts to 5 Nm.

Connect the negative cable to the battery. Set the clock values and enter the required codes.


Glow plugs with burnt-out glow rods


Burnt-out glow plug rods often cause damage to the injectors. Such damage should not be limited to replacing the glow plugs.

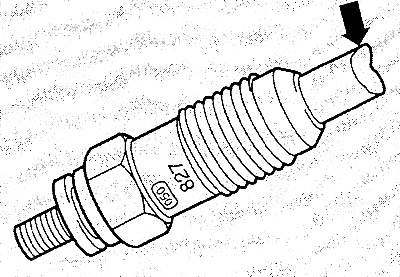
If such glow plugs (arrow) are detected during fault diagnostics, it is not enough to simply…


If such glow plugs (arrow) are detected during fault diagnostics, it is not enough to simply replace them. It is also necessary to check the injectors for the opening pressure and density (in the workshop).
This article is available at: russian, bulgarian, belarusian, ukrainian, serbian, croatian, romanian, polish, slovak, hungarian
This text was checked by: Evgeny Mereshnikov
Share with friends on social networks:

Previous
Mazda 121 (3) » Fuel injection (diesel)
Next

Removal air from the fuel system of a diesel engine
How a diesel engine works
Removal and installation injectors
Checking, removing and installing the electric engine stop device
Technical data of the diesel fuel injection system
Diagnostics of diesel fuel injection system faults
More articles on repairing other Mazda models
Checking/removing and installing the fuel shut-off valve Mazda Familia 6 (1989-1994)
Checking, removing and installing electronic control system… Mazda Capella 3 and 4 (1982-1992)
Checking for fuel leaks after installing the pump unit (diesel) Mazda3 BK (2003-2009)
Checking the exhaust system Mazda6 GG (2002-2008)
Checking, removing and installing the vacuum hose Mazda CX-5KE (2012-2017)
Link in different formats to this article
Comments and feedback from visitors
No comments yet


How much will 41 + 42 ?


Mazda BT-50 (1) (2006-2011) 
  • General information
  • Introduction to guide
  • User manual
  • Maintenance
  • Power unit
  • Engine repair (diesel)
  • Cooling and lubrication system
  • Fuel injection system
  • Intake and exhaust system
  • Engine electrical equipment
  • Transmission
  • Clutch
  • Mechanical gearbox
  • All-wheel drive system
  • Transfer case and gearboxes
  • Chassis
  • Front suspension
  • Rear suspension
  • Steering
  • Brake system
  • Body
  • Exterior (external elements)
  • Interior (internal elements)
  • Heating and air conditioning
  • Security system SRS
  • Electrical equipment
  • Equipment and devices
  • Electrical circuits
Mazda 121 (3) (1996-2003) 
  • General information
  • User manual
  • Maintenance
  • Power unit
  • Petrol engine 1.3 l
  • Petrol engine 1.25/1.4 l
  • Diesel engine
  • Lubrication system
  • Cooling system
  • Ignition system
  • Supply system
  • Fuel injection (gasoline)
  • Fuel injection (diesel)
  • Exhaust system
  • Transmission
  • Clutch
  • Car gearbox
  • Chassis
  • Front suspension
  • Rear suspension
  • Steering
  • Brake system
  • Wheels and tires
  • Body
  • Exterior (external elements)
  • Interior (internal elements)
  • Doors, windows and locks
  • Heating system
  • Electrical equipment
  • Troubleshooting
  • Equipment and devices
  • Lighting system
  • Power devices
  • Electrical circuits
MazBook.ru © 2018–2026 · Mobile version · Articles and news · Sitemap: EN BG BY UA RS HR RO PL SK HU · Feedback · Site search · Add to bookmarks Familia 5 (BF) · Familia 6 (BG) · Capella 3 (GC) · Capella 3 and 4 (GC) · Capella 4 (GD) · Capella 5 (GE) · Capella 6 (GF) · Mazda3 BK · Mazda6 GG · CX-5KE · Mazda 121 (3) · Mazda BT-50 (1) ·
By continuing to use the site, you agree to the use of cookies 🔐