


External elements of the car body Mazda BT-50 1

Front bumper — removal and installation
1. Disconnect the cable from the negative terminal of the battery. 2. Remove the radiator grille. 3. (Modifications) Disconnect the fog light connectors. 4. When...
1. Disconnect the cable from the negative terminal of the battery. 2. Remove the radiator grille. 3. (Modifications) Disconnect the fog light connectors. 4. When...

Front bumper — device
Front bumper (example, Ford Ranger). 1 - screw, 2 - piston "A", 3 - bolt, 4 - piston "B", 5 - front bumper.
Front bumper (example, Ford Ranger). 1 - screw, 2 - piston "A", 3 - bolt, 4 - piston "B", 5 - front bumper.

Disassembling and assembling the front bumper
1. Remove the front bumper and disassemble it if necessary. 2. (Modifications) Remove the fog lights (see chapter " Body electrical equipment "). 3. Remove the radiator...
1. Remove the front bumper and disassemble it if necessary. 2. (Modifications) Remove the fog lights (see chapter " Body electrical equipment "). 3. Remove the radiator...

Removal and installation the front bumper reinforcement
1. Disconnect the cable from the negative terminal of the battery. 2. Remove the radiator grille. 3. Remove the front bumper. 4. When removing the front bumper...
1. Disconnect the cable from the negative terminal of the battery. 2. Remove the radiator grille. 3. Remove the front bumper. 4. When removing the front bumper...

Rear bumper — removal and installation
1. Disconnect the cable from the negative terminal of the battery. 2. Remove the license plate light bulb (see chapter " Body electrical equipment "). 3. Loosen the...
1. Disconnect the cable from the negative terminal of the battery. 2. Remove the license plate light bulb (see chapter " Body electrical equipment "). 3. Loosen the...

Front wing — removal and installation
1. Disconnect the cable from the negative terminal of the battery. 2. In order to remove the hood mounting hinges, it is necessary to remove the following parts:...
1. Disconnect the cable from the negative terminal of the battery. 2. In order to remove the hood mounting hinges, it is necessary to remove the following parts:...

Front wing — device
Front wing (Mazda BT-50). 1 - bolt, 2 - mudguard, 3 - nut, 4 - bolt, 5 - front wing holder, 6 - front wing, 7 - piston, 8 - mudguard, 9 - front wing trim, 10 - side trim...
Front wing (Mazda BT-50). 1 - bolt, 2 - mudguard, 3 - nut, 4 - bolt, 5 - front wing holder, 6 - front wing, 7 - piston, 8 - mudguard, 9 - front wing trim, 10 - side trim...

Hood — adjustment
1. Checking the position of the hood. a) Measure the gaps between the hood and the car body as shown in the figure "Adjusting the hood". Adjusting the hood. 1 - hood, 2...
1. Checking the position of the hood. a) Measure the gaps between the hood and the car body as shown in the figure "Adjusting the hood". Adjusting the hood. 1 - hood, 2...

Hood — removal and installation
1. Disconnect the cable from the negative terminal of the battery. 2. Disconnect the windshield washer hose. 3. To unscrew the hood hinge mounting bolts, remove the...
1. Disconnect the cable from the negative terminal of the battery. 2. Disconnect the windshield washer hose. 3. To unscrew the hood hinge mounting bolts, remove the...

Ventilation grille — removal and installation
1. Remove the windshield wiper arms and blades (see chapter " Body electrical equipment "). 2. Remove the seal. 3. Loosen the screws, disconnect the pins and clips, then...
1. Remove the windshield wiper arms and blades (see chapter " Body electrical equipment "). 2. Remove the seal. 3. Loosen the screws, disconnect the pins and clips, then...

Side doors — removal and installation
1. Disconnect the cable from the negative terminal of the battery. 2. Remove the protective screen. 3. (Front door) To access the front door hinge mounting bolts, remove...
1. Disconnect the cable from the negative terminal of the battery. 2. Remove the protective screen. 3. (Front door) To access the front door hinge mounting bolts, remove...

Adjusting the position of the side doors
1. Measure the gaps between the side doors and the vehicle body as shown in the figure "Adjusting the Position of the Side Doors" and compare the obtained data with the...
1. Measure the gaps between the side doors and the vehicle body as shown in the figure "Adjusting the Position of the Side Doors" and compare the obtained data with the...

Disassembly and assembly of the door mounting panel
1. (Front door) Raise the front door glass 80 mm up from the fully open position. 2. (Rear side door) Close the door glass completely. 3. Disconnect the cable from the...
1. (Front door) Raise the front door glass 80 mm up from the fully open position. 2. (Rear side door) Close the door glass completely. 3. Disconnect the cable from the...

Removal and installation front door glass
1. Raise the front door glass 50 mm up from the fully open position. 2. (Models with electric windows) Disconnect the cable from the negative battery terminal. 3. Remove...
1. Raise the front door glass 50 mm up from the fully open position. 2. (Models with electric windows) Disconnect the cable from the negative battery terminal. 3. Remove...

Removal and installation the window lift handle
1. Using a rag, remove the window lift handle as shown in the figure. 2. Install the clamp on the handle. 3. Raise the glass fully and install the window regulator...
1. Using a rag, remove the window lift handle as shown in the figure. 2. Install the clamp on the handle. 3. Raise the glass fully and install the window regulator...

Adjusting the position of the rear luggage compartment door
1. Loosen the rear door lock bracket mounting bolts. 2. Adjust the position of the lock bracket by moving it forward and backward or left and right so that the door lock...
1. Loosen the rear door lock bracket mounting bolts. 2. Adjust the position of the lock bracket by moving it forward and backward or left and right so that the door lock...
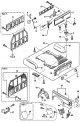
Disassembling and assembling the rear luggage compartment door
1. When disassembling and assembling the rear luggage compartment door, refer to the assembly drawing "Trunk compartment trims". Luggage compartment trim. 1 - outer rear...
1. When disassembling and assembling the rear luggage compartment door, refer to the assembly drawing "Trunk compartment trims". Luggage compartment trim. 1 - outer rear...

Fuel filler flap
Removal and installation 1. Open the hatch, unscrew the mounting bolts and remove it. Tightening torque - 4-6 Nm 2. Installation is carried out in the reverse order of...
Removal and installation 1. Open the hatch, unscrew the mounting bolts and remove it. Tightening torque - 4-6 Nm 2. Installation is carried out in the reverse order of...

Windshield — Removal
1. Disconnect the cable from the negative terminal of the battery. 2. Remove the following parts: windshield wiper arms and blades (see chapter " Body electrical...
1. Disconnect the cable from the negative terminal of the battery. 2. Remove the following parts: windshield wiper arms and blades (see chapter " Body electrical...

Windshield — installation
1. Using a spatula, clean the contact surface of the body from glue, leaving about 2 mm of glue on the surface. 2. Clean and degrease the contact surfaces of the glass...
1. Using a spatula, clean the contact surface of the body from glue, leaving about 2 mm of glue on the surface. 2. Clean and degrease the contact surfaces of the glass...

Rear window
1. Disconnect the cable from the negative terminal of the battery. 2. Remove the rear pillar trims (see section " Interior trim "). 3. Disconnect the rear window heating...
1. Disconnect the cable from the negative terminal of the battery. 2. Remove the rear pillar trims (see section " Interior trim "). 3. Disconnect the rear window heating...

Body dimensions
Exterior of the car. 1 - side stand, 2 - front and rear wing trim, 3 - rear bumper, 4 - hook for fastening, 5 - side protection, 6 - front mudguard, 7 - front bumper....
Exterior of the car. 1 - side stand, 2 - front and rear wing trim, 3 - rear bumper, 4 - hook for fastening, 5 - side protection, 6 - front mudguard, 7 - front bumper....
This section is available on: russian, bulgarian, belarusian, ukrainian, serbian, croatian, romanian, polish, slovak, hungarian
More sections on repairs of other Mazda models
• Body: Exterior (external elements) Mazda Capella 5 (1991-1997)
• Body: Exterior (external elements) Mazda6 GG (2002-2008)
• Body: Exterior (external elements) Mazda CX-5KE (2012-2017)
• Body: Exterior (external elements) Mazda Capella 5 (1991-1997)
• Body: Exterior (external elements) Mazda6 GG (2002-2008)
• Body: Exterior (external elements) Mazda CX-5KE (2012-2017)
Link in different formats to this section
TEXTHTMLBB Code
- General information
- Introduction to guide
- User manual
- Maintenance
- Power unit
- Engine repair (diesel)
- Cooling and lubrication system
- Fuel injection system
- Intake and exhaust system
- Engine electrical equipment
- Transmission
- Clutch
- Mechanical gearbox
- All-wheel drive system
- Transfer case and gearboxes
- Chassis
- Front suspension
- Rear suspension
- Steering
- Brake system
- Body
- Exterior (external elements)
- Interior (internal elements)
- Heating and air conditioning
- Security system SRS
- Electrical equipment
- Equipment and devices
- Electrical circuits
- General information
- User manual
- Maintenance
- Power unit
- Petrol engine 1.3 l
- Petrol engine 1.25/1.4 l
- Diesel engine
- Lubrication system
- Cooling system
- Ignition system
- Supply system
- Fuel injection (gasoline)
- Fuel injection (diesel)
- Exhaust system
- Transmission
- Clutch
- Car gearbox
- Chassis
- Front suspension
- Rear suspension
- Steering
- Brake system
- Wheels and tires
- Body
- Exterior (external elements)
- Interior (internal elements)
- Doors, windows and locks
- Heating system
- Electrical equipment
- Troubleshooting
- Equipment and devices
- Lighting system
- Power devices
- Electrical circuits