
MazBook.ru
English Русский
Български
Беларускі
Український
Српски
Hrvatski
Română
Polski
Slovenský
Magyar
• Bookmark • Sitemap • Contacts •   
Cars Opel Cars Ford Cars Volkswagen Cars Audi Cars Kia Cars Renault Cars Peugeot


Familia Capella Mazda3 Mazda6 CX-? Others Articles
Mazda 121 (3) (1996-2003) Mazda BT-50 (1) (2006-2011)

Windshield — installation (Mazda BT-50 (1))

  • Home
  • Mazda
  • BT-50 J97M (2006-2011)
  • Body
  • Exterior (external elements)
  • Windshield — installation
0
1. Using a spatula, clean the contact surface of the body from glue, leaving about 2 mm of glue on the surface.

2. Clean and degrease the contact surfaces of the glass and the body along the entire perimeter.

3. Install the upper molding onto the windshield, aligning the mark on the center of the molding with the mark on the windshield. Then install the molding onto the edges of the glass.
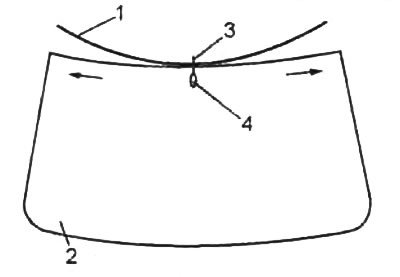
1 - top molding,

1 - top molding,
2 - windshield,
3 - label,
4 - mark on the glass.


4. Install the side moldings from the windshield as shown in the figure.
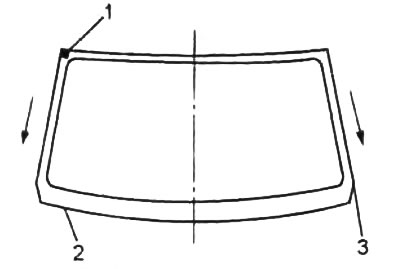
1 - chalk on glass,

1 - chalk on glass,
2 - windshield,
3 - side molding.


5. Install the seal on the windshield as shown in the figure.
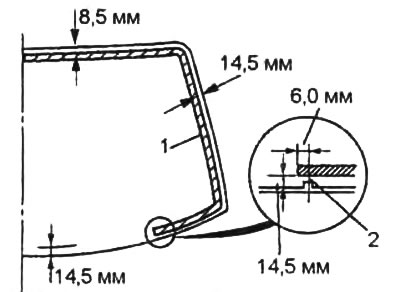
1 - windshield seal,

1 - windshield seal,
2 - ledge.


6. Install the windshield on the car body and adjust its position so that the distance between the top edge of the glass and the car body is 7.5 mm.


Apply alignment marks to the glass and body.

Note: Do not damage glass or painted surfaces of the car body.
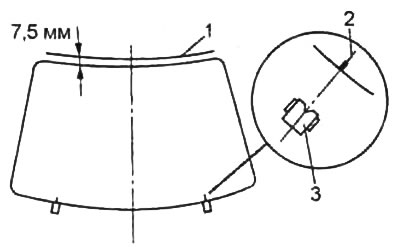

1 - car body,

1 - car body,
2 - label,
3 - spacer.


7. Remove the windshield from the car body.

8. Using a brush, apply the primer to the glass as shown in the picture. Wait for 30 minutes.

Caution: Clean the surface from dirt and grease, do not touch the surface after applying the primer, otherwise the connection will not be airtight.
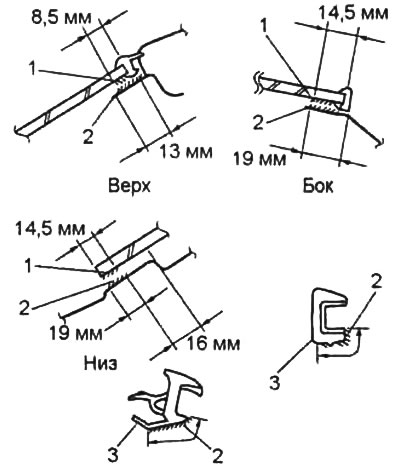

Note: Use a primer designed for glass installation. The drying time of the primer is specified in the instructions for use.


9. Using a brush, apply the primer to the contact surface of the car body.

Wait 10 minutes.

Caution: Clean the surface from dirt and grease, do not touch the surface after applying the primer, otherwise the connection will not be airtight.


1 - glass primer,

1 - glass primer,
2 - primer for the body,
3 - side molding.


10. Make a V-shaped cut on the tip of the adhesive can as shown in the picture. Place the can into the caulking gun.


11. Apply adhesive to the contact surface of the windshield between the seal and the edge of the glass as shown in the figure.
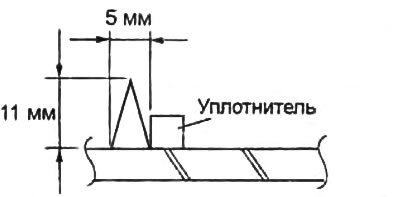
11. Apply adhesive to the contact surface of the windshield between the seal and the edge of the…


12. Install the windshield on the body according to the marks. Lightly press the glass first on the corners, then on the entire contact surface. Do not open or close the car doors until the glue dries.
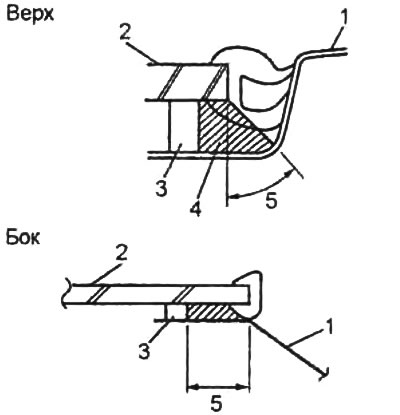
1 - car body,

1 - car body,
2 - windshield,
3 - seal,
4 - glue,
5 - contact surface.


13. Remove excess adhesive from glass and painted surfaces of the body.

14. Wait 1 hour. Check and repair any leaky connections.

a) After the curing time has elapsed, check the connection for leaks.

b) Seal any leaks with automotive glass sealant.

15. Install all removed elements.
This article is available at: russian, bulgarian, belarusian, ukrainian, serbian, croatian, romanian, polish, slovak, hungarian
This text was checked by: Vladimir Bazhenov
Share with friends on social networks:

Previous
Mazda BT-50 (1) » Exterior (external elements)
Next

Windshield — Removal
Fuel filler flap
Disassembling and assembling the rear luggage compartment door
Adjusting the position of the rear luggage compartment door
Removal and installation the window lift handle
Rear window
Body dimensions
More articles on repairing other Mazda models
Removal and installation the windshield wiper Mazda Familia 5 (1985-1989)
Inspection and replacement of windshield wipers Mazda Capella 3 (1982-1992, petrol)
Windshield defroster mode Mazda3 BK (2003-2009)
Windshield defroster mode Mazda6 GG (2002-2008)
Windshield washer Mazda CX-5KE (2012-2017)
Link in different formats to this article
Comments and feedback from visitors
No comments yet


How much will 38 + 31 ?


Mazda BT-50 (1) (2006-2011) 
  • General information
  • Introduction to guide
  • User manual
  • Maintenance
  • Power unit
  • Engine repair (diesel)
  • Cooling and lubrication system
  • Fuel injection system
  • Intake and exhaust system
  • Engine electrical equipment
  • Transmission
  • Clutch
  • Mechanical gearbox
  • All-wheel drive system
  • Transfer case and gearboxes
  • Chassis
  • Front suspension
  • Rear suspension
  • Steering
  • Brake system
  • Body
  • Exterior (external elements)
  • Interior (internal elements)
  • Heating and air conditioning
  • Security system SRS
  • Electrical equipment
  • Equipment and devices
  • Electrical circuits
Mazda 121 (3) (1996-2003) 
  • General information
  • User manual
  • Maintenance
  • Power unit
  • Petrol engine 1.3 l
  • Petrol engine 1.25/1.4 l
  • Diesel engine
  • Lubrication system
  • Cooling system
  • Ignition system
  • Supply system
  • Fuel injection (gasoline)
  • Fuel injection (diesel)
  • Exhaust system
  • Transmission
  • Clutch
  • Car gearbox
  • Chassis
  • Front suspension
  • Rear suspension
  • Steering
  • Brake system
  • Wheels and tires
  • Body
  • Exterior (external elements)
  • Interior (internal elements)
  • Doors, windows and locks
  • Heating system
  • Electrical equipment
  • Troubleshooting
  • Equipment and devices
  • Lighting system
  • Power devices
  • Electrical circuits
MazBook.ru © 2018–2026 · Mobile version · Articles and news · Sitemap: EN BG BY UA RS HR RO PL SK HU · Feedback · Site search · Add to bookmarks Familia 5 (BF) · Familia 6 (BG) · Capella 3 (GC) · Capella 3 and 4 (GC) · Capella 4 (GD) · Capella 5 (GE) · Capella 6 (GF) · Mazda3 BK · Mazda6 GG · CX-5KE · Mazda 121 (3) · Mazda BT-50 (1) ·
By continuing to use the site, you agree to the use of cookies 🔐