
MazBook.ru
English Русский
Български
Беларускі
Український
Српски
Hrvatski
Română
Polski
Slovenský
Magyar
• Bookmark • Sitemap • Contacts •   
Cars Opel Cars Ford Cars Volkswagen Cars Audi Cars Kia Cars Renault Cars Peugeot


Familia Capella Mazda3 Mazda6 CX-? Others Articles
Mazda 121 (3) (1996-2003) Mazda BT-50 (1) (2006-2011)

Windshield — Removal (Mazda BT-50 (1))

  • Home
  • Mazda
  • BT-50 J97M (2006-2011)
  • Body
  • Exterior (external elements)
  • Windshield — Removal
0
1. Disconnect the cable from the negative terminal of the battery.

2. Remove the following parts:
  • windshield wiper arms and blades (see chapter "Body electrical equipment");
  • ventilation grille (see section "Ventilation grille");
  • interior rear view mirror (see section "Rear view mirror");
  • sun visors (see section "Interior trim");
  • interior lighting lamp (see chapter " Body electrical equipment");
  • front pillar trims (see section "Interior trim").

3. Fold the front edge of the roof trim away from the roof.

[Original version of the article on the website: www.MAZbook.ru]

4. Before starting work, apply protective tape to the contact surfaces of the car body and the instrument panel.
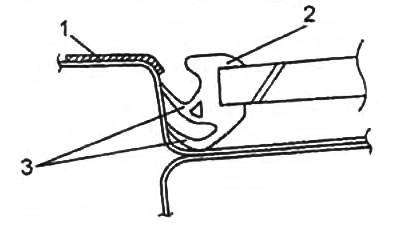
1 - protective tape,

1 - protective tape,
2 - top molding,
3 - edge of the molding.


5. Remove the windshield molding by pulling it from the edge.

6. If the windshield is not going to be reinstalled, use a special tool to cut off the layer of adhesive that attaches the glass to the body. Then remove the glass.
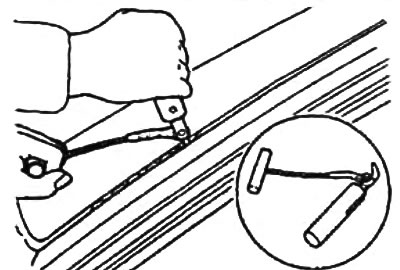
6. If the windshield is not going to be reinstalled, use a special tool to cut off the layer of…


7. If the windshield is to be reinstalled, perform the following procedures:


a) Using an awl, make a hole in the glue layer from the inside of the car body.

b) Pull the string through the hole.
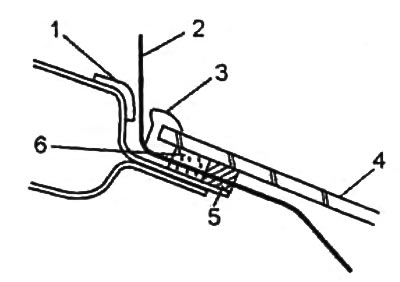
1 - protective tape,

1 - protective tape,
2 - string,
3 - top molding,
4 - windshield,
5 - seal,
6 - glue.


c) Secure the ends of the string to wooden blocks.

d) Cut off the layer of glue around the entire perimeter of the glass.

Note:
  • To avoid breaking the string while working, use its entire length;
  • The string may cut your hands, so wear gloves when working.
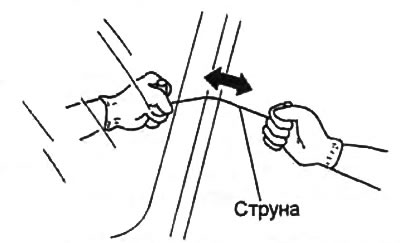

The string may cut your hands, so wear gloves when working.


8. Remove the windshield.

9. Remove the seal from the glass.
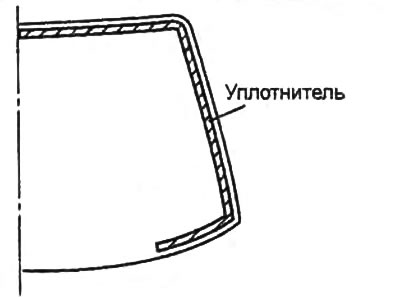
9. Remove the seal from the glass.


10. Remove the top and side moldings from the windshield.
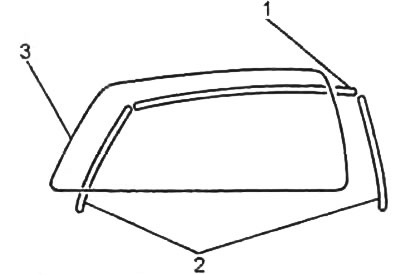


1 - top molding,

1 - top molding,
2 - side molding,
3 - windshield.
This article is available at: russian, bulgarian, belarusian, ukrainian, serbian, croatian, romanian, polish, slovak, hungarian
This text was checked by: Vladimir Bazhenov
Share with friends on social networks:

Previous
Mazda BT-50 (1) » Exterior (external elements)
Next

Fuel filler flap
Disassembling and assembling the rear luggage compartment door
Adjusting the position of the rear luggage compartment door
Removal and installation the window lift handle
Removal and installation front door glass
Windshield — installation
Rear window
Body dimensions
More articles on repairing other Mazda models
Removal and installation the windshield wiper Mazda Familia 5 (1985-1989)
Inspection and replacement of windshield wipers Mazda Capella 3 (1982-1992, petrol)
Windshield defroster mode Mazda3 BK (2003-2009)
Windshield defroster mode Mazda6 GG (2002-2008)
Windshield washer Mazda CX-5KE (2012-2017)
Link in different formats to this article
Comments and feedback from visitors
No comments yet


How much will 27 + 40 ?


Mazda BT-50 (1) (2006-2011) 
  • General information
  • Introduction to guide
  • User manual
  • Maintenance
  • Power unit
  • Engine repair (diesel)
  • Cooling and lubrication system
  • Fuel injection system
  • Intake and exhaust system
  • Engine electrical equipment
  • Transmission
  • Clutch
  • Mechanical gearbox
  • All-wheel drive system
  • Transfer case and gearboxes
  • Chassis
  • Front suspension
  • Rear suspension
  • Steering
  • Brake system
  • Body
  • Exterior (external elements)
  • Interior (internal elements)
  • Heating and air conditioning
  • Security system SRS
  • Electrical equipment
  • Equipment and devices
  • Electrical circuits
Mazda 121 (3) (1996-2003) 
  • General information
  • User manual
  • Maintenance
  • Power unit
  • Petrol engine 1.3 l
  • Petrol engine 1.25/1.4 l
  • Diesel engine
  • Lubrication system
  • Cooling system
  • Ignition system
  • Supply system
  • Fuel injection (gasoline)
  • Fuel injection (diesel)
  • Exhaust system
  • Transmission
  • Clutch
  • Car gearbox
  • Chassis
  • Front suspension
  • Rear suspension
  • Steering
  • Brake system
  • Wheels and tires
  • Body
  • Exterior (external elements)
  • Interior (internal elements)
  • Doors, windows and locks
  • Heating system
  • Electrical equipment
  • Troubleshooting
  • Equipment and devices
  • Lighting system
  • Power devices
  • Electrical circuits
MazBook.ru © 2018–2026 · Mobile version · Articles and news · Sitemap: EN BG BY UA RS HR RO PL SK HU · Feedback · Site search · Add to bookmarks Familia 5 (BF) · Familia 6 (BG) · Capella 3 (GC) · Capella 3 and 4 (GC) · Capella 4 (GD) · Capella 5 (GE) · Capella 6 (GF) · Mazda3 BK · Mazda6 GG · CX-5KE · Mazda 121 (3) · Mazda BT-50 (1) ·
By continuing to use the site, you agree to the use of cookies 🔐