
Note:
- When using a slotted screwdriver to release the trim fasteners, wrap the screwdriver with protective tape before use to prevent damage to the trims;
- If necessary, replace damaged fasteners with new ones before installation;
- Installation is made in an order, the return to removal.
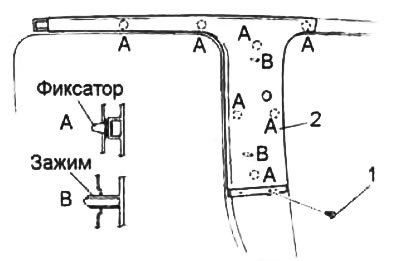
A-pillar trim
1. Remove the roof trim.
2. Pull the trim down and release the tabs "A" and pin "IN".
3. Remove finishing of a forward rack.
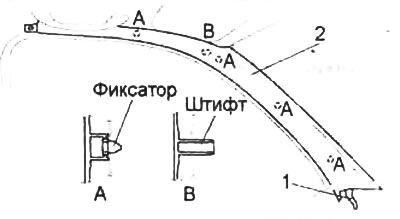
1 - clamp,
2 - finishing of the front pillar.
Front side trim
1. Remove finishing of a threshold of a forward door.
2. Loosen the nut.
3. Pull the front side trim in the direction indicated by the arrow in the figure and remove it.

1 - nut,
2 - front side trim.
Front door sill trim
1. Turn away fastening fastenings of furnish of a threshold.
2.Pull the sill trim up, disengage the pin "A" and remove trim.
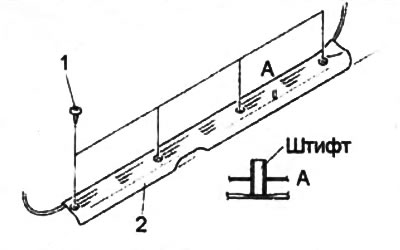
1 - screw,
2 - threshold finishing.
Rear side door sill trim
1. Turn away the screw of fastening of furnish of a threshold.
2. Pull the sill trim up, unfasten the clips "A" and pin "IN" and remove the sill trim.
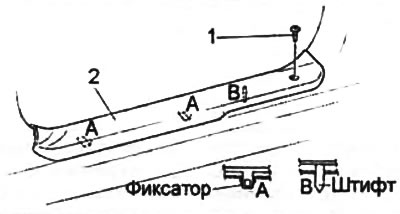
1 - screw,
2 - threshold finishing.
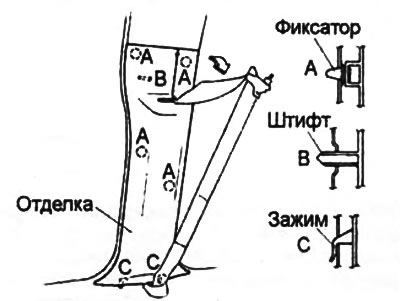
B-pillar lower trim
1. Remove finishing of a threshold of a forward door.
2. Remove finishing of a threshold of a back lateral door.
3. Fold back the edges of the side door seals.
4. Pull the bottom trim at the top edge and release the tabs "A" and pin "IN".
5. Pull the seat belt through the hole in the trim.
6.Pull the bottom trim up, detach the clips "WITH".
7. Remove the bottom furnish of a back lateral door.
B-pillar top trim
1. Remove the bottom finishing of the central rack.
2. Turn away a bolt of the top fastening of a seat belt.
3. Remove finishing of a back rack.
4. Disconnect the piston.
5. Pull the top post trim towards you, then release the clips "A" and pins "IN" trim fixings.
1 - piston,
2 - upper trim of the central pillar.
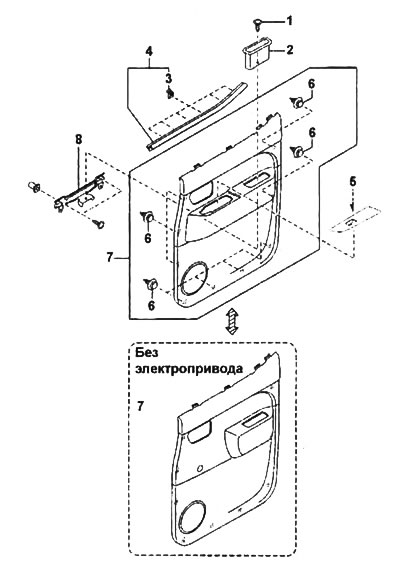
Front door trim panel
1. (Power window models) Disconnect the wire from the negative battery terminal.
2. (Models without power windows) Remove the power window handle (see section "side doors),
3. Remove the interior trim.

Front door trim panel.
1 - interior decoration,
2 - screw,
3 - finishing,
4 - sealant,
5 - power window control panel (electric models),
6 - piston,
7 - finishing panel of the door,
8 - bracket for fastening the door trim panel.
4. (Power window models) Remove the power window control panel (see section "side doors").
5. Disconnect caps and remove the finishing panel of a door.
Rear side door trim panel
1. (Power window models) Disconnect the wire from the negative battery terminal.
2. (Models without power windows) Remove the power window handle (see section "side doors).
3. (Power window models) Remove the power window control panel (see section "side doors").
4. Disconnect caps of fastening of the finishing panel of a door and remove it.
Finishing panel of the rear side door.
1 - screw,
2 - finishing,
3 - latch,
4 - sealant,
5 - power window control panel,
6 - piston,
7 - finishing panel of the door,
8 - bracket for fastening the door trim panel.
C-pillar trim
1. Fold back the edge of the rear side door opening seal.
2. Remove the rear seats (see section "seats").
3. Turn away a bolt of the top fastening of a seat belt of a back seat (see section "Seat belts").
4. Disconnect the caps.
5. Pull the C-pillar trim towards you, then release the clips "A" and pin "IN".
6. Carefully remove the rear pillar trim.
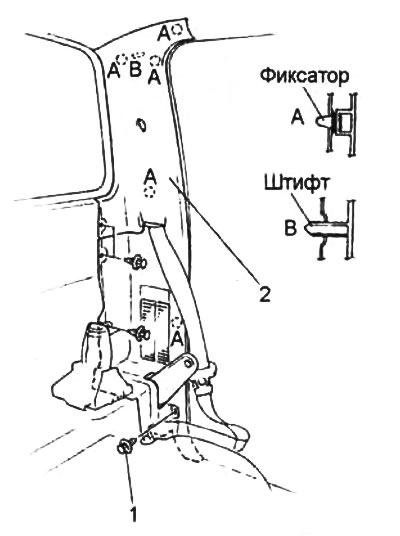
1 - piston,
2 - rear pillar trim.
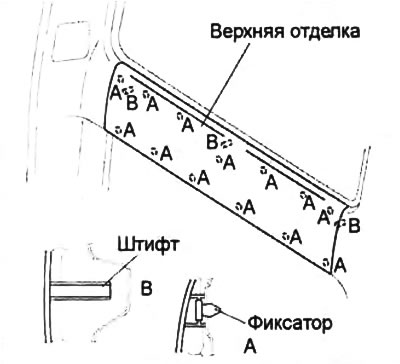
Rear upper trim
1. Insert a slotted screwdriver into the gap between the rear window seal and the rear trim.
2. Pull the trim towards you and release the clips "A" and pins "IN" mounts.
3. Remove the rear top trim.
Rear lower trim
1. Remove the upper rear trim.
2. Disconnect the caps.
3. Remove the rear lower trim.
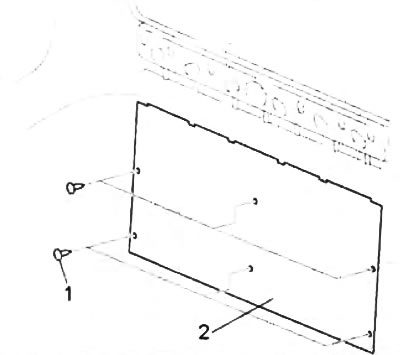
1 - piston,
2 - rear lower trim.