
Note:
- When removing and installing the instrument panel, follow the assembly drawing "Dashboard", and when disassembling and assembling, follow the assembly drawing "Disassembly and assembly of the instrument panel".
- The pictures show the instrument panel for Mazda BT-50. The layout of the Ford Ranger dashboard components is similar.
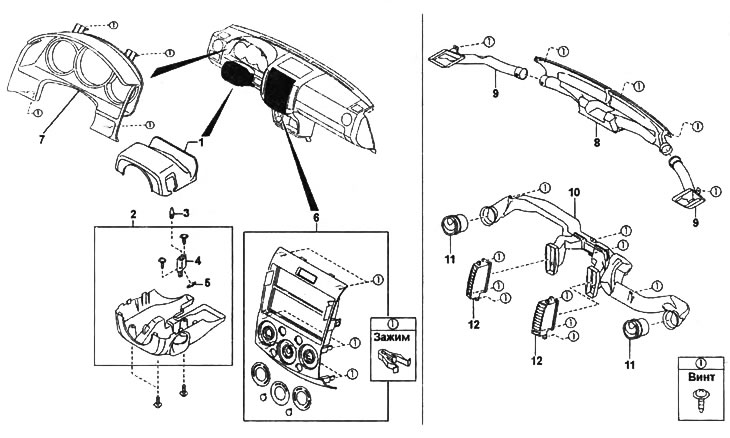
Dashboard.
1 - the upper part of the casing of the steering column,
2 - the lower part of the casing of the steering column,
3 - lamp,
4 - lamp socket,
5 - diffuser,
6 - central trim of the instrument panel,
7 - instrument cluster,
8 - windshield heating deflector,
9 - side air duct,
10 - central air duct,
11, 12 - ventilation grille.
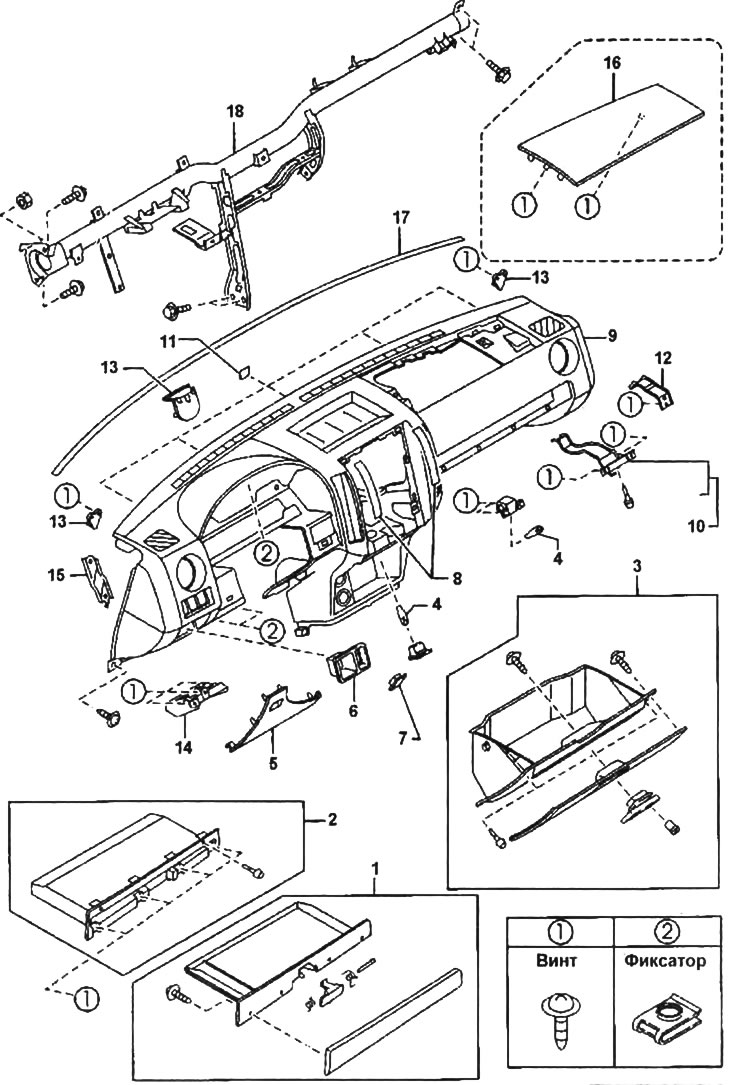
Disassembly and assembly of the instrument panel.
1 - top glove box cover,
2 - cover,
3 - glove box,
4 - glove box illumination lamp,
5 - lower trim of the instrument panel on the driver's side,
6 - switch panel trim,
7 - microphone trim,
8 - overlay,
9 - instrument panel,
10 - instrument panel holder,
11 - spacer,
12 - bracket,
13 - holder,
14 - bracket,
15 - amplifier,
16 - upper overlay of the instrument panel,
17 - finishing,
18 - instrument panel amplifier.
1. Disconnect a wire from the negative plug of the storage battery.
2. Remove the driver's airbag (see chapter "Passive safety system (SRS)").
3. Remove the front passenger airbag (see chapter "Passive safety system (SRS)").
4. Remove the steering wheel (see chapter "Steering").
5. Turn away bolts of fastening of a steering shaft and lower it (see chapter "Steering").
6. Remove finishing of a combination of devices.
7. Remove a combination of devices.
8. Remove the center console (see section "center console").
9. Remove a ware box.
10. Turn away a nut of fastening of a cable of a drive of the lock of a cowl.
11. Remove trim front pillars (see section "Interior trim").
12. Disconnect the fan unit and heater unit cables (see chapter "Air conditioning, heating and ventilation").
13. Remove the fuse box.
14. Turn away bolts and remove the panel of devices.
- Tightening torque - 8-12 Nm
Note: Do not remove the instrument panel alone, it may fall and injure you.
15. If necessary, disassemble the instrument panel.
16. If necessary, remove the amplifier of the panel of devices, having turned away bolts of fastening.
- Tightening torque - 16-22 Nm
17. Installation is made in an order, the return to removal.
18. After installation, adjust the position of the cables of the fan unit and heater unit (see chapter "Air conditioning, heating and ventilation").