
MazBook.ru
English Русский
Български
Беларускі
Український
Српски
Hrvatski
Română
Polski
Slovenský
Magyar
• Bookmark • Sitemap • Contacts •   
Cars Opel Cars Ford Cars Volkswagen Cars Audi Cars Kia Cars Renault Cars Peugeot


Familia Capella Mazda3 Mazda6 CX-? Others Articles
Mazda 121 (3) (1996-2003) Mazda BT-50 (1) (2006-2011)

Hood — adjustment (Mazda BT-50 (1))

  • Home
  • Mazda
  • BT-50 J97M (2006-2011)
  • Body
  • Exterior (external elements)
  • Hood — adjustment
0
1. Checking the position of the hood.

a) Measure the gaps between the hood and the car body as shown in the figure "Adjusting the hood".
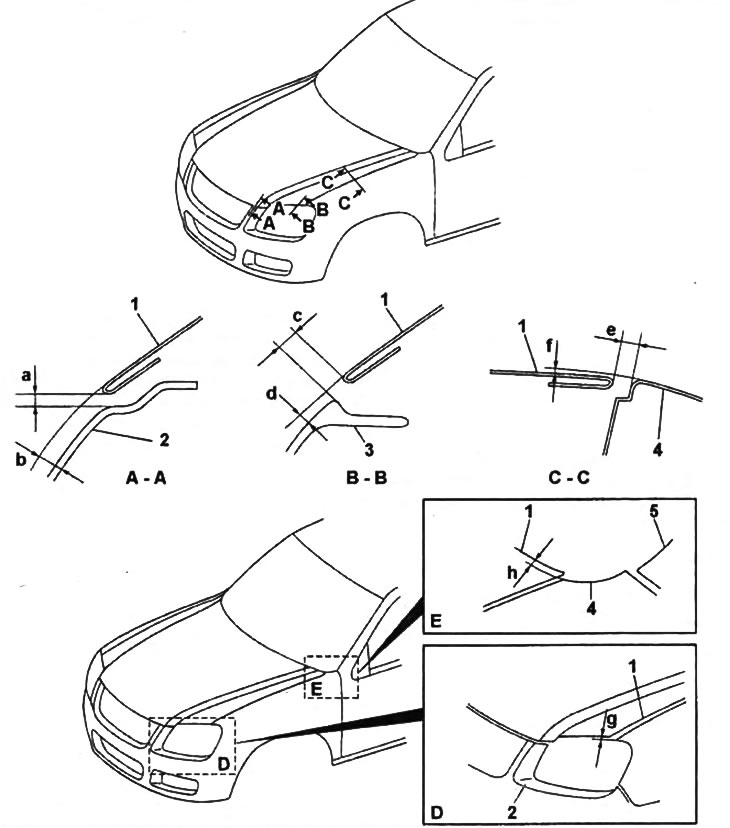
Adjusting the hood.

Adjusting the hood.
1 - hood,
2 - front bumper,
3 - headlight,
4 - front wing,
5 - front door.


b) Compare the obtained values with the nominal values given in the table "Bonnet adjustment".

Table. Hood adjustment.
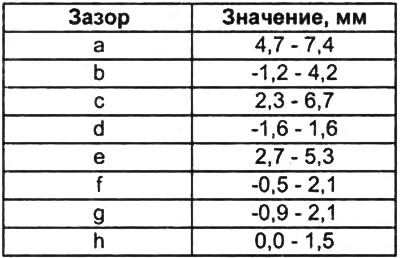
Table. Hood adjustment.

c) If the measured values do not correspond to those specified, the position of the hood must be adjusted.

2. Adjusting the position of the hood.

Adjusting horizontal clearances

a) Open the hood and loosen the hood hinge bolts.

b) Adjust the position of the hood by moving it forward and backward and left and right.
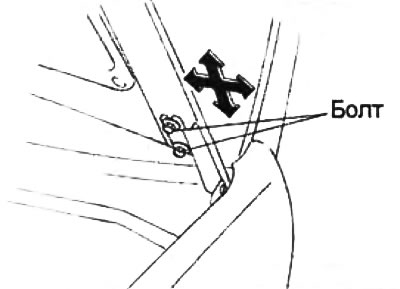
b) Adjust the position of the hood by moving it forward and backward and left and right.


c) Tighten the bolts after adjustment.


Adjusting vertical clearances

a) Remove the radiator grille.

b) Turn the adjusting pad until the protrusion fits into the groove as shown in the figure.
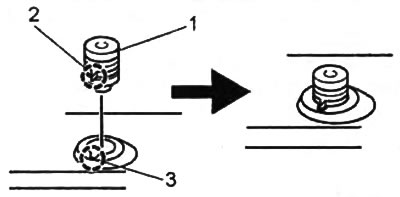
1 - pillow,

1 - pillow,
2 - ledge,
3 - groove.


c) Turn the adjustment pad until it is lowered 3 mm from the previously set position, as shown in the figure.
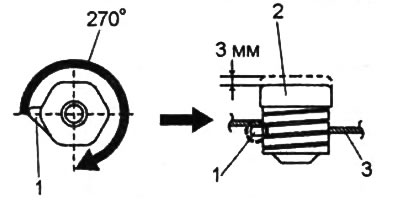
1 - protrusion,

1 - protrusion,
2 - adjustment cushion,
3 - amplifier.


d) Loosen the hood lock mounting bolts and nut and move the hood lock to the upper position.
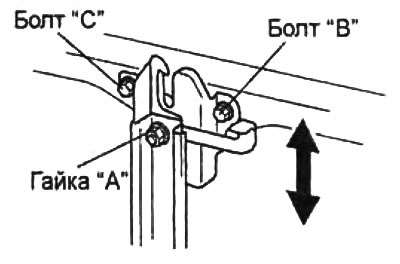
d) Loosen the hood lock mounting bolts and nut and move the hood lock to the upper position.


d) Tighten the hood lock mounting bolts.


e) Close the hood and loosen the lock mounting bolts.

g) Pull the lock slightly by hand and move it downwards so that the gap between the lock and the lock bracket is not excessively large. Tighten nut "A", then bolts "B" and "C".

h) Make sure there is no gap between the hood and the adjusting cushions.

The original article is on [MAZBOOK]

i) Open the hood.

c) Install all removed parts.
This article is available at: russian, bulgarian, belarusian, ukrainian, serbian, croatian, romanian, polish, slovak, hungarian
This text was checked by: Vladimir Bazhenov
Share with friends on social networks:

Previous
Mazda BT-50 (1) » Exterior (external elements)
Next

Front wing — device
Front wing — removal and installation
Rear bumper — removal and installation
Removal and installation the front bumper reinforcement
Disassembling and assembling the front bumper
Hood — removal and installation
Ventilation grille — removal and installation
Side doors — removal and installation
Adjusting the position of the side doors
Disassembly and assembly of the door mounting panel
More articles on repairing other Mazda models
Removal and installation / adjustment of the hood Mazda Familia 6 (1989-1994)
Hood — removal, installation and adjustment Mazda Capella 3 and 4 (1982-1992)
Opening and closing the hood Mazda3 BK (2003-2009)
Opening and closing the hood Mazda6 GG (2002-2008)
Hood — General Information Mazda CX-5KE (2012-2017)
Link in different formats to this article
Comments and feedback from visitors
No comments yet


How much will 41 + 19 ?


Mazda BT-50 (1) (2006-2011) 
  • General information
  • Introduction to guide
  • User manual
  • Maintenance
  • Power unit
  • Engine repair (diesel)
  • Cooling and lubrication system
  • Fuel injection system
  • Intake and exhaust system
  • Engine electrical equipment
  • Transmission
  • Clutch
  • Mechanical gearbox
  • All-wheel drive system
  • Transfer case and gearboxes
  • Chassis
  • Front suspension
  • Rear suspension
  • Steering
  • Brake system
  • Body
  • Exterior (external elements)
  • Interior (internal elements)
  • Heating and air conditioning
  • Security system SRS
  • Electrical equipment
  • Equipment and devices
  • Electrical circuits
Mazda 121 (3) (1996-2003) 
  • General information
  • User manual
  • Maintenance
  • Power unit
  • Petrol engine 1.3 l
  • Petrol engine 1.25/1.4 l
  • Diesel engine
  • Lubrication system
  • Cooling system
  • Ignition system
  • Supply system
  • Fuel injection (gasoline)
  • Fuel injection (diesel)
  • Exhaust system
  • Transmission
  • Clutch
  • Car gearbox
  • Chassis
  • Front suspension
  • Rear suspension
  • Steering
  • Brake system
  • Wheels and tires
  • Body
  • Exterior (external elements)
  • Interior (internal elements)
  • Doors, windows and locks
  • Heating system
  • Electrical equipment
  • Troubleshooting
  • Equipment and devices
  • Lighting system
  • Power devices
  • Electrical circuits
MazBook.ru © 2018–2026 · Mobile version · Articles and news · Sitemap: EN BG BY UA RS HR RO PL SK HU · Feedback · Site search · Add to bookmarks Familia 5 (BF) · Familia 6 (BG) · Capella 3 (GC) · Capella 3 and 4 (GC) · Capella 4 (GD) · Capella 5 (GE) · Capella 6 (GF) · Mazda3 BK · Mazda6 GG · CX-5KE · Mazda 121 (3) · Mazda BT-50 (1) ·
By continuing to use the site, you agree to the use of cookies 🔐