
MazBook.ru
English Русский
Български
Беларускі
Український
Српски
Hrvatski
Română
Polski
Slovenský
Magyar
• Bookmark • Sitemap • Contacts •   
Cars Opel Cars Ford Cars Volkswagen Cars Audi Cars Kia Cars Renault Cars Peugeot


Familia Capella Mazda3 Mazda6 CX-? Others Articles
CX-5KE (2012-2017)

Removal and installation the clutch mechanism (Mazda CX-5KE)

  • Home
  • Mazda CX-?
  • CX 5 KE (2012-2017)
  • Transmission
  • Clutch
  • Removal and installation the clutch mechanism
0
Contents: Removal ⇓ Installation ⇓
Note: Removal and installation of the clutch mechanism is shown using the example of the C66M-R, C66MX-R clutch.
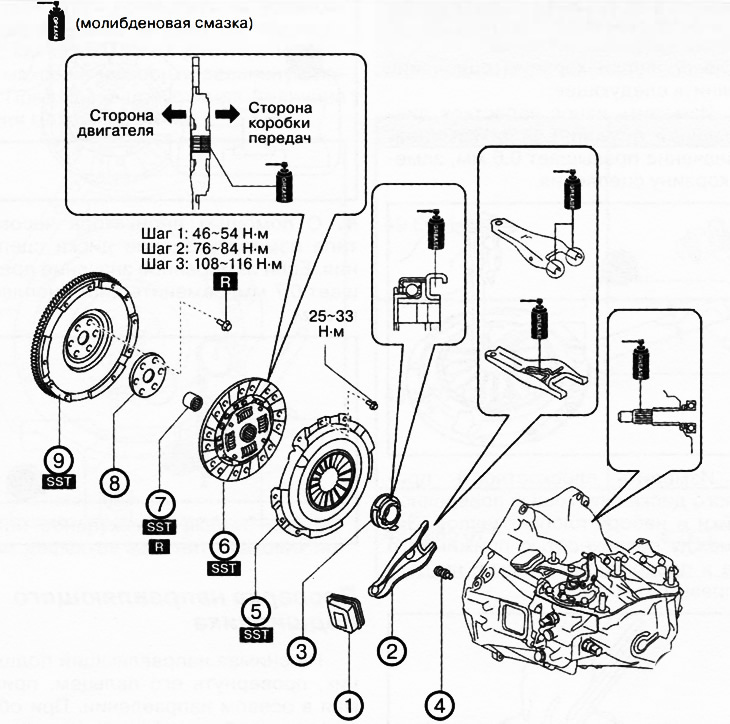

1. Dust cover.

1. Dust cover.
2. Clutch release fork.
3. Clutch release bearing.
4. Support pin.
5. Clutch basket.
6. Clutch disc.
7. Guide bearing.
8. Disc.
9. Flywheel.


Note:

: replace the part with a new one after each removal.

: use a special tool or device.


Based on website data [MAZBOOK.ru]


Removal


1. Disconnect the negative battery terminal.

2. Remove the manual gearbox assembly.

3. Remove the clutch basket and disc:

Using a special device, secure the clutch mechanism.
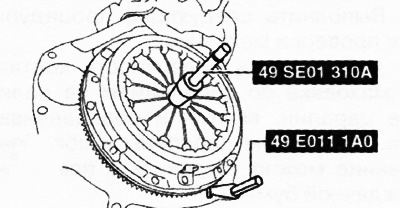
Using a special device, secure the clutch mechanism.


Loosen each bolt in a crisscross pattern by one turn at a time to relieve spring tension.

Remove the clutch basket and disc.

4. If necessary, remove the clutch guide bearing using a special tool.
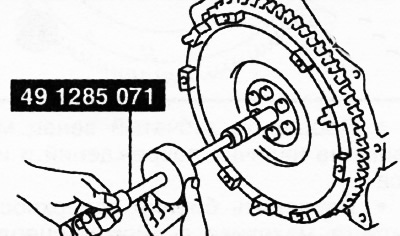
4. If necessary, remove the clutch guide bearing using a special tool.


Note: The guide bearing should only be removed for replacement.


5. Remove the flywheel:

Having secured the flywheel with a special device, unscrew the mounting bolts in the specified sequence and remove the flywheel with the disk.
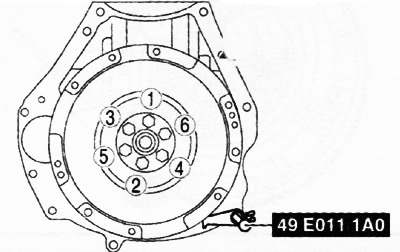
Having secured the flywheel with a special device, unscrew the mounting bolts in the specified…


Check for leaks through the rear crankshaft oil seal. If necessary, replace the rear crankshaft oil seal with a new one.


Installation


1. Install the flywheel:
  • Clean the threaded holes of the crankshaft.
  • Install the flywheel with the disk on the crankshaft and tighten the new bolts.
  • Fix the flywheel using a special device.

Fully tighten the flywheel mounting bolts in the sequence shown in the figure in three stages.
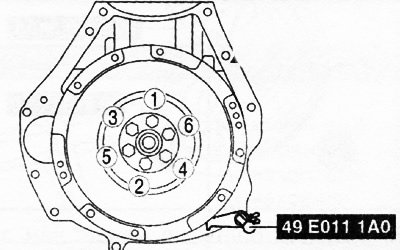
Fully tighten the flywheel mounting bolts in the sequence shown in the figure in three stages.


Tightening the flywheel mounting bolts:
  • Stage 1: 46-54 Nm
  • Stage 2: 76-84 Nm
  • Stage 3: 108-116 Nm.

2. If removed, install a new clutch guide bearing in the required position using the A160M7 adapter (20-22 mm) from the A160M kit. To do this, position the 20 mm side of the A160M7 adapter against the guide bearing. You can also use any other mandrel or socket with an outer diameter of 21 mm and an inner diameter of 19 mm.

2. If removed, install a new clutch guide bearing in the required position using the A160M7 adapter…


Note: Distance A to the guide bearing from the end of the crankshaft: 1.5-2.5 mm.
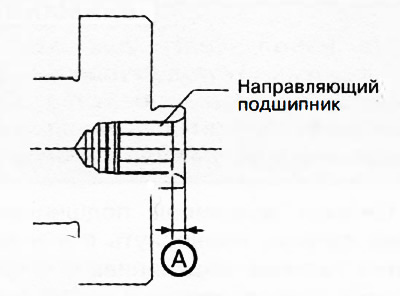


Note: Distance A to the guide bearing from the end of the crankshaft: 1.5-2.5 mm.


3. Install the clutch disc and basket using a special centering rod.
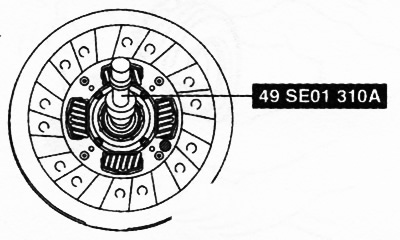
3. Install the clutch disc and basket using a special centering rod.


4. Secure the clutch mechanism from turning using a special device.
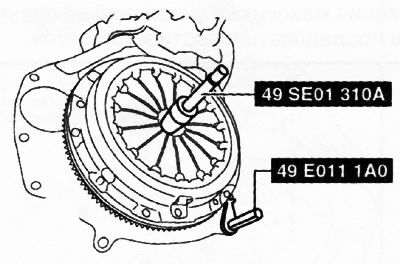
4. Secure the clutch mechanism from turning using a special device.


5. Tighten the bolts in at least two steps:

Tighten the bolts in the sequence shown in the figure.
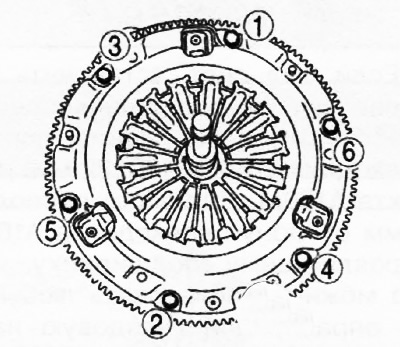
Tighten the bolts in the sequence shown in the figure.


Fully tighten the bolts in the sequence shown in the figure to a torque of 25-33 Nm


6. Remove special devices.

7. Further installation is carried out in the reverse order of removal. After installation, fill the required amount of transmission oil into the gearbox.
This article is available at: russian, bulgarian, belarusian, ukrainian, serbian, croatian, romanian, polish, slovak, hungarian
This text was checked by: Evgeny Mereshnikov
Share with friends on social networks:

Previous
CX-5KE » Clutch
Next

Removal and installation the clutch slave cylinder
Removal and installation of hydraulic clutch lines and hoses
Removal and installation the clutch travel sensor
Removal and installation the clutch master cylinder
Removal and installation the starter interlock switch
Checking the clutch mechanism components
Special tools and accessories
More articles on repairing other Mazda models
Details of the clutch mechanism and its drive Mazda Familia 5 (1985-1989)
Clutch mechanism components — removal and installation Mazda Capella 5 (1991-1997)
Valve mechanism — general information Mazda3 BK (2003-2009)
Valve mechanism — general information Mazda6 GG (2002-2008)
Camshaft/Diesel Valve Drive Mechanism Mazda 121 (3) (1996-2003)
Link in different formats to this article
Comments and feedback from visitors
No comments yet


How much will 43 + 25 ?


CX-5KE (2012-2017) 
  • General information
  • Introduction to the guide
  • User manual
  • Maintenance
  • Power unit
  • Petrol engines 2.0 l
  • Petrol engines 2.5 l
  • Diesel engines 2.2 l
  • Cooling system
  • Lubrication system
  • Supply system
  • Control system
  • Intake and exhaust system
  • Engine electrical equipment
  • Transmission
  • Clutch
  • Mechanical gearbox
  • Automatic gearbox
  • Transfer case
  • Drive shafts and cardan
  • Chassis
  • Wheels and tires
  • Front suspension
  • Rear suspension
  • Brake system
  • Steering
  • Body
  • Exterior (external elements)
  • Interior (internal elements)
  • Security systems
  • Heating and air conditioning
  • Electrical equipment
  • Equipment and devices
  • Electrical circuits
MazBook.ru © 2018–2026 · Mobile version · Articles and news · Sitemap: EN BG BY UA RS HR RO PL SK HU · Feedback · Site search · Add to bookmarks Familia 5 (BF) · Familia 6 (BG) · Capella 3 (GC) · Capella 3 and 4 (GC) · Capella 4 (GD) · Capella 5 (GE) · Capella 6 (GF) · Mazda3 BK · Mazda6 GG · CX-5KE · Mazda 121 (3) · Mazda BT-50 (1) ·
By continuing to use the site, you agree to the use of cookies 🔐