
MazBook.ru
English Русский
Български
Беларускі
Український
Српски
Hrvatski
Română
Polski
Slovenský
Magyar
• Bookmark • Sitemap • Contacts •   
Cars Opel Cars Ford Cars Volkswagen Cars Audi Cars Kia Cars Renault Cars Peugeot


Familia Capella Mazda3 Mazda6 CX-? Others Articles
CX-5KE (2012-2017)

Removal and installation the clutch master cylinder (Mazda CX-5KE)

  • Home
  • Mazda CX-?
  • CX 5 KE (2012-2017)
  • Transmission
  • Clutch
  • Removal and installation the clutch master cylinder
0
Contents: Removal ⇓ Installation ⇓
Attention.
  • Fix the steering wheel with tape or wire to prevent the steering shaft from turning after disconnecting. If the steering wheel is turned after the steering shaft is disconnected from the steering gear, the internal parts of the contact disk may be damaged.
  • Do not allow brake fluid to come into contact with painted surfaces. This fluid contains substances that can dissolve the body paint. If brake fluid comes into contact with a painted surface, it is necessary to immediately wash it off with plenty of water and wipe the surface thoroughly.


Removal


1. Disconnect the negative battery terminal.

2. Remove the air filter with the air duct.

3. Remove the battery from the shelf.

4. Remove the bracket from the steering shaft.

5. Remove the clutch pedal position sensor.

6. Remove the starter interlock switch.

7. Remove the steering joint cover.

8. Disconnect the steering shaft from the steering gear.

9. Disconnect the pipeline with hose No.1 from the clutch master cylinder and plug the holes to prevent leakage of the clutch hydraulic fluid.

10. Disconnect the feed hose from the clutch master cylinder and plug the holes to prevent the clutch hydraulic fluid from leaking.

11. Remove the clutch master cylinder:

Loosen the mounting nuts and remove the clutch pedal with the master cylinder as one unit.
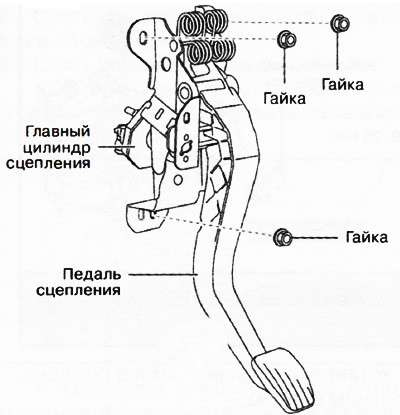
Loosen the mounting nuts and remove the clutch pedal with the master cylinder as one unit.


Rotate the clutch master cylinder in the direction of the arrow in the figure to separate the clutch master cylinder housing from the pedal.
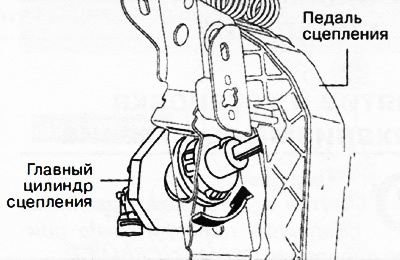


Rotate the clutch master cylinder in the direction of the arrow in the figure to separate the…


Unclip the piston rod retainers and remove the master cylinder.
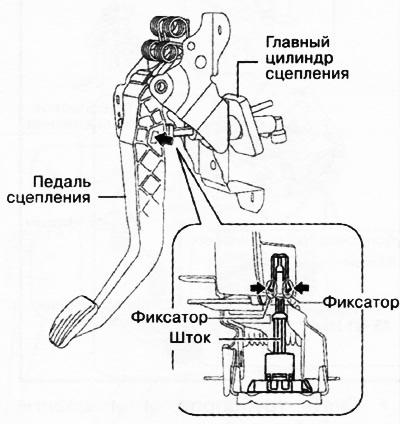
Unclip the piston rod retainers and remove the master cylinder.


Installation


1. Install the clutch master cylinder as follows:

Hook the rod retainers onto the clutch pedal as shown in the previous figure.

Turn the clutch master cylinder in the direction of the arrow in the figure until it stops.
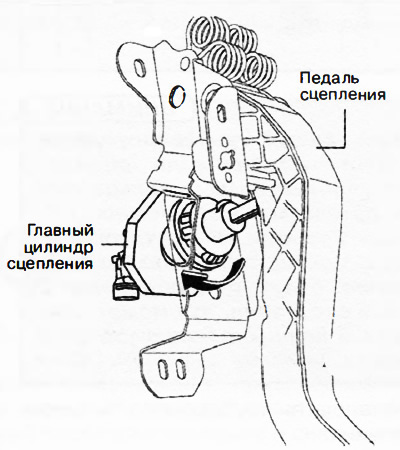
Turn the clutch master cylinder in the direction of the arrow in the figure until it stops.


Install the pedal with the clutch master cylinder as a single unit on the vehicle.
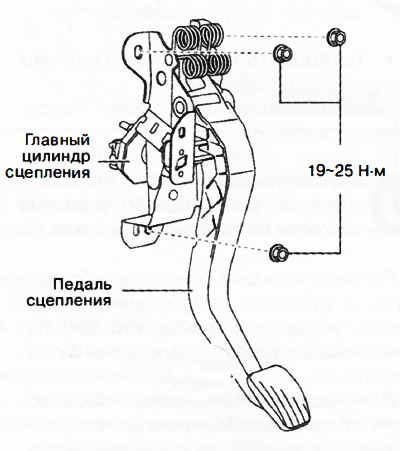


Install the pedal with the clutch master cylinder as a single unit on the vehicle.


2. Connect the feed hose to the clutch master cylinder.

3. Connect the pipeline with hose No.1 to the clutch master cylinder.

4. Connect the steering shaft and install the steering joint housing.

5. Install the steering joint cover.

6. Remove air from the clutch hydraulic system.

7. Check the clutch pedal.

8. Install a new starter interlock switch.

9. Install the new clutch pedal position sensor.

10. Install the bracket on the steering shaft.

11. Install the battery with the shelf.

12. Install the air filter with air duct.

13. Connect the negative terminal of the battery.

14. Press the clutch pedal all the way down and make sure that the engine starts.
This article is available at: russian, bulgarian, belarusian, ukrainian, serbian, croatian, romanian, polish, slovak, hungarian
This text was checked by: Evgeny Mereshnikov
Share with friends on social networks:

Previous
CX-5KE » Clutch
Next

Removal and installation the starter interlock switch
Removal and installation the clutch pedal position sensor
Removal and installation the clutch pedal
Clutch pedal
Replacing the clutch hydraulic fluid/bleeding air from the system
Removal and installation the clutch travel sensor
Removal and installation of hydraulic clutch lines and hoses
Removal and installation the clutch slave cylinder
Removal and installation the clutch mechanism
Checking the clutch mechanism components
More articles on repairing other Mazda models
Brake master cylinder and vacuum booster Mazda Familia 5 (1985-1989)
Clutch Master Cylinder — removal and installation Mazda Capella 6 (1997-2005, petrol)
Removal and installation the clutch release master cylinder Mazda3 BK (2003-2009)
Removal and installation the clutch release master cylinder Mazda6 GG (2002-2008)
Clutch master cylinder Mazda BT-50 (1) (2006-2011)
Link in different formats to this article
Comments and feedback from visitors
No comments yet


How much will 29 + 12 ?


CX-5KE (2012-2017) 
  • General information
  • Introduction to the guide
  • User manual
  • Maintenance
  • Power unit
  • Petrol engines 2.0 l
  • Petrol engines 2.5 l
  • Diesel engines 2.2 l
  • Cooling system
  • Lubrication system
  • Supply system
  • Control system
  • Intake and exhaust system
  • Engine electrical equipment
  • Transmission
  • Clutch
  • Mechanical gearbox
  • Automatic gearbox
  • Transfer case
  • Drive shafts and cardan
  • Chassis
  • Wheels and tires
  • Front suspension
  • Rear suspension
  • Brake system
  • Steering
  • Body
  • Exterior (external elements)
  • Interior (internal elements)
  • Security systems
  • Heating and air conditioning
  • Electrical equipment
  • Equipment and devices
  • Electrical circuits
MazBook.ru © 2018–2026 · Mobile version · Articles and news · Sitemap: EN BG BY UA RS HR RO PL SK HU · Feedback · Site search · Add to bookmarks Familia 5 (BF) · Familia 6 (BG) · Capella 3 (GC) · Capella 3 and 4 (GC) · Capella 4 (GD) · Capella 5 (GE) · Capella 6 (GF) · Mazda3 BK · Mazda6 GG · CX-5KE · Mazda 121 (3) · Mazda BT-50 (1) ·
By continuing to use the site, you agree to the use of cookies 🔐