
MAZDA 323 since 10/89
Removing
1. Change the position of the wheel disk relative to the hub so that the balanced wheel can be installed in its previous position.
2. Loosen the wheel nuts of the car on the ground.
3. Raise the front of the car.
4. Remove the wheel.
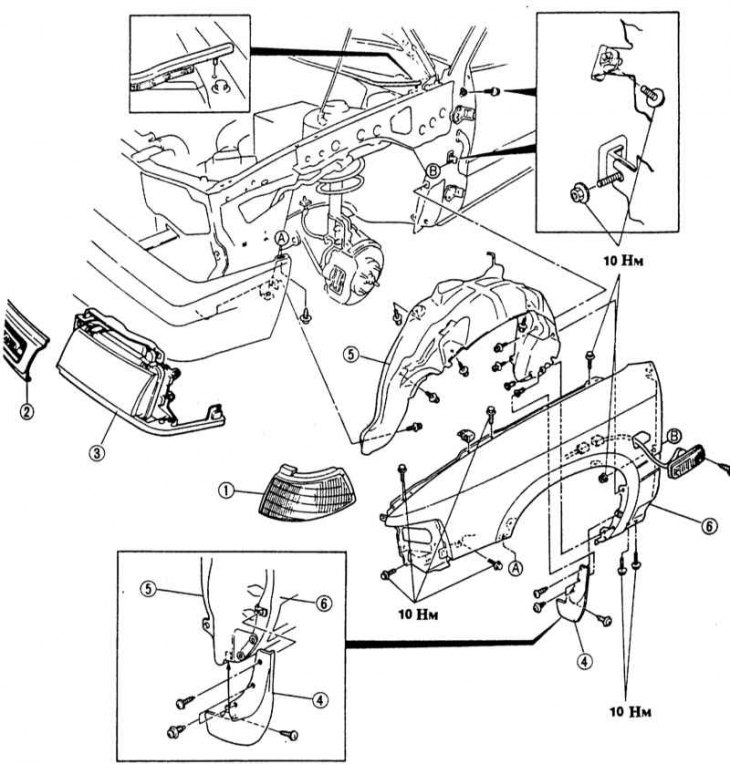
5. Remove the front direction indicator -1-, see Chapter Heater, lighting system, appliances.
6. Remove the radiator grille -2-, as well as the grille overlay, Chapter Body, car painting, car care.
7. Remove headlight -3-, Chapter Lighting system, appliances.
8. Unscrew dirt trap -4-.
9. Unscrew the locker bolts -5- from the inside, press the locker away from the wing and remove it.
10. Due to the protective mastic and sealing tape, the wing sits very firmly. To loosen the wing attachment, a hair dryer reaching at least +450°C is required. If there is no hair dryer, it is recommended to cut off the protective mastic at the joints with a knife.
Attention! Heat the vinyl protective mastic of the bottom (PVC material) lightly and for a short time. The PVC should not change color and should not blister. Otherwise, hazardous vapors are produced and corrosive hydrochloric acid is formed.
11. Carefully remove the wing step by step.
Installation
1. If necessary, paint the fender.
2. Clean the contact surfaces of the wing, straighten if necessary.
3. Coat the mounting points of the fender mounting bolts in the wheel arch and A-pillar with an anti-corrosion agent.
4. Apply standard wing sealing tape to the contact surfaces.
5. Install, align and screw the fender. At the same time, keep an even gap between the hood and fender, as well as the door and fender.
Attention! Mounting bolts (self-tapping screws) can be tightened with a force of 10 Nm, i.e. quite easily.
6. Apply bottom protection mastic to the inside of the wing.
7. Seal the locker on the fender with sealant.
8. Screw on the dirt trap.
9. Install the grille and decorative trim.
10. Install the headlight and turn signal. Adjust headlights.
11. Install the wheel, taking into account the mark on the hub. Lower the vehicle and tighten the wheel nuts crosswise with force 100 Nm.