


Contents: Removal ⇓ Installation ⇓
Attention! When the battery is disconnected, the data from the fault memory of the engine control unit, anti-lock braking system, and other constantly operating devices are erased (for example, a radio and a clock). Before switching off, read the data from the fault memory. Some radio receivers have a security code. The coding prevents unauthorized switching on of the receiver after switching off the power supply. The power supply is switched off, for example, when the battery is disconnected, when the radio receiver is removed or when the fuse fails. If the radio receiver is coded, determine the security code before switching off. If the code is unknown, only the manufacturer can switch on the receiver.
Removal
1. Switch off the ignition and vehicle lighting. This will prevent damage to the electronic control devices (for example, engine control device).
2. Open the hood. The battery is located in the engine compartment on the left side.
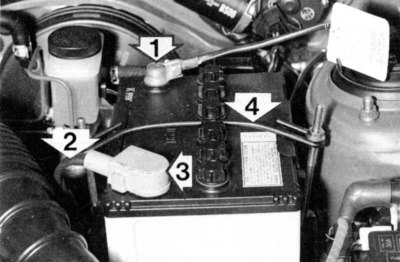
3. Disconnect the cables from the battery, first the ground cable "1", then the positive cable "2". First remove the rubber cap "3". The corresponding + and - symbols are pressed out next to the battery terminals.
4. Unscrew and remove the mounting bracket "4".
5. Remove the battery.
Warning! The battery contains toxic substances, so it should not be thrown away with household waste. Old batteries should be handed over to special points.
Installation
1. Before installation, clean the battery terminals; a brass wire brush is suitable for this. To protect against corrosion, coat the terminals with a special lubricant, such as BOSCH terminal lubricant.
2. Insert the battery.
3. Install and loosely screw the mounting bracket.
4. Connect the positive cable to the positive pole of the battery, the ground cable to the negative pole of the battery.
Warning: An incorrectly connected battery can cause significant damage to the generator and electrical equipment.
5. Place the polymer cap on the positive pole.
6. If necessary, program the radio receiver.
7. Set the time on the clock.