
MazBook.ru
English Русский
Български
Беларускі
Український
Српски
Hrvatski
Română
Polski
Slovenský
Magyar
• Bookmark • Sitemap • Contacts •   
Cars Opel Cars Ford Cars Volkswagen Cars Audi Cars Kia Cars Renault Cars Peugeot


Familia Capella Mazda3 Mazda6 CX-? Others Articles
Capella 3 (1982-1992, petrol) Capella 3 and 4 (1982-1992) Capella 4 (1987-1992) Capella 5 (1991-1997) Capella 6 (1997-2005, petrol)

Jump starting with a spare battery (Mazda Capella GC)

  • Home
  • Mazda Capella
  • Capella GC (1982-1992)
  • General information
  • User manual
  • Jump starting with a spare battery
0
Carefully!
  • Jump starting can be dangerous if done incorrectly. If the following conditions cannot be met, or if you are unsure of the outcome, it is recommended that you contact a qualified mechanic or call a towing service to get the vehicle back online.
  • Keep batteries out of reach of children as they contain sulfuric acid. Avoid any contact of the acid with skin, eyes, clothing or vehicle. If acid is spilled, all affected surfaces must be immediately and thoroughly washed with clean water. Persons who have received sulfuric acid burns should be taken to a doctor immediately; the affected areas can be washed with clean water.
  • Do not allow fire or sparks near the battery. Gases produced by the battery during operation are explosive. Do not attempt to jump start a vehicle with a spare battery if the discharged battery is frozen or has a low electrolyte level; the battery may explode. Do not use 24V power source (for example, two 12V batteries in series or one at 24V), as electrical components may be damaged.


Starting with a spare battery is done as follows:

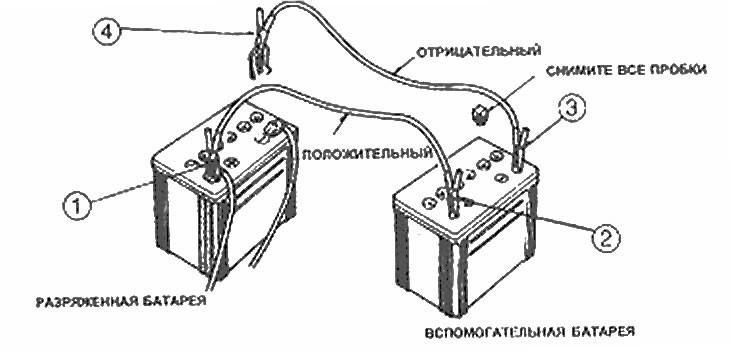
1. Make sure the spare battery is a 12V battery and that its negative terminal is grounded.

2. If using a spare battery from another vehicle, avoid contact between the two vehicles.

3. Turn off all electrical appliances when not in use.

4. Remove all caps from both batteries and place rags around the holes of both batteries.

5. Battery terminals must be connected in strict sequence. First, connect the positive terminal of the dead battery to the positive terminal of the auxiliary battery. Then connect the negative terminal of the booster battery to the negative terminal of the dead battery. Make sure that the metal clamps do not come into contact with each other and that the vehicles do not touch each other. Do not lean over the battery while connecting the contacts.


(Original version of the article on the website mazbook)

6. Start the engine of the vehicle from which you are starting and let it run for a few minutes. Then start to start the engine of the car with the discharged battery.

7. Disconnect the terminals carefully, in exactly the reverse order to that indicated in point 5.

8. Remove the rags and reattach all plugs.
8. Remove the rags and reattach all plugs.
This article is available at: russian, bulgarian, belarusian, ukrainian, serbian, croatian, romanian, polish, slovak, hungarian
This text was checked by: Evdokia Filimonova
Share with friends on social networks:

Previous
Capella 3 » User manual
Next

Hazard warning lights
Brake lining wear signal
Brake booster
Parking brake
Brake pedal
Air traffic jam
Towing for launch purposes
Towing a car
Management in Complex Environments
Rocking the car back and forth
More articles on repairing other Mazda models
A. Schemes of battery charging, starting system, heating element of… Mazda Familia 5 (1985-1989)
Starting the engine from an auxiliary battery Mazda3 BK (2003-2009)
Starting the engine from an auxiliary battery Mazda6 GG (2002-2008)
Spare wheel and tool kit Mazda CX-5KE (2012-2017)
Starting the engine from an auxiliary battery Mazda 121 (3) (1996-2003)
Link in different formats to this article
Comments and feedback from visitors
No comments yet


How much will 14 + 31 ?


Capella 6 (1997-2005, petrol) 
  • General information
  • Introduction to guide
  • User manual
  • Troubleshooting
  • Maintenance
  • Power unit
  • 4-cylinder engines
  • 6-cylinder engines
  • Engine overhaul
  • Cooling and ventilation
  • Power and exhaust systems
  • Engine electrics
  • Control system
  • Transmission
  • Mechanical gearbox
  • Automatic gearbox
  • Clutch and drive shafts
  • Chassis
  • Brake system
  • Car suspension
  • Steering
  • Body
  • Exterior (external elements)
  • Interior (internal elements)
  • Doors, windows and locks
  • Electrical equipment
  • Equipment and devices
  • Electrical circuits
Capella 5 (1991-1997) 
  • General information
  • User manual
  • Maintenance
  • Helpful hints
  • Power unit
  • Petrol engines 1.6 and 1.8
  • Petrol engines 2.0
  • 2.5 petrol engines
  • Overhaul engines 1.6 and 1.8
  • Overhaul engines 2.0 and 2.5
  • Diesel engine 2.0
  • Engine electrics
  • Cooling system
  • Air conditioner
  • Carburetor Nikki 30/34
  • Power system (1.6 and 1.8)
  • Power system (2.0 and 2.5)
  • Control system
  • Transmission
  • Mechanical gearbox
  • Automatic gearbox
  • Clutch and axles
  • Chassis
  • Brake system
  • Suspension and wheels
  • Steering
  • Body
  • Exterior (external elements)
  • Interior (internal elements)
  • Doors and windows
  • Electrical equipment
  • Equipment and devices
  • Electrical circuits
Capella 4 (1987-1992) 
  • General information
  • Introduction to manual
  • Vehicle specifications
  • Power unit
  • Engine repair
  • Lubrication system
  • Cooling system
  • Fuel system (carburetor)
  • Fuel injection (FE)
  • Fuel injection (DOHC)
  • Fuel system (diesel)
  • Ignition system
  • Transmission
  • Clutch
  • Gearbox
  • Drive shafts
  • Chassis
  • Front suspension
  • Rear suspension
  • Steering system
  • Brake system
  • Electrical equipment
  • Equipment and devices
  • Electrical circuits
Capella 3 and 4 (1982-1992) 
  • General information
  • User manual
  • Maintenance
  • Power unit
  • Gasoline engine
  • Engine overhaul (gasoline)
  • Diesel engine
  • Cooling and heating
  • Supply system
  • Ignition system
  • Emission reduction
  • Transmission
  • Clutch
  • Mechanical gearbox
  • Automatic gearbox
  • Drive shafts
  • Chassis
  • Brake system
  • Suspension and wheels
  • Steering
  • Body
  • Exterior (external elements)
  • Interior (internal elements)
  • Electrical equipment
  • Equipment and devices
  • Power devices
  • Electrical circuits
Capella 3 (1982-1992, petrol) 
  • General information
  • User manual
  • Maintenance
  • Troubleshooting
  • Late models
  • Power unit
  • Engine in car
  • Engine overhaul
  • Cooling and heating system
  • Fuel and exhaust system
  • Engine electrical system
  • Emission control system
  • Transmission
  • Mechanical gearbox
  • Automatic gearbox
  • Clutch and drive shafts
  • Chassis
  • Brake system
  • Suspension and wheels
  • Steering
  • Body
  • Exterior (external elements)
  • Interior (internal elements)
  • Electrical equipment
  • Equipment and devices
  • Lighting and lamps
  • Electrical circuits
MazBook.ru © 2018–2026 · Mobile version · Articles and news · Sitemap: EN BG BY UA RS HR RO PL SK HU · Feedback · Site search · Add to bookmarks Familia 5 (BF) · Familia 6 (BG) · Capella 3 (GC) · Capella 3 and 4 (GC) · Capella 4 (GD) · Capella 5 (GE) · Capella 6 (GF) · Mazda3 BK · Mazda6 GG · CX-5KE · Mazda 121 (3) · Mazda BT-50 (1) ·
By continuing to use the site, you agree to the use of cookies 🔐