


Car engine repair Mazda 626 (4)
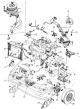
Removal and installation the engine
The engine and gearbox are lifted up out of the car. This job requires a lifting mechanism, but the engine can be lifted without the help of two strong people. The...
The engine and gearbox are lifted up out of the car. This job requires a lifting mechanism, but the engine can be lifted without the help of two strong people. The...

Disassembling the engine
Before starting work, it is necessary to thoroughly clean all external surfaces of the engine. Before doing this, cover all engine openings with a clean cloth to prevent...
Before starting work, it is necessary to thoroughly clean all external surfaces of the engine. Before doing this, cover all engine openings with a clean cloth to prevent...

Gasoline engine (except DOHC engine)
Remove the oil level indicator. Unscrew the power steering pump console. Remove the ignition distributor. To do this, remove the spark plug wires one by one (the wires...
Remove the oil level indicator. Unscrew the power steering pump console. Remove the ignition distributor. To do this, remove the spark plug wires one by one (the wires...

Disassembling a DOHC engine
Disassembly of this engine is carried out in the same way as described for the standard engine. The difference, of course, is in the steering due to the installation of...
Disassembly of this engine is carried out in the same way as described for the standard engine. The difference, of course, is in the steering due to the installation of...

Disassembling a diesel engine
The cylinder block of a diesel engine is removed in the same way as the block of a gasoline engine, but on the other hand, the main difference is in the parts that...
The cylinder block of a diesel engine is removed in the same way as the block of a gasoline engine, but on the other hand, the main difference is in the parts that...

Engine assembly
Just like disassembly, engine assembly is described in separate operations and you need to read the following chapters. The assembly sequence is the opposite of...
Just like disassembly, engine assembly is described in separate operations and you need to read the following chapters. The assembly sequence is the opposite of...
Removal the cylinder head
The cylinder head can be removed with the engine installed, and this work will be discussed in the following description. If the engine is already disassembled, you can...
The cylinder head can be removed with the engine installed, and this work will be discussed in the following description. If the engine is already disassembled, you can...

Disassembling the cylinder head
The following description applies to all engines. Details can be found in the relevant drawings regarding disassembling the cylinder head: Clamp the cylinder head in a...
The following description applies to all engines. Details can be found in the relevant drawings regarding disassembling the cylinder head: Clamp the cylinder head in a...

Inspection of the cylinder head
Check all cylinder parts for wear. Clean the cylinder head surfaces thoroughly (sometimes from the remnants of a previous compaction) - for this you need to use a...
Check all cylinder parts for wear. Clean the cylinder head surfaces thoroughly (sometimes from the remnants of a previous compaction) - for this you need to use a...

Cylinder head assembly
All cylinder head parts must be thoroughly cleaned and carefully laid out on the workbench in such an order that assembly can be carried out correctly. It is necessary...
All cylinder head parts must be thoroughly cleaned and carefully laid out on the workbench in such an order that assembly can be carried out correctly. It is necessary...

Installing the cylinder head
Insert the cylinder head gasket, but ensure that the valves and openings in the block are not covered by the gasket. Ensure that proper sealing has been applied. You...
Insert the cylinder head gasket, but ensure that the valves and openings in the block are not covered by the gasket. Ensure that proper sealing has been applied. You...

Checking and setting valve clearances
Valve clearance should only be set on standard 8-valve engines and diesel engines. 12-valve and DOHC engines are equipped with hydraulic valve clearance adjustment...
Valve clearance should only be set on standard 8-valve engines and diesel engines. 12-valve and DOHC engines are equipped with hydraulic valve clearance adjustment...
Cylinder compression control
If it is determined that a cylinder no longer has the compression or compression pressure it had when it left the factory, a compression pressure tester can be purchased...
If it is determined that a cylinder no longer has the compression or compression pressure it had when it left the factory, a compression pressure tester can be purchased...

Pistons and connecting rods — removal and disassembly
The pistons and connecting rods are knocked out from the inside of the cylinder block upwards using the handle of a hammer, after the connecting rod caps and bearing...
The pistons and connecting rods are knocked out from the inside of the cylinder block upwards using the handle of a hammer, after the connecting rod caps and bearing...

Measuring cylinder bores
To measure the cylinder bores, a dial indicator is required (figure 81). with which you can measure the inside and bottom of the hole. If there is no pointer indicator,...
To measure the cylinder bores, a dial indicator is required (figure 81). with which you can measure the inside and bottom of the hole. If there is no pointer indicator,...

Pistons and connecting rods
Figure 84. Assembly drawing of the piston with connecting rod, as they are installed in a standard engine with 8 or 12 valves. On DOHC and diesel engines, the piston pin...
Figure 84. Assembly drawing of the piston with connecting rod, as they are installed in a standard engine with 8 or 12 valves. On DOHC and diesel engines, the piston pin...

Assembly of pistons and connecting rods
2.5.4. Measuring the operating clearance of the connecting rod bearing This work is described in the section on the crankshaft. 2.5.5. Assembly of pistons and connecting...
2.5.4. Measuring the operating clearance of the connecting rod bearing This work is described in the section on the crankshaft. 2.5.5. Assembly of pistons and connecting...

Installing pistons and connecting rods
Lubricate the cylinder bores well. Lay out all connecting rods according to cylinder numbers. The forward markings on the connecting rod and the piston side (with the...
Lubricate the cylinder bores well. Lay out all connecting rods according to cylinder numbers. The forward markings on the connecting rod and the piston side (with the...

Cylinder block
When completely disassembling the cylinder block, thoroughly clean and remove all foreign objects from the cavities and oil holes. Particular care must be taken to...
When completely disassembling the cylinder block, thoroughly clean and remove all foreign objects from the cavities and oil holes. Particular care must be taken to...

Crankshaft and flywheel — inspection of parts
Carefully inspect the crankshaft for defects and measure the main and connecting rod bearing journals. The crankshaft main bearing journals and crankshaft connecting rod...
Carefully inspect the crankshaft for defects and measure the main and connecting rod bearing journals. The crankshaft main bearing journals and crankshaft connecting rod...

Crankshaft axial clearance control
Install a dial indicator using a bracket in front of the front of the cylinder block to position the dial indicator pin in the crankshaft end journal (figure 99). Figure...
Install a dial indicator using a bracket in front of the front of the cylinder block to position the dial indicator pin in the crankshaft end journal (figure 99). Figure...
Installing the crankshaft
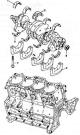
Using the drawing 100: Dry the blind holes and insert the inserts with lubrication grooves and a guide protrusion into the groove of the blind holes. Lubricate the...
Using the drawing 100: Dry the blind holes and insert the inserts with lubrication grooves and a guide protrusion into the groove of the blind holes. Lubricate the...

Crankshaft sealing rings
The front and rear crankshaft rings must be replaced whenever the crankshaft, oil pump or O-ring flanges are removed. The front flange also serves as the oil pump...
The front and rear crankshaft rings must be replaced whenever the crankshaft, oil pump or O-ring flanges are removed. The front flange also serves as the oil pump...

Flywheel and drive pulley
Figure 105 shows the location of the flywheel and drive pulley on a gasoline engine. Diesel engines use similar parts. To release the flywheel or drive pulley, they must...
Figure 105 shows the location of the flywheel and drive pulley on a gasoline engine. Diesel engines use similar parts. To release the flywheel or drive pulley, they must...
Drive and camshaft
The drive to the overhead camshaft is accomplished via a belt drive and one drive gear each on the camshaft and crankshaft. The oil and water pump are driven by a...
The drive to the overhead camshaft is accomplished via a belt drive and one drive gear each on the camshaft and crankshaft. The oil and water pump are driven by a...

Removal and installation the timing belt
2.8.1.1. Standard engine Using Figure 106: Remove the spark plug drive and unscrew the spark plugs. Unscrew the shield (2) on the side of the engine. Loosen the V-belt...
2.8.1.1. Standard engine Using Figure 106: Remove the spark plug drive and unscrew the spark plugs. Unscrew the shield (2) on the side of the engine. Loosen the V-belt...

Exhaust gas system
2.9.1. Removing and installing the exhaust manifold When removing and installing the exhaust manifold, observe the following points: The nuts connecting the flanges...
2.9.1. Removing and installing the exhaust manifold When removing and installing the exhaust manifold, observe the following points: The nuts connecting the flanges...
This section is available on: russian, bulgarian, belarusian, ukrainian, serbian, croatian, romanian, polish, slovak, hungarian
More sections on repairs of other Mazda models
• Power unit: Engine repair (gasoline) Mazda3 BK (2003-2009)
• Power unit: Engine repair Mazda6 GG (2002-2008)
• Power unit: Engine repair (gasoline) Mazda3 BK (2003-2009)
• Power unit: Engine repair Mazda6 GG (2002-2008)
Link in different formats to this section
TEXTHTMLBB Code
- General information
- Introduction to guide
- User manual
- Troubleshooting
- Maintenance
- Power unit
- 4-cylinder engines
- 6-cylinder engines
- Engine overhaul
- Cooling and ventilation
- Power and exhaust systems
- Engine electrics
- Control system
- Transmission
- Mechanical gearbox
- Automatic gearbox
- Clutch and drive shafts
- Chassis
- Brake system
- Car suspension
- Steering
- Body
- Exterior (external elements)
- Interior (internal elements)
- Doors, windows and locks
- Electrical equipment
- Equipment and devices
- Electrical circuits
- General information
- User manual
- Maintenance
- Helpful hints
- Power unit
- Petrol engines 1.6 and 1.8
- Petrol engines 2.0
- 2.5 petrol engines
- Overhaul engines 1.6 and 1.8
- Overhaul engines 2.0 and 2.5
- Diesel engine 2.0
- Engine electrics
- Cooling system
- Air conditioner
- Carburetor Nikki 30/34
- Power system (1.6 and 1.8)
- Power system (2.0 and 2.5)
- Control system
- Transmission
- Mechanical gearbox
- Automatic gearbox
- Clutch and axles
- Chassis
- Brake system
- Suspension and wheels
- Steering
- Body
- Exterior (external elements)
- Interior (internal elements)
- Doors and windows
- Electrical equipment
- Equipment and devices
- Electrical circuits
- General information
- Introduction to manual
- Vehicle specifications
- Power unit
- Engine repair
- Lubrication system
- Cooling system
- Fuel system (carburetor)
- Fuel injection (FE)
- Fuel injection (DOHC)
- Fuel system (diesel)
- Ignition system
- Transmission
- Clutch
- Gearbox
- Drive shafts
- Chassis
- Front suspension
- Rear suspension
- Steering system
- Brake system
- Electrical equipment
- Equipment and devices
- Electrical circuits
- General information
- User manual
- Maintenance
- Power unit
- Gasoline engine
- Engine overhaul (gasoline)
- Diesel engine
- Cooling and heating
- Supply system
- Ignition system
- Emission reduction
- Transmission
- Clutch
- Mechanical gearbox
- Automatic gearbox
- Drive shafts
- Chassis
- Brake system
- Suspension and wheels
- Steering
- Body
- Exterior (external elements)
- Interior (internal elements)
- Electrical equipment
- Equipment and devices
- Power devices
- Electrical circuits
- General information
- User manual
- Maintenance
- Troubleshooting
- Late models
- Power unit
- Engine in car
- Engine overhaul
- Cooling and heating system
- Fuel and exhaust system
- Engine electrical system
- Emission control system
- Transmission
- Mechanical gearbox
- Automatic gearbox
- Clutch and drive shafts
- Chassis
- Brake system
- Suspension and wheels
- Steering
- Body
- Exterior (external elements)
- Interior (internal elements)
- Electrical equipment
- Equipment and devices
- Lighting and lamps
- Electrical circuits