
MazBook.ru
English Русский
Български
Беларускі
Український
Српски
Hrvatski
Română
Polski
Slovenský
Magyar
• Bookmark • Sitemap • Contacts •   
Cars Opel Cars Ford Cars Volkswagen Cars Audi Cars Kia Cars Renault Cars Peugeot


Familia Capella Mazda3 Mazda6 CX-? Others Articles
Capella 3 (1982-1992, petrol) Capella 3 and 4 (1982-1992) Capella 4 (1987-1992) Capella 5 (1991-1997) Capella 6 (1997-2005, petrol)

Pistons and connecting rods — removal and disassembly (Mazda Capella GD)

  • Home
  • Mazda Capella
  • Capella GD (1987-1992)
  • Power unit
  • Engine repair
  • Pistons and connecting rods — removal and disassembly
0
The pistons and connecting rods are knocked out from the inside of the cylinder block upwards using the handle of a hammer, after the connecting rod caps and bearing shells have been removed. Before carrying out these works, the following instructions must be observed, including markings, assembly direction, etc.
  • Each piston and its connecting rod are provided with the number of the cylinder from which they were removed. It is best to put the number on the bottom with paint. Mark one of the front sides of the engine with a corresponding arrow.
  • When removing the piston with the connecting rod, observe the exact direction of installation of the piston bearing cap and immediately after removal mark the sides with the cylinder number. This can best be done with a center punch (cylinder #1 - one punch strike, etc.).
  • Mark the bearing shells according to the connecting rods and bearing caps. Mark the upper and lower liners on the back with paint.
  • Remove the bearing caps and liners and push out the parts as described above. If necessary, scrape off the oil ring from the top of the cylinder bores using a scraper.
  • Remove the piston rings one by one using a piston ring collet (figure 80). If the rings are to be used again, they must be marked accordingly. If you don't have collets, you can insert metal strips under the ring at opposite places on the piston. Be sure to place one strip under the ring to avoid scratches.
  • Disassemble pistons and connecting rods only when necessary. Standard engine piston rings are pressed in and must be pressed out using a suitable mandrel in a pressing device after the pistons have been heated to a temperature of 50-60°C. "MAZDA" has the part number 49 G030 042. DOHC and diesel engine pistons are equipped with retaining spring rings on each side to protect the piston pins. After both spring rings have been removed, the pins can be driven out using a mandrel. If the pin is very tight, the piston needs to be warmed up in warm water.
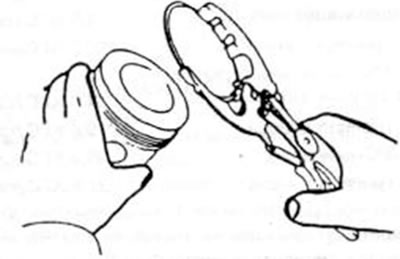

Figure 80. Removing piston rings using powder ring collets.

Figure 80. Removing piston rings using powder ring collets.
This article is available at: russian, bulgarian, belarusian, ukrainian, serbian, croatian, romanian, polish, slovak, hungarian
This text was checked by: Georgy Afanasyev
Share with friends on social networks:

Previous
Capella 4 » Engine repair
Next

Cylinder compression control
Checking and setting valve clearances
Installing the cylinder head
Cylinder head assembly
Inspection of the cylinder head
Measuring cylinder bores
Pistons and connecting rods
Assembly of pistons and connecting rods
Installing pistons and connecting rods
Cylinder block
More articles on repairing other Mazda models
Disconnecting and connecting cable plugs Mazda Familia 6 (1989-1994)
Connecting rod and connecting rod bearing — description Mazda3 BK (2003-2009)
Connecting rod and connecting rod bearing Mazda6 GG (2002-2008)
Checking the connecting rods of the cylinder block Mazda CX-5KE (2012-2017)
Connecting rods and pistons Mazda BT-50 (1) (2006-2011)
Link in different formats to this article
Comments and feedback from visitors
No comments yet


How much will 42 + 47 ?


Capella 6 (1997-2005, petrol) 
  • General information
  • Introduction to guide
  • User manual
  • Troubleshooting
  • Maintenance
  • Power unit
  • 4-cylinder engines
  • 6-cylinder engines
  • Engine overhaul
  • Cooling and ventilation
  • Power and exhaust systems
  • Engine electrics
  • Control system
  • Transmission
  • Mechanical gearbox
  • Automatic gearbox
  • Clutch and drive shafts
  • Chassis
  • Brake system
  • Car suspension
  • Steering
  • Body
  • Exterior (external elements)
  • Interior (internal elements)
  • Doors, windows and locks
  • Electrical equipment
  • Equipment and devices
  • Electrical circuits
Capella 5 (1991-1997) 
  • General information
  • User manual
  • Maintenance
  • Helpful hints
  • Power unit
  • Petrol engines 1.6 and 1.8
  • Petrol engines 2.0
  • 2.5 petrol engines
  • Overhaul engines 1.6 and 1.8
  • Overhaul engines 2.0 and 2.5
  • Diesel engine 2.0
  • Engine electrics
  • Cooling system
  • Air conditioner
  • Carburetor Nikki 30/34
  • Power system (1.6 and 1.8)
  • Power system (2.0 and 2.5)
  • Control system
  • Transmission
  • Mechanical gearbox
  • Automatic gearbox
  • Clutch and axles
  • Chassis
  • Brake system
  • Suspension and wheels
  • Steering
  • Body
  • Exterior (external elements)
  • Interior (internal elements)
  • Doors and windows
  • Electrical equipment
  • Equipment and devices
  • Electrical circuits
Capella 4 (1987-1992) 
  • General information
  • Introduction to manual
  • Vehicle specifications
  • Power unit
  • Engine repair
  • Lubrication system
  • Cooling system
  • Fuel system (carburetor)
  • Fuel injection (FE)
  • Fuel injection (DOHC)
  • Fuel system (diesel)
  • Ignition system
  • Transmission
  • Clutch
  • Gearbox
  • Drive shafts
  • Chassis
  • Front suspension
  • Rear suspension
  • Steering system
  • Brake system
  • Electrical equipment
  • Equipment and devices
  • Electrical circuits
Capella 3 and 4 (1982-1992) 
  • General information
  • User manual
  • Maintenance
  • Power unit
  • Gasoline engine
  • Engine overhaul (gasoline)
  • Diesel engine
  • Cooling and heating
  • Supply system
  • Ignition system
  • Emission reduction
  • Transmission
  • Clutch
  • Mechanical gearbox
  • Automatic gearbox
  • Drive shafts
  • Chassis
  • Brake system
  • Suspension and wheels
  • Steering
  • Body
  • Exterior (external elements)
  • Interior (internal elements)
  • Electrical equipment
  • Equipment and devices
  • Power devices
  • Electrical circuits
Capella 3 (1982-1992, petrol) 
  • General information
  • User manual
  • Maintenance
  • Troubleshooting
  • Late models
  • Power unit
  • Engine in car
  • Engine overhaul
  • Cooling and heating system
  • Fuel and exhaust system
  • Engine electrical system
  • Emission control system
  • Transmission
  • Mechanical gearbox
  • Automatic gearbox
  • Clutch and drive shafts
  • Chassis
  • Brake system
  • Suspension and wheels
  • Steering
  • Body
  • Exterior (external elements)
  • Interior (internal elements)
  • Electrical equipment
  • Equipment and devices
  • Lighting and lamps
  • Electrical circuits
MazBook.ru © 2018–2026 · Mobile version · Articles and news · Sitemap: EN BG BY UA RS HR RO PL SK HU · Feedback · Site search · Add to bookmarks Familia 5 (BF) · Familia 6 (BG) · Capella 3 (GC) · Capella 3 and 4 (GC) · Capella 4 (GD) · Capella 5 (GE) · Capella 6 (GF) · Mazda3 BK · Mazda6 GG · CX-5KE · Mazda 121 (3) · Mazda BT-50 (1) ·
By continuing to use the site, you agree to the use of cookies 🔐