


External body elements Mazda 626 (3rd and 4th gen)

Body — general description
The models are of block construction. The car body is designed to provide rigidity to the car without the need for a separate stiffening frame. The side rails of the...
The models are of block construction. The car body is designed to provide rigidity to the car without the need for a separate stiffening frame. The side rails of the...
Body — maintenance
1. The condition of your car's roof is very important, as it will greatly affect its resale value. It is much more difficult to restore a damaged body than mechanical...
1. The condition of your car's roof is very important, as it will greatly affect its resale value. It is much more difficult to restore a damaged body than mechanical...
Hinges and locks — maintenance
Every 5,000 km or every three months, the door, sunroof lid and rear hinges, locks must be lubricated with a few drops of oil. The door and tailgate strike plates should...
Every 5,000 km or every three months, the door, sunroof lid and rear hinges, locks must be lubricated with a few drops of oil. The door and tailgate strike plates should...
Body repair — minor damage
Repair of minor scratches in the body structure 1. If the scratch is superficial and does not penetrate to the metal of the body structure, repair is very simple....
Repair of minor scratches in the body structure 1. If the scratch is superficial and does not penetrate to the metal of the body structure, repair is very simple....
Body repair — serious damage
1. Serious damage must be repaired in a body shop specially equipped to perform the necessary repairs. 2. If the damage was caused by a collision, it is necessary to...
1. Serious damage must be repaired in a body shop specially equipped to perform the necessary repairs. 2. If the damage was caused by a collision, it is necessary to...

Hood — removal and installation
1. Raise the hood. 2. While holding the hood open, place a protective cover underneath (rags or cardboard) at the bottom of its corners and above the front fenders to...
1. Raise the hood. 2. While holding the hood open, place a protective cover underneath (rags or cardboard) at the bottom of its corners and above the front fenders to...

Hood lock mechanism and release cable — removal and installation
1. Remove the front radiator grille. 2. If the same hood latch mechanism is to be reinstalled, make a mark with a pencil or paint around the outer edge of the mechanism...
1. Remove the front radiator grille. 2. If the same hood latch mechanism is to be reinstalled, make a mark with a pencil or paint around the outer edge of the mechanism...

Rear door shock absorber — removal and installation
1. Support the rear door in the fully open position. 2. Unscrew the nut securing the shock absorber to the door (photo). Use a wrench to loosen the shock absorber nut 3....
1. Support the rear door in the fully open position. 2. Unscrew the nut securing the shock absorber to the door (photo). Use a wrench to loosen the shock absorber nut 3....

Rear door — removal, installation and adjustment
Rear door component locations 1. Hinge; 2. Rear door opening lever; 3. Gasket; 4. Shock absorber; 5. Rear door; 6. Rear door opening cable; 7. Castle; 8. Impact plate;...
Rear door component locations 1. Hinge; 2. Rear door opening lever; 3. Gasket; 4. Shock absorber; 5. Rear door; 6. Rear door opening cable; 7. Castle; 8. Impact plate;...
Trunk lid — removal and installation
1. Open the cover and mark the location of the nut heads around them with a pencil to install them in the same position. 2. With the help of an assistant, support its...
1. Open the cover and mark the location of the nut heads around them with a pencil to install them in the same position. 2. With the help of an assistant, support its...

Rear Compartment Lid Lock Assembly — removal and installation
1. Remove the trim panel for access. 2. Remove the fuse (sedan and coupe). Installing the rear compartment lock components 3. Remove the mounting bolt and lock to access...
1. Remove the trim panel for access. 2. Remove the fuse (sedan and coupe). Installing the rear compartment lock components 3. Remove the mounting bolt and lock to access...
Rear compartment lid strike plate — removal and installation
1. Remove the trim panel for access, if necessary. 2. Mark the location of the bolt. 3. Remove the bolts and strike plate from the vehicle. 4. During installation, it...
1. Remove the trim panel for access, if necessary. 2. Mark the location of the bolt. 3. Remove the bolts and strike plate from the vehicle. 4. During installation, it...

Fuel Filler/Rear Compartment Release Lever — removal and installation
1. Inside the vehicle, remove the lever handle, pull out the main components and remove the trim to access the release lever mounting bolt. 2. Remove the bolt and...
1. Inside the vehicle, remove the lever handle, pull out the main components and remove the trim to access the release lever mounting bolt. 2. Remove the bolt and...

Door glass and window regulator — removal and installation
Front door window and power window installation details 1. inner door handle cover; 2. Thrust ring; 3. Frame; 4. Regulator handle; 5. Armrest; 6. door trim panel; 7....
Front door window and power window installation details 1. inner door handle cover; 2. Thrust ring; 3. Frame; 4. Regulator handle; 5. Armrest; 6. door trim panel; 7....

Triangular window glass (coupe models) — removal and installation
Triangular window glass installation details (coupe models) 1. Center pillar trim; 2. Glass installation plate; 3. Castle; 4. Glass of the triangular window of the...
Triangular window glass installation details (coupe models) 1. Center pillar trim; 2. Glass installation plate; 3. Castle; 4. Glass of the triangular window of the...

Radiator grille — removal and installation
1. Open the six radiator grille retaining clips using a flat-head screwdriver as shown in the illustration. Using a screwdriver, detach the radiator grille mounting...
1. Open the six radiator grille retaining clips using a flat-head screwdriver as shown in the illustration. Using a screwdriver, detach the radiator grille mounting...
Radiator grille cover — removal and installation
1. Open the lid. 2. Remove the clips and remove the cover from the vehicle. 3. Assembly is carried out in reverse order.
1. Open the lid. 2. Remove the clips and remove the cover from the vehicle. 3. Assembly is carried out in reverse order.
Hood panel — removal and installation
1. Remove the windshield wiper arms. 2. Remove the mounting screws, remove the rubber seal from the clips and remove the hood panel. 3. Assembly is carried out in...
1. Remove the windshield wiper arms. 2. Remove the mounting screws, remove the rubber seal from the clips and remove the hood panel. 3. Assembly is carried out in...
Front Skirt Panel — removal and installation
1. Remove the front bumper ( Chapter 26 ). 2. Remove the six mounting screws and the lower skirt from the vehicle. 3. Install and position the skirt correctly, tighten...
1. Remove the front bumper ( Chapter 26 ). 2. Remove the six mounting screws and the lower skirt from the vehicle. 3. Install and position the skirt correctly, tighten...

Bumpers — removal and installation
1. Remove the bumper suspension mounting bolts and nuts, remove the bumper assembly from the vehicle. 2. See accompanying illustrations for bumper removal details. Front...
1. Remove the bumper suspension mounting bolts and nuts, remove the bumper assembly from the vehicle. 2. See accompanying illustrations for bumper removal details. Front...
Replacement of fixed glass
Due to special processing requirements, installation of the windshield, rear window and side windows must be performed by a dealer or auto repair shop.
Due to special processing requirements, installation of the windshield, rear window and side windows must be performed by a dealer or auto repair shop.

Exterior Door Handle — removal and installation
1. Close the window completely. 2. Remove the trim panel and peel off the waterproofing film ( Chapter 16 ). 3. Using a straight-blade screwdriver, disconnect the push...
1. Close the window completely. 2. Remove the trim panel and peel off the waterproofing film ( Chapter 16 ). 3. Using a straight-blade screwdriver, disconnect the push...

Outside mirror — removal and installation
Exterior mirror installation details 1. Trim panel; 2. Screws (3); 3. Mirror 1. On models with power mirrors, disconnect the negative battery cable. 2. Remove the trim...
Exterior mirror installation details 1. Trim panel; 2. Screws (3); 3. Mirror 1. On models with power mirrors, disconnect the negative battery cable. 2. Remove the trim...
Central locking — general description
1. On models equipped with central locking, it forces all passenger door locks to follow the position of the driver's door lock. The system components include the...
1. On models equipped with central locking, it forces all passenger door locks to follow the position of the driver's door lock. The system components include the...

Doors — removal, installation, adjustment
1. On models with power windows, central locking, etc., disconnect the negative battery cable. Also disconnect the door wiring harness connector. In this case, it may be...
1. On models with power windows, central locking, etc., disconnect the negative battery cable. Also disconnect the door wiring harness connector. In this case, it may be...
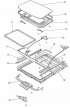
Luke — general description
Disassembled view of the hatch 1. Interior trim; 2. External panel; 3. Gasket; 4. Wind shield; 5. Stopper; 6. Guide; 7. Bottom panel; 8. Engine; 9. Rear guide...
Disassembled view of the hatch 1. Interior trim; 2. External panel; 3. Gasket; 4. Wind shield; 5. Stopper; 6. Guide; 7. Bottom panel; 8. Engine; 9. Rear guide...
This section is available on: russian, bulgarian, belarusian, ukrainian, serbian, croatian, romanian, polish, slovak, hungarian
More sections on repairs of other Mazda models
• Body: Exterior (external elements) Mazda6 GG (2002-2008)
• Body: Exterior (external elements) Mazda CX-5KE (2012-2017)
• Body: Exterior (external elements) Mazda BT-50 (1) (2006-2011)
• Body: Exterior (external elements) Mazda6 GG (2002-2008)
• Body: Exterior (external elements) Mazda CX-5KE (2012-2017)
• Body: Exterior (external elements) Mazda BT-50 (1) (2006-2011)
Link in different formats to this section
TEXTHTMLBB Code
- General information
- Introduction to guide
- User manual
- Troubleshooting
- Maintenance
- Power unit
- 4-cylinder engines
- 6-cylinder engines
- Engine overhaul
- Cooling and ventilation
- Power and exhaust systems
- Engine electrics
- Control system
- Transmission
- Mechanical gearbox
- Automatic gearbox
- Clutch and drive shafts
- Chassis
- Brake system
- Car suspension
- Steering
- Body
- Exterior (external elements)
- Interior (internal elements)
- Doors, windows and locks
- Electrical equipment
- Equipment and devices
- Electrical circuits
- General information
- User manual
- Maintenance
- Helpful hints
- Power unit
- Petrol engines 1.6 and 1.8
- Petrol engines 2.0
- 2.5 petrol engines
- Overhaul engines 1.6 and 1.8
- Overhaul engines 2.0 and 2.5
- Diesel engine 2.0
- Engine electrics
- Cooling system
- Air conditioner
- Carburetor Nikki 30/34
- Power system (1.6 and 1.8)
- Power system (2.0 and 2.5)
- Control system
- Transmission
- Mechanical gearbox
- Automatic gearbox
- Clutch and axles
- Chassis
- Brake system
- Suspension and wheels
- Steering
- Body
- Exterior (external elements)
- Interior (internal elements)
- Doors and windows
- Electrical equipment
- Equipment and devices
- Electrical circuits
- General information
- Introduction to manual
- Vehicle specifications
- Power unit
- Engine repair
- Lubrication system
- Cooling system
- Fuel system (carburetor)
- Fuel injection (FE)
- Fuel injection (DOHC)
- Fuel system (diesel)
- Ignition system
- Transmission
- Clutch
- Gearbox
- Drive shafts
- Chassis
- Front suspension
- Rear suspension
- Steering system
- Brake system
- Electrical equipment
- Equipment and devices
- Electrical circuits
- General information
- User manual
- Maintenance
- Power unit
- Gasoline engine
- Engine overhaul (gasoline)
- Diesel engine
- Cooling and heating
- Supply system
- Ignition system
- Emission reduction
- Transmission
- Clutch
- Mechanical gearbox
- Automatic gearbox
- Drive shafts
- Chassis
- Brake system
- Suspension and wheels
- Steering
- Body
- Exterior (external elements)
- Interior (internal elements)
- Electrical equipment
- Equipment and devices
- Power devices
- Electrical circuits
- General information
- User manual
- Maintenance
- Troubleshooting
- Late models
- Power unit
- Engine in car
- Engine overhaul
- Cooling and heating system
- Fuel and exhaust system
- Engine electrical system
- Emission control system
- Transmission
- Mechanical gearbox
- Automatic gearbox
- Clutch and drive shafts
- Chassis
- Brake system
- Suspension and wheels
- Steering
- Body
- Exterior (external elements)
- Interior (internal elements)
- Electrical equipment
- Equipment and devices
- Lighting and lamps
- Electrical circuits