


Engine Power System Mazda 626 (3 and 4)

General information about the power supply system
The fuel supply system consists of a fuel tank (capacity 60 l), located at the rear of the vehicle, a mechanically driven fuel pump, a carburetor and an air filter. The...
The fuel supply system consists of a fuel tank (capacity 60 l), located at the rear of the vehicle, a mechanically driven fuel pump, a carburetor and an air filter. The...

Fuel pump — inspection, removal and installation
Examination The fuel pump is mounted to the cylinder head at the rear of the engine (from the side of the engine compartment bulkhead). Structurally, the pump is...
Examination The fuel pump is mounted to the cylinder head at the rear of the engine (from the side of the engine compartment bulkhead). Structurally, the pump is...

Repair and replacement of fuel lines
If it is necessary to replace a metal fuel line tube, use only seamless steel tube, as copper or aluminum tubes are subject to rapid wear from the vibrations that occur...
If it is necessary to replace a metal fuel line tube, use only seamless steel tube, as copper or aluminum tubes are subject to rapid wear from the vibrations that occur...

Fuel tank — removal and installation
Warning: An empty fuel tank contains explosive fuel vapors, so use caution. Warning! The removed fuel tank must be stored away from open flames, sparking devices, open...
Warning: An empty fuel tank contains explosive fuel vapors, so use caution. Warning! The removed fuel tank must be stored away from open flames, sparking devices, open...

Carburetor — removal, inspection and installation
Removal and installation Disconnect the cable from the negative battery terminal. Remove the air filter. Disconnect the accelerator cable and cruise control cable from...
Removal and installation Disconnect the cable from the negative battery terminal. Remove the air filter. Disconnect the accelerator cable and cruise control cable from...

Engine idling crankshaft speed compensator
The idle speed compensator, provided on some models, is designed to automatically increase the engine idle speed, which decreases under the effect of additional load...
The idle speed compensator, provided on some models, is designed to automatically increase the engine idle speed, which decreases under the effect of additional load...
Air damper control cable
Disconnect the cable from the negative battery terminal. Remove the air filter. Disconnect the choke control cable from the carburetor by loosening the clamp fastening...
Disconnect the cable from the negative battery terminal. Remove the air filter. Disconnect the choke control cable from the carburetor by loosening the clamp fastening...
Elements of the exhaust system
Caution! Exhaust system components become very hot, so touching them should only be done after they have completely cooled. Use extreme caution when working near the...
Caution! Exhaust system components become very hot, so touching them should only be done after they have completely cooled. Use extreme caution when working near the...
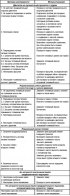
Power supply system malfunctions, their causes and troubleshooting methods
Power supply system malfunctions, their causes and troubleshooting methods
Power supply system malfunctions, their causes and troubleshooting methods

Carburetor — removal, inspection and installation (since 1984)
Figure 14.3. Carburetor equipped with an automatically controlled air damper: 1 – primary chamber air jet; 2 – primary chamber economizer and economizer atomizer; 3 –...
Figure 14.3. Carburetor equipped with an automatically controlled air damper: 1 – primary chamber air jet; 2 – primary chamber economizer and economizer atomizer; 3 –...

Distributed fuel injection system (since 1984)
Figure 14.8. Elements of the air supply system of the RVT system: 1 – expansion chamber; 2 – damper; 3 – throttle assembly; 4 – throttle position sensor; 5 –...
Figure 14.8. Elements of the air supply system of the RVT system: 1 – expansion chamber; 2 – damper; 3 – throttle assembly; 4 – throttle position sensor; 5 –...

Throttle body — removal, inspection and installation (since 1984)
The throttle body is located behind the air flow meter and is attached to the expansion chamber. It is equipped with a throttle valve which is connected to the...
The throttle body is located behind the air flow meter and is attached to the expansion chamber. It is equipped with a throttle valve which is connected to the...
Air valve (since 1984)
The air valve is installed in the bypass hose that bypasses the throttle assembly. It has an electric heating coil and a bimetallic spring. When the engine is cold, the...
The air valve is installed in the bypass hose that bypasses the throttle assembly. It has an electric heating coil and a bimetallic spring. When the engine is cold, the...

Fuel pump — inspection, removal and installation (since 1984)
The fuel pump is located at the lower rear of the vehicle next to the fuel tank. The fuel pump is of a centrifugal type, with five rollers moving planetarily inside a...
The fuel pump is located at the lower rear of the vehicle next to the fuel tank. The fuel pump is of a centrifugal type, with five rollers moving planetarily inside a...

Fuel Injectors — checking, removing, and installing (since 1984)
Fuel injectors inject fuel into the inlet ports. The amount of fuel injected is determined by the time the injector needle valve is open, which in turn is determined by...
Fuel injectors inject fuel into the inlet ports. The amount of fuel injected is determined by the time the injector needle valve is open, which in turn is determined by...
Fuel pressure regulator (since 1984)
If the fuel pressure in the injectors were always constant, then the vacuum fluctuations in the intake manifold would cause the wrong amount of fuel to be delivered,...
If the fuel pressure in the injectors were always constant, then the vacuum fluctuations in the intake manifold would cause the wrong amount of fuel to be delivered,...
Control unit of the RVT system (since 1984)
The EGR system control unit processes information received from the sensors and controls the operation of the injectors and the electromagnetic valve for warming up the...
The EGR system control unit processes information received from the sensors and controls the operation of the injectors and the electromagnetic valve for warming up the...

Adjusting the accelerator cable of the RVT system (since 1984)
Figure 14.21. Accelerator cable of the RVT system: 1 – free play adjustment nuts; 2 – full throttle opening adjustment bolt Make sure that when the accelerator pedal is...
Figure 14.21. Accelerator cable of the RVT system: 1 – free play adjustment nuts; 2 – full throttle opening adjustment bolt Make sure that when the accelerator pedal is...
Checking the components of the electronic injection control system (since 1984)
The EGR system control unit sends control signals to the injectors and the electromagnetic engine warm-up valve based on information from the following elements:...
The EGR system control unit sends control signals to the injectors and the electromagnetic engine warm-up valve based on information from the following elements:...

Adjusting the engine warm-up valve (since 1984)
Start the engine and warm it up to normal operating temperature. Stop the engine and connect the tachometer. Figure 14.24. Schematic diagram of the engine warm-up...
Start the engine and warm it up to normal operating temperature. Stop the engine and connect the tachometer. Figure 14.24. Schematic diagram of the engine warm-up...

Load Control Valve Adjustment (since 1984)
Connect the tachometer to the engine, start it and warm it up to normal operating temperature. Disconnect the connector from the load control valve. Figure 14.27....
Connect the tachometer to the engine, start it and warm it up to normal operating temperature. Disconnect the connector from the load control valve. Figure 14.27....

Fuel injection system (since 1986)
Later models are equipped with an electronic fuel injection system. It consists of three main systems: fuel supply, air supply and electronic control. Servicing the fuel...
Later models are equipped with an electronic fuel injection system. It consists of three main systems: fuel supply, air supply and electronic control. Servicing the fuel...
Air supply system (since 1986)
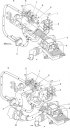
Figure 15.12. Air supply system: a – non-turbocharged engines; b – turbocharged engines; 1 – smoothing receiver; 2 – bypass electromagnetic valve; 3 – air flow meter; 4...
Figure 15.12. Air supply system: a – non-turbocharged engines; b – turbocharged engines; 1 – smoothing receiver; 2 – bypass electromagnetic valve; 3 – air flow meter; 4...

Electronic control system (since 1986)
The electronic control system controls the electronic fuel injection system and other systems through a control unit containing a microprocessor, the so-called EGI unit....
The electronic control system controls the electronic fuel injection system and other systems through a control unit containing a microprocessor, the so-called EGI unit....
General diagnostics of the electronic fuel injection system (since 1986)
Malfunctions of the electronic fuel injection system, as a rule, do not cause engine failure. The malfunction is usually caused by a faulty contact connection in the...
Malfunctions of the electronic fuel injection system, as a rule, do not cause engine failure. The malfunction is usually caused by a faulty contact connection in the...
Reducing pressure in the fuel system (since 1986)
Remove the cap from the fuel tank filler neck, which will cause the pressure in the tank to become equal to atmospheric pressure. On 1986 and 1987 models, remove the...
Remove the cap from the fuel tank filler neck, which will cause the pressure in the tank to become equal to atmospheric pressure. On 1986 and 1987 models, remove the...
Checking the fuel system pressure (since 1986)
To check the pressure in the fuel supply system, you need a pressure gauge and a corresponding adapter for connecting to the system. Reduce the pressure in the fuel...
To check the pressure in the fuel supply system, you need a pressure gauge and a corresponding adapter for connecting to the system. Reduce the pressure in the fuel...

Fuel supply system components (since 1986)
Caution! The fuel system is under pressure. Before disconnecting the fuel system components, it is necessary to relieve the pressure in the system. To do this, cover the...
Caution! The fuel system is under pressure. Before disconnecting the fuel system components, it is necessary to relieve the pressure in the system. To do this, cover the...

Air supply system components (since 1986)
Remove the two screws and pull the rubber boot off the air flow meter connector. Figure 15.24. Air flow meter connector pinout Turn the key in the ignition switch to the...
Remove the two screws and pull the rubber boot off the air flow meter connector. Figure 15.24. Air flow meter connector pinout Turn the key in the ignition switch to the...

Air shock absorber (since 1986)
To check the air shock absorber, press on the rod with your finger - it should slowly retract with noticeable resistance to the pressing force. When released, the rod...
To check the air shock absorber, press on the rod with your finger - it should slowly retract with noticeable resistance to the pressing force. When released, the rod...

Idle Speed Compensation System (1986 and 1987)
Figure 15.32. Idle speed compensation system diagram (1986 and 1987 models): 1 – atmospheric pressure sensor; 2 – intake air temperature sensor; 3 – coolant temperature...
Figure 15.32. Idle speed compensation system diagram (1986 and 1987 models): 1 – atmospheric pressure sensor; 2 – intake air temperature sensor; 3 – coolant temperature...

Checking, removing and installing electronic control system components (since 1986)
Engine Air Intake Temperature Sensor for 1986 and 1987 models Remove the air filter cover. Using an ohmmeter connected to the "E2" and "TNA" contacts of the air flow...
Engine Air Intake Temperature Sensor for 1986 and 1987 models Remove the air filter cover. Using an ohmmeter connected to the "E2" and "TNA" contacts of the air flow...

Turbocharger — inspection, removal and installation (since 1986)
Figure 15.46. Turbocharging diagram: 1 – pressure sensor; 2 – nozzle; 3 – actuator; 4 – bypass valve; 5 – turbine wheel; 6 – turbocharger; 7 – from the air flow meter; 8...
Figure 15.46. Turbocharging diagram: 1 – pressure sensor; 2 – nozzle; 3 – actuator; 4 – bypass valve; 5 – turbine wheel; 6 – turbocharger; 7 – from the air flow meter; 8...
This section is available on: russian, bulgarian, belarusian, ukrainian, serbian, croatian, romanian, polish, slovak, hungarian
More sections on repairs of other Mazda models
• Power unit: Supply system Mazda Familia 6 (1989-1994)
• Power unit: Fuel system Mazda3 BK (2003-2009)
• Power unit: Fuel system Mazda6 GG (2002-2008)
• Power unit: Supply system Mazda CX-5KE (2012-2017)
• Power unit: Supply system Mazda 121 (3) (1996-2003)
• Power unit: Supply system Mazda Familia 6 (1989-1994)
• Power unit: Fuel system Mazda3 BK (2003-2009)
• Power unit: Fuel system Mazda6 GG (2002-2008)
• Power unit: Supply system Mazda CX-5KE (2012-2017)
• Power unit: Supply system Mazda 121 (3) (1996-2003)
Link in different formats to this section
TEXTHTMLBB Code
- General information
- Introduction to guide
- User manual
- Troubleshooting
- Maintenance
- Power unit
- 4-cylinder engines
- 6-cylinder engines
- Engine overhaul
- Cooling and ventilation
- Power and exhaust systems
- Engine electrics
- Control system
- Transmission
- Mechanical gearbox
- Automatic gearbox
- Clutch and drive shafts
- Chassis
- Brake system
- Car suspension
- Steering
- Body
- Exterior (external elements)
- Interior (internal elements)
- Doors, windows and locks
- Electrical equipment
- Equipment and devices
- Electrical circuits
- General information
- User manual
- Maintenance
- Helpful hints
- Power unit
- Petrol engines 1.6 and 1.8
- Petrol engines 2.0
- 2.5 petrol engines
- Overhaul engines 1.6 and 1.8
- Overhaul engines 2.0 and 2.5
- Diesel engine 2.0
- Engine electrics
- Cooling system
- Air conditioner
- Carburetor Nikki 30/34
- Power system (1.6 and 1.8)
- Power system (2.0 and 2.5)
- Control system
- Transmission
- Mechanical gearbox
- Automatic gearbox
- Clutch and axles
- Chassis
- Brake system
- Suspension and wheels
- Steering
- Body
- Exterior (external elements)
- Interior (internal elements)
- Doors and windows
- Electrical equipment
- Equipment and devices
- Electrical circuits
- General information
- Introduction to manual
- Vehicle specifications
- Power unit
- Engine repair
- Lubrication system
- Cooling system
- Fuel system (carburetor)
- Fuel injection (FE)
- Fuel injection (DOHC)
- Fuel system (diesel)
- Ignition system
- Transmission
- Clutch
- Gearbox
- Drive shafts
- Chassis
- Front suspension
- Rear suspension
- Steering system
- Brake system
- Electrical equipment
- Equipment and devices
- Electrical circuits
- General information
- User manual
- Maintenance
- Power unit
- Gasoline engine
- Engine overhaul (gasoline)
- Diesel engine
- Cooling and heating
- Supply system
- Ignition system
- Emission reduction
- Transmission
- Clutch
- Mechanical gearbox
- Automatic gearbox
- Drive shafts
- Chassis
- Brake system
- Suspension and wheels
- Steering
- Body
- Exterior (external elements)
- Interior (internal elements)
- Electrical equipment
- Equipment and devices
- Power devices
- Electrical circuits
- General information
- User manual
- Maintenance
- Troubleshooting
- Late models
- Power unit
- Engine in car
- Engine overhaul
- Cooling and heating system
- Fuel and exhaust system
- Engine electrical system
- Emission control system
- Transmission
- Mechanical gearbox
- Automatic gearbox
- Clutch and drive shafts
- Chassis
- Brake system
- Suspension and wheels
- Steering
- Body
- Exterior (external elements)
- Interior (internal elements)
- Electrical equipment
- Equipment and devices
- Lighting and lamps
- Electrical circuits