


Contents: Removal and installation ⇓ Repair ⇓
Warning: An empty fuel tank contains explosive fuel vapors, so use caution.
Warning! The removed fuel tank must be stored away from open flames, sparking devices, open fire-hazardous lighting devices, and smoking areas.
Removal and installation
Raise the rear of the vehicle and support it on stands.
Disconnect the cable from the negative battery terminal.
Drain the fuel from the fuel tank into a clean container.
Remove the rear seat, protective panel and disconnect the wire from the fuel gauge sensor.
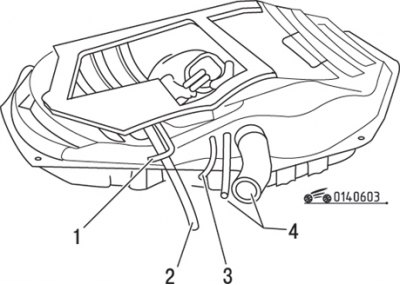
Figure 6.3. Fuel tank: 1 – to the fuel return pipe; 2 – to the main fuel line; 3 – to the control valve; 4 – to the filler neck
Label the fuel lines and disconnect them (figure 6.3). Disconnect the filler hose from the fuel tank filler neck.
Holding the tank (ask an assistant or install a stand), unscrew the five bolts.
Carefully lower the tank and remove it from the vehicle.
Caution! Even an empty fuel tank contains explosive fuel vapors, so exercise caution.
Before installation, make sure the tank is completely clean of dirt and rust. It is recommended to paint the tank with anti-corrosion enamel. Replace a tank that is corroded from the inside.
Installation is carried out in the reverse order of removal.
The original text is published on Mazbook.ru
Repair
Any fuel tank repair (fuel filler neck) must be performed by a specialist who has experience in performing potentially hazardous work. Even after cleaning and flushing the fuel tank, explosive fuel vapors remain in it.
If the fuel tank is removed from the vehicle, it should not be stored near areas where sparks or open flames may occur. Use special caution in a garage with a natural gas supply.