
MazBook.ru
English Русский
Български
Беларускі
Український
Српски
Hrvatski
Română
Polski
Slovenský
Magyar
• Bookmark • Sitemap • Contacts •   
Cars Opel Cars Ford Cars Volkswagen Cars Audi Cars Kia Cars Renault Cars Peugeot


Familia Capella Mazda3 Mazda6 CX-? Others Articles
Familia 5 (1985-1989) Familia 6 (1989-1994)

Removal and installation / checking the sensor in the fuel tank (Mazda Familia BG)

  • Home
  • Mazda Familia
  • Familia BG (1989-1994)
  • Power unit
  • Supply system
  • Removal and installation / checking the sensor in the fuel tank
0
Contents: Removal ⇓ Examination ⇓ Installation ⇓
The level sensor is screwed into the top of the fuel tank. When the fuel level in the sensor drops, the float drops. At the same time, due to the sliding contact on the float, the resistance of the sensor increases. Because of this, the voltage on the indicator drops, and the arrow drops in the direction of "Empty". If the float continues to drop, on some models, a signal contact closes at a certain position and the reserve fuel indicator light on the instrument panel lights up. The fuel level sensor should be checked if the fuel level indicator on the instrument panel shows too high, too low, or does not show a fuel level at all.

All-wheel drive models have two separate fuel level sensors. The fuel pump fuel level sensor is located in the left half of the tank, looking in the direction of travel, the auxiliary pump sensor is located in the right half of the fuel tank, also looking forward in the direction of travel. If a problem occurs, both sensors should be checked.

Verification condition: All electrical wires must be checked for current flow according to the electrical diagram, see Chapter Electrical equipment system.

Warning! When removing the sensor, some fuel may leak out. Fuel vapors are toxic, so ensure good ventilation of the room. Avoid contact with skin. Wear fuel-resistant gloves. Do not work near open flames! Keep a fire extinguisher handy!


Removal


1. Disconnect the ground cable from the battery.

Warning! This will erase the engine fault memory or the radio security code. Before disconnecting the battery, read the instructions in Section Removal and installation the battery.


2. Remove the rear seat, see Chapter Body, car painting, car care.
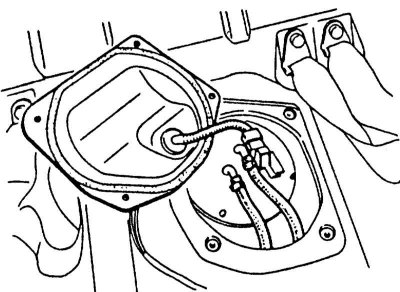
2. Remove the rear seat, see Chapter Body, car painting, car care.


3. Unscrew the fuel pump cover and disconnect the plug.

4. Loosen the hose clamps and disconnect the fuel hoses. Mark the hoses with tape to make installation easier.

5. Loosen the fuel level sensor mounting bolts.

6. Pull the sensor up, tilt it to the side and remove it. Place a rag underneath and collect the leaking fuel.

Examination


1. Holding the sensor in the installation position, measure the resistance with an ohmmeter in the indicated positions of the float. Models up to 9/89: Connect the ohmmeter to the terminals a and b on the plug.
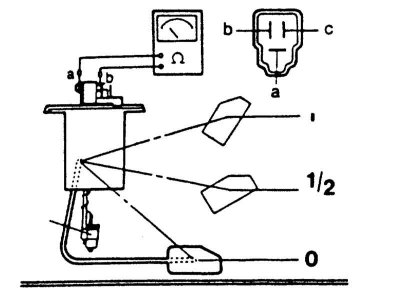
1. Holding the sensor in the installation position, measure the resistance with an ohmmeter in the…


2. The position corresponds to the degree of filling of the gas tank. "0" corresponds to an empty tank, "1/2" corresponds to a half-filled tank, position "1" corresponds to a full tank.


Required values


Model Float level in mm Resistance in Ohm
1 1/2 0
since 9/89. 117 3
__ __
0 110
Compact since 10/89. 104,2 3
50,8 32,5
0 110
Sedan, hatchback from 10/89 model year. 118 3
58,7 32,5
0 110
All wheel drive, Fuel pump sensor 158 0 — 2,5
118 7,3 — 13,3
0 72,1 — 82,1
4WD, Auxiliary Pump Sensor 157 0 — 2,5
112 7,3 — 13,3
0 29,9 — 35,9

If the value does not match the required value, the fuel level sensor should be replaced.

Installation


1. Insert the sensor with a new gasket.

2. Install the sensor and tighten the mounting bolts.

3. Put on the fuel lines according to the markings and secure with clamps.

4. Connect the plug and screw on the cover.

5. Install the rear seat, see Chapter Body, car painting, car care.

6. Connect the ground cable to the battery.

7. If available, set the time on the clock and set the security code for the radio receiver.

8. Check the operation of the fuel level indicator on the instrument panel.

[Article is based on website data: MazBook.ru]
This article is available at: russian, bulgarian, belarusian, ukrainian, serbian, croatian, romanian, polish, slovak, hungarian
This text was checked by: Evdokia Filimonova
Share with friends on social networks:

Previous
Familia 6 » Supply system
Next

Cleanliness rules when working with the power supply system
Description of the power supply system
Removal and installation the fuel tank
Removal and installation the fuel pump
Removal and installation / checking of the fuel pump
Removal and installation the air filter
More articles on repairing other Mazda models
Fuel tank level sensor ~ checking and replacing Mazda Capella 6 (1997-2005, petrol)
Fuel tank filler flap and cap Mazda3 BK (2003-2009)
Fuel tank filler flap and cap Mazda6 GG (2002-2008)
Checking the fuel tank for leaks Mazda CX-5KE (2012-2017)
Checking the fuel temperature sensor of the injection pump Mazda BT-50 (1) (2006-2011)
Link in different formats to this article
Comments and feedback from visitors
No comments yet


How much will 37 + 13 ?


Familia 6 (1989-1994) 
  • General information
  • Introduction to guide
  • User manual
  • Maintenance
  • Power unit
  • Petrol engines
  • Diesel engines
  • Lubrication system
  • Cooling system
  • Ignition system
  • Supply system
  • Carburetor
  • Injection system
  • Exhaust system
  • Transmission
  • Clutch
  • Car gearbox
  • Chassis
  • Front suspension
  • Rear suspension
  • Steering
  • Brake system
  • Wheels and tires
  • Body
  • Body elements
  • Doors and windows
  • Body Care
  • Electrical equipment
  • Equipment and devices
  • Power devices
  • Heating system
  • Lighting and headlights
  • Windshield wipers and washers
  • Wiring diagrams (since 1987)
  • Wiring diagrams (since 1991)
Familia 5 (1985-1989) 
  • General information
  • Vehicle data
  • Model «E» engine
  • Engine repair
  • Cooling and lubrication system
  • Power and ignition system
  • Model «B» engine
  • Engine repair
  • Cooling and lubrication system
  • Ignition system
  • Power system (carburetor)
  • Power system (injector)
  • Transmission
  • Clutch
  • Mechanical gearbox
  • Automatic gearbox
  • Front wheel drive
  • Chassis
  • Steering
  • Front suspension
  • Rear suspension
  • Brake system
  • Electrical equipment
  • Equipment and devices
  • Electrical circuits
  • Wiring diagrams (station wagon)
MazBook.ru © 2018–2026 · Mobile version · Articles and news · Sitemap: EN BG BY UA RS HR RO PL SK HU · Feedback · Site search · Add to bookmarks Familia 5 (BF) · Familia 6 (BG) · Capella 3 (GC) · Capella 3 and 4 (GC) · Capella 4 (GD) · Capella 5 (GE) · Capella 6 (GF) · Mazda3 BK · Mazda6 GG · CX-5KE · Mazda 121 (3) · Mazda BT-50 (1) ·
By continuing to use the site, you agree to the use of cookies 🔐