
MazBook.ru
English Русский
Български
Беларускі
Український
Српски
Hrvatski
Română
Polski
Slovenský
Magyar
• Bookmark • Sitemap • Contacts •   
Cars Opel Cars Ford Cars Volkswagen Cars Audi Cars Kia Cars Renault Cars Peugeot


Familia Capella Mazda3 Mazda6 CX-? Others Articles
Familia 5 (1985-1989) Familia 6 (1989-1994)

Removal and installation / checking of the fuel pump (Mazda Familia BG)

  • Home
  • Mazda Familia
  • Familia BG (1989-1994)
  • Power unit
  • Supply system
  • Removal and installation / checking of the fuel pump
0
Contents: Carburetor engine ⇓ Examination ⇓ Removal ⇓ Installation ⇓

Carburetor engine


The fuel pump is bolted to the cylinder head. It is driven via a lever directly from the camshaft. It does not need to be removed to check the pump.

Warning! When removing the fuel pump, some fuel may leak out. Fuel vapors are toxic, so ensure good ventilation. Avoid contact with skin. Wear fuel-resistant gloves. Do not work near open flames! Keep a fire extinguisher handy!


Examination
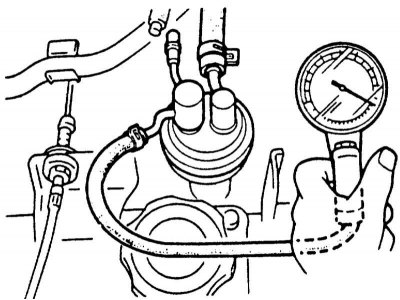


Examination


1. Disconnect the fuel hose on the carburetor and connect it to the pressure gauge.

2. Disconnect the return fuel hose from the pump and plug the nipple on the pump with a plug. Secure the plug with a clamp. Plug the return fuel line with a clean bolt.

3. Ask an assistant to start the engine. When the starter is running, read the pressure gauge. The pressure when the starter is running should be 2.8-3.5 Bar (E1, EZ, E5: 2.0-3.0 Bar).
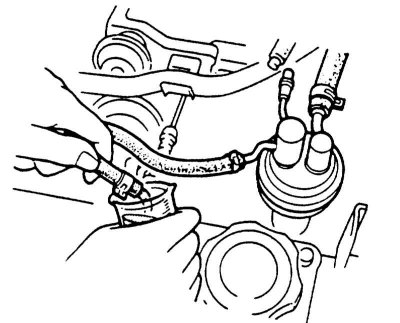
3. Ask an assistant to start the engine. When the starter is running, read the pressure gauge. The…


4. Remove the pressure gauge and lower the fuel hose into a measuring vessel (graduating cylinder).


5. Ask an assistant to start the engine. The pump should deliver 800 ml of fuel per minute at idle speed.

6. Remove the plug, connect the fuel lines and secure with clamps.

7. If the values during the test do not correspond to the required ones, the pump is faulty and must be replaced.

Removal
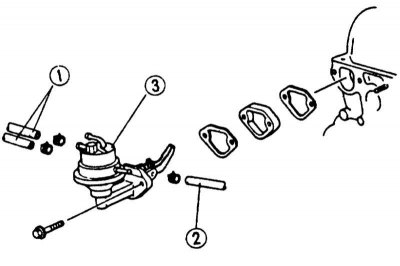


Removal


1. Loosen the hose clamps and disconnect fuel hoses "1" and "2". Plug the hoses with suitable clean bolts. Mark the hoses with adhesive tape.

Caution! When disconnecting the fuel lines, place a rag underneath to collect any leaking fuel.


2. Unscrew the mounting bolts and remove the fuel pump "3", gaskets and insulator.

Installation


1. Carefully remove any remaining sealing material from the sealing surface on the cylinder head and the insulator using a scraper.

(The article is copied from the resource: MazBook.ru)

2. Install the fuel pump with 2 new gaskets and insulator and tighten the mounting bolts with force 25 Nm.

3. Connect the fuel lines according to the markings and secure with hose clamps.

4. Start the engine and check the tightness of the fuel pump and connections.
This article is available at: russian, bulgarian, belarusian, ukrainian, serbian, croatian, romanian, polish, slovak, hungarian
This text was checked by: Evdokia Filimonova
Share with friends on social networks:

Previous
Familia 6 » Supply system
Next

Removal and installation the fuel pump
Removal and installation the fuel tank
Removal and installation / checking the sensor in the fuel tank
Cleanliness rules when working with the power supply system
Description of the power supply system
Removal and installation the air filter
More articles on repairing other Mazda models
Fuel Pump (EGI) — checking, removing and installing Mazda Capella 3 (1982-1992, petrol)
Checking for fuel leaks after installing the pump unit (diesel) Mazda3 BK (2003-2009)
Fuel Pump Unit — General Information Mazda6 GG (2002-2008)
Checking fuel injectors of the high-pressure fuel pump Mazda CX-5KE (2012-2017)
Checking the fuel pressure control valve of the high-pressure fuel… Mazda BT-50 (1) (2006-2011)
Link in different formats to this article
Comments and feedback from visitors
No comments yet


How much will 45 + 25 ?


Familia 6 (1989-1994) 
  • General information
  • Introduction to guide
  • User manual
  • Maintenance
  • Power unit
  • Petrol engines
  • Diesel engines
  • Lubrication system
  • Cooling system
  • Ignition system
  • Supply system
  • Carburetor
  • Injection system
  • Exhaust system
  • Transmission
  • Clutch
  • Car gearbox
  • Chassis
  • Front suspension
  • Rear suspension
  • Steering
  • Brake system
  • Wheels and tires
  • Body
  • Body elements
  • Doors and windows
  • Body Care
  • Electrical equipment
  • Equipment and devices
  • Power devices
  • Heating system
  • Lighting and headlights
  • Windshield wipers and washers
  • Wiring diagrams (since 1987)
  • Wiring diagrams (since 1991)
Familia 5 (1985-1989) 
  • General information
  • Vehicle data
  • Model «E» engine
  • Engine repair
  • Cooling and lubrication system
  • Power and ignition system
  • Model «B» engine
  • Engine repair
  • Cooling and lubrication system
  • Ignition system
  • Power system (carburetor)
  • Power system (injector)
  • Transmission
  • Clutch
  • Mechanical gearbox
  • Automatic gearbox
  • Front wheel drive
  • Chassis
  • Steering
  • Front suspension
  • Rear suspension
  • Brake system
  • Electrical equipment
  • Equipment and devices
  • Electrical circuits
  • Wiring diagrams (station wagon)
MazBook.ru © 2018–2026 · Mobile version · Articles and news · Sitemap: EN BG BY UA RS HR RO PL SK HU · Feedback · Site search · Add to bookmarks Familia 5 (BF) · Familia 6 (BG) · Capella 3 (GC) · Capella 3 and 4 (GC) · Capella 4 (GD) · Capella 5 (GE) · Capella 6 (GF) · Mazda3 BK · Mazda6 GG · CX-5KE · Mazda 121 (3) · Mazda BT-50 (1) ·
By continuing to use the site, you agree to the use of cookies 🔐