
MazBook.ru
English Русский
Български
Беларускі
Український
Српски
Hrvatski
Română
Polski
Slovenský
Magyar
• Bookmark • Sitemap • Contacts •   
Cars Opel Cars Ford Cars Volkswagen Cars Audi Cars Kia Cars Renault Cars Peugeot


Familia Capella Mazda3 Mazda6 CX-? Others Articles
Mazda 121 (3) (1996-2003) Mazda BT-50 (1) (2006-2011)

Removal and installation the fuel tank (Mazda 121 (3))

  • Home
  • Mazda
  • 121 JASM (1996-2003)
  • Power unit
  • Supply system
  • Removal and installation the fuel tank
0
Contents: Precautionary measures ⇓ Removal ⇓ Installation ⇓

Precautionary measures


Do not use open fire, do not smoke, and do not bring hot or very hot objects to the workplace - this is a fire hazard! Prepare a fire extinguisher.

Ensure good ventilation of the workplace - fuel vapors are toxic.

The fuel system is under pressure. When opening the system, gasoline may spray out, which should be collected with a rag. Wear protective glasses when working.

Note: A special pump is required to suck out the fuel. A jack and four stands are required to support the vehicle.


Removal


Drive a car until all the gas in the tank is used up.

Disconnect the negative cable from the battery with the ignition off. This will erase the data from the electronic memory units, such as radio codes. See the instructions in the chapter "Electrical equipment".

Unscrew the fuel tank cap and suck out the remaining fuel from the tank using a pump, following the operating instructions.

Raise and support the vehicle.

Unhook the exhaust system from the rubber mounts at the front and rear, lower it slightly and hang it on a wire under the bottom of the car body.
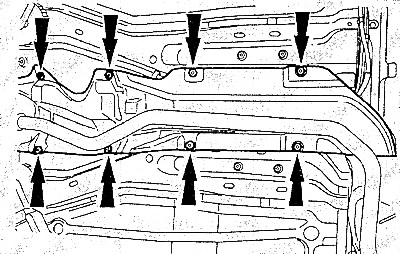
Unscrew and remove the middle and rear heat shields of the exhaust system.
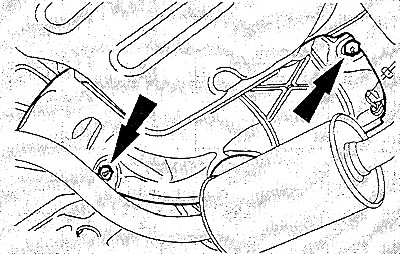

Unscrew and remove the middle and rear heat shields of the exhaust system.


Ford Fiesta/Mazda 121: unscrew the bolts and remove the heat shield of the tank.
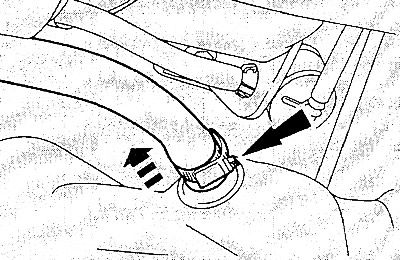

Ford Fiesta/Mazda 121: unscrew the bolts and remove the heat shield of the tank.

Loosen the hose clamp and pull the ventilation hose off the tank.


Loosen the hose clamp and pull the ventilation hose off the tank.

Support the vehicle from behind and support the fuel tank with a jack, placing a block of wood under its head to avoid damaging the surface of the tank.

Precautions: The gasoline injection system is under pressure. When opening the system, fuel may spray out, which should be collected with a rag. Wear goggles when working.


Gasoline engine: Place a container underneath to catch the drain. Pull the fuel outlet line off the quick release coupling on the fuel filter.
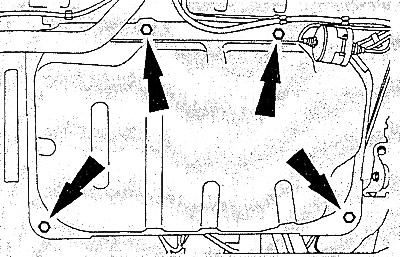
Unscrew the bolts and carefully lower the fuel side down a little.


Unscrew the bolts and carefully lower the fuel side down a little.


Caution: The filler neck remains on the vehicle. Unhook the tank from the filler neck.
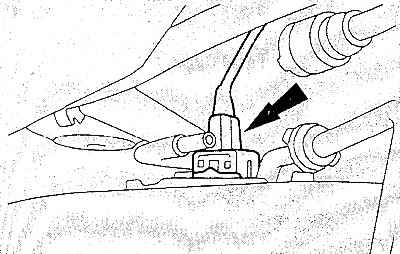

Remove the fuel quantity sensor/fuel pump plug.
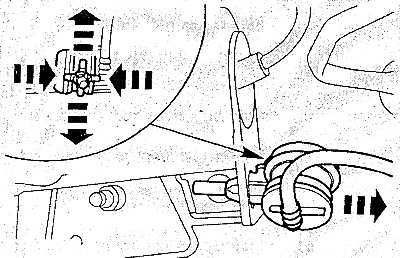

Remove the fuel quantity sensor/fuel pump plug.

Pull the return fuel line off the top of the tank by squeezing the quick release coupling. On a…


Pull the return fuel line off the top of the tank by squeezing the quick release coupling. On a diesel engine, remove the two fuel lines. To make installation easier, it is best to mark the connecting nipples and fuel lines with strips of adhesive tape.

Pull off the ventilation pipe from the safety valve. Remove the safety valve from the holder.

Check that all wires, tubes and hoses are disconnected. Remove the fuel tank.

Installation


Before installation, check the fuel tank for damage and replace it if necessary.
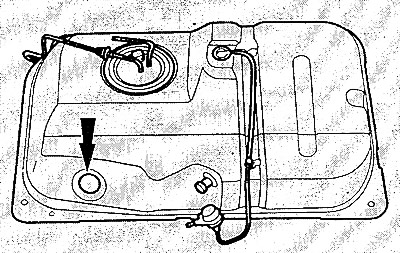
Lubricate the gasket on the filler neck of the tank with clean engine oil to make it easier to fit…


Lubricate the gasket on the filler neck of the tank with clean engine oil to make it easier to fit the neck.


Place the fuel tank in the installation position and install the fuel sensor/fuel pump plug.

Insert the safety relief valve into the holder and put on the ventilation hose.

Put on the upper fuel line (fuel lines) on quick-release connections.

Install the fuel tank and secure it with bolts.

Gasoline engine: Attach the fuel hose connection to the fuel filter.

Place the ventilation pipe on top of the fuel tank and secure it with a clamp.

Install the heat shield on the underbody of the vehicle.

Hang the exhaust system on rubber hangers, remove the wire on which it was hanging previously.

Lower the car.

Fill the tank with fuel and tighten the tank cap.

Connect the negative cable to the battery. Set the clock and enter the required radio codes.

Start the engine and check the operation of the fuel gauge on the instrument panel.
This article is available at: russian, bulgarian, belarusian, ukrainian, serbian, croatian, romanian, polish, slovak, hungarian
This text was checked by: Evgeny Mereshnikov
Share with friends on social networks:

Previous
Mazda 121 (3) » Supply system
Next

Checking, removing and installing the fuel pump relay
Turning on, removing and installing the fuel pump safety switch
Precautions and rules when working with the fuel system
How to save fuel while driving
Fuel system — general information
Removal and installation the fuel pump and fuel quantity sensor
Removal and installation the air filter and air supply hose
Removal and installation the gas cable
Adjusting the throttle cable
More articles on repairing other Mazda models
Removal and installation / checking the sensor in the fuel tank Mazda Familia 6 (1989-1994)
Fuel tank repair Mazda Capella 3 (1982-1992, petrol)
Fuel tank filler flap and cap Mazda3 BK (2003-2009)
Fuel tank filler flap and cap Mazda6 GG (2002-2008)
Fuel tank filler flap and cap Mazda CX-5KE (2012-2017)
Link in different formats to this article
Comments and feedback from visitors
No comments yet


How much will 48 + 42 ?


Mazda BT-50 (1) (2006-2011) 
  • General information
  • Introduction to guide
  • User manual
  • Maintenance
  • Power unit
  • Engine repair (diesel)
  • Cooling and lubrication system
  • Fuel injection system
  • Intake and exhaust system
  • Engine electrical equipment
  • Transmission
  • Clutch
  • Mechanical gearbox
  • All-wheel drive system
  • Transfer case and gearboxes
  • Chassis
  • Front suspension
  • Rear suspension
  • Steering
  • Brake system
  • Body
  • Exterior (external elements)
  • Interior (internal elements)
  • Heating and air conditioning
  • Security system SRS
  • Electrical equipment
  • Equipment and devices
  • Electrical circuits
Mazda 121 (3) (1996-2003) 
  • General information
  • User manual
  • Maintenance
  • Power unit
  • Petrol engine 1.3 l
  • Petrol engine 1.25/1.4 l
  • Diesel engine
  • Lubrication system
  • Cooling system
  • Ignition system
  • Supply system
  • Fuel injection (gasoline)
  • Fuel injection (diesel)
  • Exhaust system
  • Transmission
  • Clutch
  • Car gearbox
  • Chassis
  • Front suspension
  • Rear suspension
  • Steering
  • Brake system
  • Wheels and tires
  • Body
  • Exterior (external elements)
  • Interior (internal elements)
  • Doors, windows and locks
  • Heating system
  • Electrical equipment
  • Troubleshooting
  • Equipment and devices
  • Lighting system
  • Power devices
  • Electrical circuits
MazBook.ru © 2018–2026 · Mobile version · Articles and news · Sitemap: EN BG BY UA RS HR RO PL SK HU · Feedback · Site search · Add to bookmarks Familia 5 (BF) · Familia 6 (BG) · Capella 3 (GC) · Capella 3 and 4 (GC) · Capella 4 (GD) · Capella 5 (GE) · Capella 6 (GF) · Mazda3 BK · Mazda6 GG · CX-5KE · Mazda 121 (3) · Mazda BT-50 (1) ·
By continuing to use the site, you agree to the use of cookies 🔐