
MazBook.ru
English Русский
Български
Беларускі
Український
Српски
Hrvatski
Română
Polski
Slovenský
Magyar
• Bookmark • Sitemap • Contacts •   
Cars Opel Cars Ford Cars Volkswagen Cars Audi Cars Kia Cars Renault Cars Peugeot


Familia Capella Mazda3 Mazda6 CX-? Others Articles
Mazda 121 (3) (1996-2003) Mazda BT-50 (1) (2006-2011)

Removal and installation the fuel pump and fuel quantity sensor (Mazda 121 (3))

  • Home
  • Mazda
  • 121 JASM (1996-2003)
  • Power unit
  • Supply system
  • Removal and installation the fuel pump and fuel quantity sensor
0
Contents: Removal ⇓ Installation ⇓
The fuel quantity sensor and the petrol fuel pump are located on top of the fuel tank.

the diesel engine is equipped with only a fuel quantity sensor without a pump, the fuel is supplied from the high-pressure fuel pump.

When the fuel level drops, the sensor float also drops. Due to the sliding contact on the float, the electrical resistance of the sensor increases. Because of this, the voltage supplied to the instrument panel drops, and the fuel gauge needle moves in the direction of the empty tank readings. On some models, when the fuel level drops to the reserve value, an additional control lamp on the instrument panel lights up.

Caution: Precautions are described at the beginning of the previous section.


Removal


Remove the fuel tank.
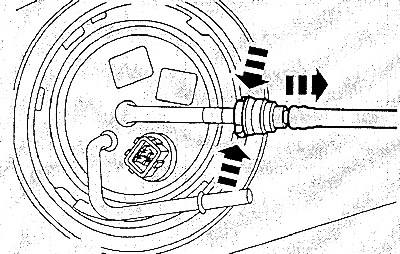
Gasoline engine: Pull the fuel supply line off the sensor. To loosen, fully press both buttons on…


Gasoline engine: Pull the fuel supply line off the sensor. To loosen, fully press both buttons on the quick release coupling and pull the coupling off. This fuel line coupling is marked with white paint or a white ring to avoid confusion during installation.
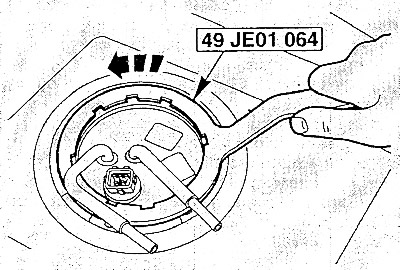
Turn the fastening ring counterclockwise using a special device. If there is no such device, you…


Turn the fastening ring counterclockwise using a special device. If there is no such device, you can turn this ring with a pipe wrench or tap it with a hardwood rod and light hammer blows.


Attention: Under no circumstances should sparks appear - this is a fire hazard!


Remove the mounting ring together with the gasket.
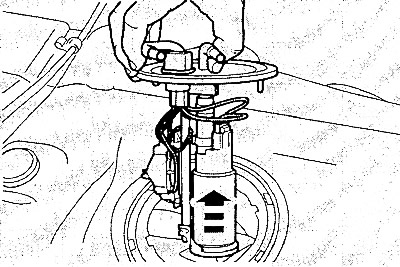
Pull out the sensor mount, tilt the sensor to the side and remove it. Place a rag underneath and…


Pull out the sensor mount, tilt the sensor to the side and remove it. Place a rag underneath and collect the protruding fuel.

Installation


Clean the sealing surface and fastening from rust and dirt.

Caution: Do not allow contaminants to fall into the fuel tank.
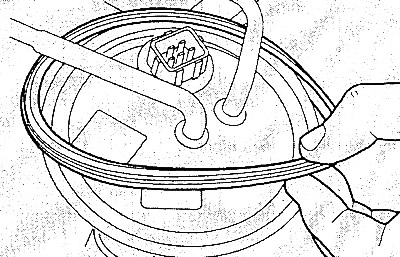

Remove the old sensor mounting sealing ring and replace with a new one.


Remove the old sensor mounting sealing ring and replace with a new one.

Install the sensor mount. Place the mounting ring together with the gasket and tighten it clockwise with a special tool.

Install the fuel supply line without mixing up the connections. Make sure that the quick-release coupling is fully seated on the fuel line.


Install the fuel tank.

[Text taken from an online platform: MAZBOOK.ru]
This article is available at: russian, bulgarian, belarusian, ukrainian, serbian, croatian, romanian, polish, slovak, hungarian
This text was checked by: Evgeny Mereshnikov
Share with friends on social networks:

Previous
Mazda 121 (3) » Supply system
Next

Removal and installation the fuel tank
Checking, removing and installing the fuel pump relay
Turning on, removing and installing the fuel pump safety switch
Precautions and rules when working with the fuel system
How to save fuel while driving
Removal and installation the air filter and air supply hose
Removal and installation the gas cable
Adjusting the throttle cable
More articles on repairing other Mazda models
Fuel pump — removal and installation Mazda Familia 5 (1985-1989)
Fuel Pump (EGI) — checking, removing and installing Mazda Capella 3 (1982-1992, petrol)
Fuel Pump Block — Description Mazda3 BK (2003-2009)
Fuel Pump Unit — General Information Mazda6 GG (2002-2008)
Checking fuel injectors of the high-pressure fuel pump Mazda CX-5KE (2012-2017)
Link in different formats to this article
Comments and feedback from visitors
No comments yet


How much will 14 + 15 ?


Mazda BT-50 (1) (2006-2011) 
  • General information
  • Introduction to guide
  • User manual
  • Maintenance
  • Power unit
  • Engine repair (diesel)
  • Cooling and lubrication system
  • Fuel injection system
  • Intake and exhaust system
  • Engine electrical equipment
  • Transmission
  • Clutch
  • Mechanical gearbox
  • All-wheel drive system
  • Transfer case and gearboxes
  • Chassis
  • Front suspension
  • Rear suspension
  • Steering
  • Brake system
  • Body
  • Exterior (external elements)
  • Interior (internal elements)
  • Heating and air conditioning
  • Security system SRS
  • Electrical equipment
  • Equipment and devices
  • Electrical circuits
Mazda 121 (3) (1996-2003) 
  • General information
  • User manual
  • Maintenance
  • Power unit
  • Petrol engine 1.3 l
  • Petrol engine 1.25/1.4 l
  • Diesel engine
  • Lubrication system
  • Cooling system
  • Ignition system
  • Supply system
  • Fuel injection (gasoline)
  • Fuel injection (diesel)
  • Exhaust system
  • Transmission
  • Clutch
  • Car gearbox
  • Chassis
  • Front suspension
  • Rear suspension
  • Steering
  • Brake system
  • Wheels and tires
  • Body
  • Exterior (external elements)
  • Interior (internal elements)
  • Doors, windows and locks
  • Heating system
  • Electrical equipment
  • Troubleshooting
  • Equipment and devices
  • Lighting system
  • Power devices
  • Electrical circuits
MazBook.ru © 2018–2026 · Mobile version · Articles and news · Sitemap: EN BG BY UA RS HR RO PL SK HU · Feedback · Site search · Add to bookmarks Familia 5 (BF) · Familia 6 (BG) · Capella 3 (GC) · Capella 3 and 4 (GC) · Capella 4 (GD) · Capella 5 (GE) · Capella 6 (GF) · Mazda3 BK · Mazda6 GG · CX-5KE · Mazda 121 (3) · Mazda BT-50 (1) ·
By continuing to use the site, you agree to the use of cookies 🔐