MazBook.ru
English Русский
Български
Беларускі
Український
Српски
Hrvatski
Română
Polski
Slovenský
Magyar
• Bookmark • Sitemap • Contacts •   
Cars Opel Cars Ford Cars Volkswagen Cars Audi Cars Kia Cars Renault Cars Peugeot


Familia Capella Mazda3 Mazda6 CX-? Others Articles
Familia 5 (1985-1989) Familia 6 (1989-1994)

Spare wheel (Mazda Familia BG)

  • Home
  • Mazda Familia
  • Familia BG (1989-1994)
  • General information
  • User manual
  • Spare wheel
0
Contents: Toolbox ⇓ Removal the jack ⇓ Removal the spare wheel from the…⇓ Fixing the spare wheel in the mount ⇓
Spare wheel


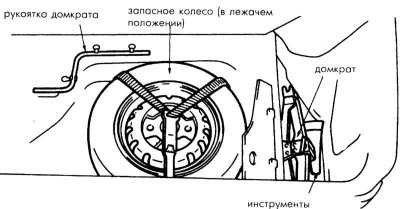
The spare wheel can be placed either in a standing or lying position, depending on the need.
The spare wheel can be placed either in a standing or lying position, depending on the need.


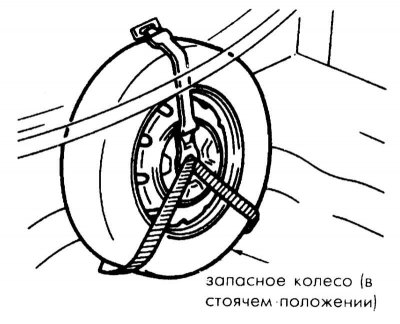
Spare wheel in standing position:
  • 1. Fold the spare wheel cover toward the back of the rear seat.
  • 2. Install the wheel and secure it with straps.

Warning: Make sure that the rear seat back is properly secured when placing the spare wheel in the standing position, so that no additional danger arises in the event of emergency braking or an accident.


Hatchback


Hatchback


The spare wheel, jack, jack handle and tools are located in the luggage compartment.


Note: To prevent the jack, jack handle and tools from rattling when moving, they must be properly secured.


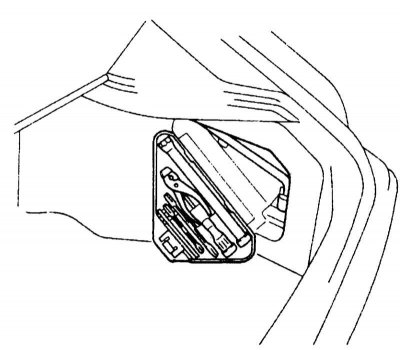
Toolbox
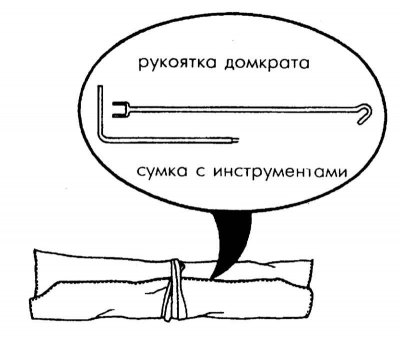


Toolbox


The tool box is located on the right side of the luggage compartment.

Station wagon


The jack, jack handle and tools are located in the trunk.

Removal the jack


Note: To prevent the jack, jack handle and tools from rattling when moving, they must be properly secured.
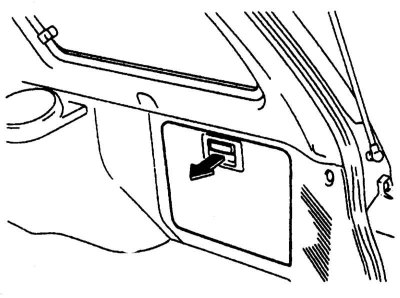

Note: To prevent the jack, jack handle and tools from rattling when moving, they must be properly…


The jack is located in the box on the right side. Open the lid and loosen the clamp bolt to remove the jack.

Removal the spare wheel from the mount
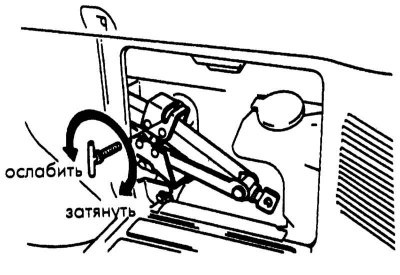


Removal the spare wheel from the mount


1. Open the tailgate.
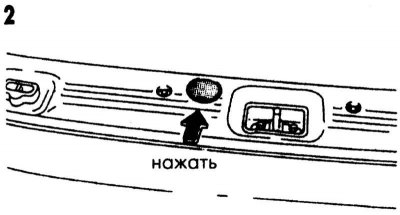


1. Open the tailgate.


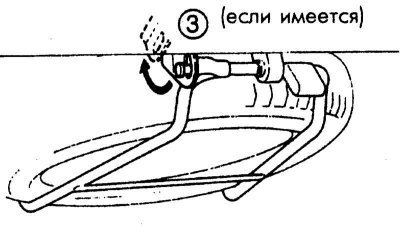
2. Remove the fastening bolt cap. Press the cap brackets in the direction of the arrow and pull out the cap.

Turn the bolt with a lug wrench 30-35 turns to the left.
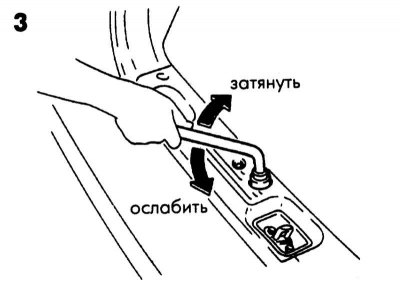
Turn the bolt with a lug wrench 30-35 turns to the left.


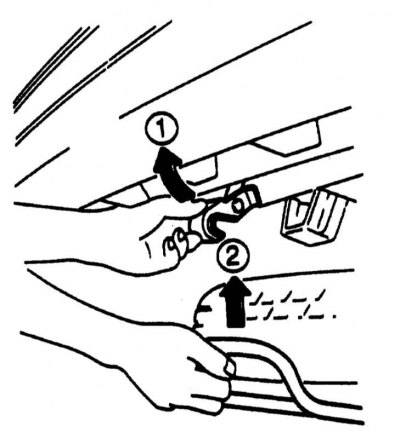
Press the spare tire mount upward and pull the tabs back to release the mount. Hold the spare tire mount firmly while pressing the latch forward.
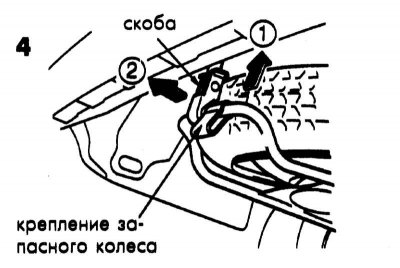
Press the spare tire mount upward and pull the tabs back to release the mount. Hold the spare tire…

Text taken from an online platform Mazbook


Caution: If you release the spare wheel fastening, the wheel may come off.


Fixing the spare wheel in the mount


1. Place the spare tire correctly into the center of the mount.

Warning! If the spare tire is not installed correctly in the mount, the mount will not be secured properly. Even if the mount can be installed, there is a risk that the tire will fall off while driving.

Warning! If the spare tire is not installed correctly in the mount, the mount will not be secured…


2. Secure the spare wheel in the reverse order of removal.
This article is available at: russian, bulgarian, belarusian, ukrainian, serbian, croatian, romanian, polish, slovak, hungarian
This text was checked by: Evdokia Filimonova
Share with friends on social networks:

Previous
Familia 6 » User manual
Next

Trunk lid (if equipped)
Luggage straps (wagon, if equipped)
Rear view mirrors
Refueling a car
Tailgate / Boot lid
Dashboard
Ignition and steering column lock
Starting the engine
Manual transmission and transfer case control
Operating a car with an automatic transmission
More articles on repairing other Mazda models
Key left in steering wheel lock reminder signal Mazda Capella 3 (1982-1992, petrol)
Spare wheel and tool kit Mazda3 BK (2003-2009)
Spare wheel and tool kit Mazda6 GG (2002-2008)
Spare wheel and tool kit Mazda CX-5KE (2012-2017)
Checking the steering wheel covers Mazda 121 (3) (1996-2003)
Link in different formats to this article
Comments and feedback from visitors
No comments yet


How much will 34 + 31 ?


Familia 6 (1989-1994) 
  • General information
  • Introduction to guide
  • User manual
  • Maintenance
  • Power unit
  • Petrol engines
  • Diesel engines
  • Lubrication system
  • Cooling system
  • Ignition system
  • Supply system
  • Carburetor
  • Injection system
  • Exhaust system
  • Transmission
  • Clutch
  • Car gearbox
  • Chassis
  • Front suspension
  • Rear suspension
  • Steering
  • Brake system
  • Wheels and tires
  • Body
  • Body elements
  • Doors and windows
  • Body Care
  • Electrical equipment
  • Equipment and devices
  • Power devices
  • Heating system
  • Lighting and headlights
  • Windshield wipers and washers
  • Wiring diagrams (since 1987)
  • Wiring diagrams (since 1991)
Familia 5 (1985-1989) 
  • General information
  • Vehicle data
  • Model «E» engine
  • Engine repair
  • Cooling and lubrication system
  • Power and ignition system
  • Model «B» engine
  • Engine repair
  • Cooling and lubrication system
  • Ignition system
  • Power system (carburetor)
  • Power system (injector)
  • Transmission
  • Clutch
  • Mechanical gearbox
  • Automatic gearbox
  • Front wheel drive
  • Chassis
  • Steering
  • Front suspension
  • Rear suspension
  • Brake system
  • Electrical equipment
  • Equipment and devices
  • Electrical circuits
  • Wiring diagrams (station wagon)
MazBook.ru © 2018–2026 · Mobile version · Articles and news · Sitemap: EN BG BY UA RS HR RO PL SK HU · Feedback · Site search · Add to bookmarks Familia 5 (BF) · Familia 6 (BG) · Capella 3 (GC) · Capella 3 and 4 (GC) · Capella 4 (GD) · Capella 5 (GE) · Capella 6 (GF) · Mazda3 BK · Mazda6 GG · CX-5KE · Mazda 121 (3) · Mazda BT-50 (1) ·
By continuing to use the site, you agree to the use of cookies 🔐