
MazBook.ru
English Русский
Български
Беларускі
Український
Српски
Hrvatski
Română
Polski
Slovenský
Magyar
• Bookmark • Sitemap • Contacts •   
Cars Opel Cars Ford Cars Volkswagen Cars Audi Cars Kia Cars Renault Cars Peugeot


Familia Capella Mazda3 Mazda6 CX-? Others Articles
Mazda3 BK (2003-2009)

Removal and installation refrigerant lines (LF) (Mazda 3 BK)

  • Home
  • Mazda 3
  • Mazda3 BK (2003-2009)
  • Body
  • Air conditioning and heater
  • Removal and installation refrigerant lines (LF)
0
Contents: Removal ⇓ Separation of the insulating joint ⇓ Installation ⇓
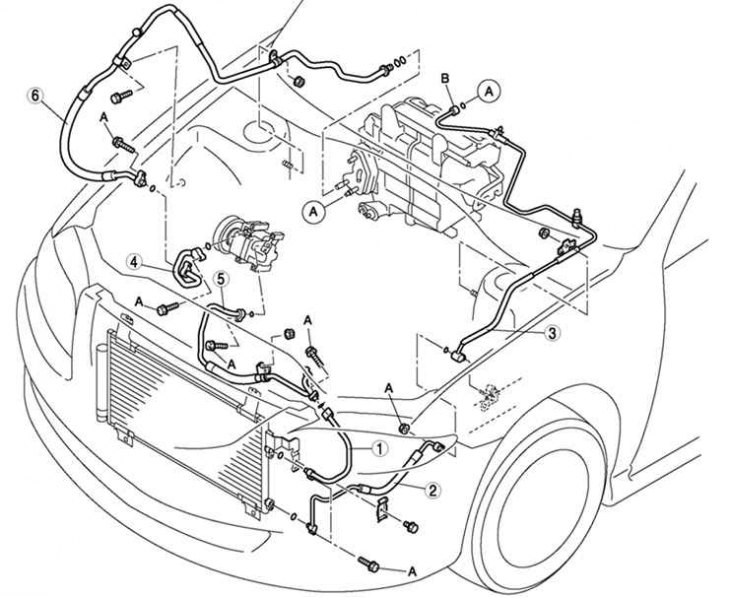
Fig. 8.78. Coolant line of Mazda 3: 1 – Cooler tube No.1; 2 – cooler tube No.2; 3 – cooler tube…

Fig. 8.78. Coolant line of Mazda 3: 1 – Cooler tube No.1; 2 – cooler tube No.2; 3 – cooler tube No.3; 4 – cooler tube No.4; 5 – cooler hose (upper); 6 – cooler hose (lower)


Removal


Disconnect the negative cable from the battery.

Discharge the refrigerant.

Remove the power steering reservoir.

Remove the expansion tank of the cooling system

Remove the throttle cable.

Remove the power steering hose bracket.

Remove in the order shown in table. Do not allow oil to spill from the compressor.

Warning! If moisture or impurities enter the cooling circuit, the cooling capacity of the circuit will be reduced and abnormal noise will be heard. Always plug open fittings after removing any components of the cooling circuit to prevent moisture or impurities from entering the circuit.


Separation of the insulating joint
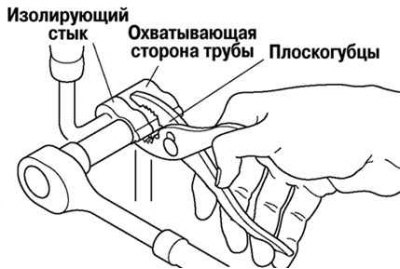


Fig. 8.79. Disconnection of pipes with an insulating joint

Fig. 8.79. Disconnection of pipes with an insulating joint


To disconnect pipes with an insulated joint, clamp the female side of the pipe with pliers or a similar tool, and then unscrew the connecting bolt or nut (Fig. 8.79).
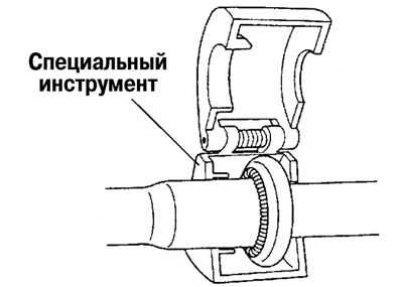
Fig. 8.80. Installing a special device on a coupling with a spring lock

Fig. 8.80. Installing a special device on a coupling with a spring lock


Install a special device on the coupling with a spring lock (Fig. 8.80).

Insert the protruding element of the special device into the holder until it stops, monitoring the position of the protruding element through the viewing window.

Use a special tool to disconnect the male pipe or hose from the female part by pulling on the male part of the pipe or hose.
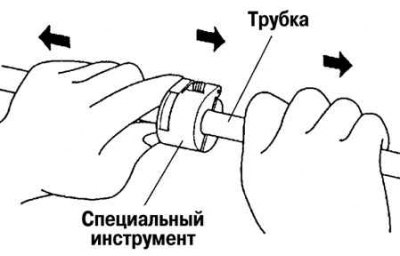
Fig. 8.81. Disconnecting tubes

Fig. 8.81. Disconnecting tubes


Caution! The male tube or hose can be easily disconnected from the female part by pulling it out while simultaneously pressing on the protruding element of the special device (Fig. 8.81).


Installation


Apply compressor grease to the o-rings and connect the tubes.

(Article is based on website data: Mazbook)

Tighten the connections.

Tighten the insulating joint connection bolt by hand.
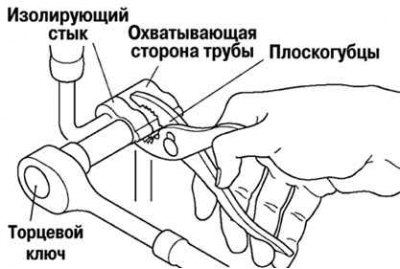
Fig. 8.82. Connecting pipes with an insulating joint

Fig. 8.82. Connecting pipes with an insulating joint


To connect tubes with an insulated joint, clamp the female side of the tube with pliers or a similar tool, and then tighten the connecting bolt or nut with a torque wrench (Fig. 8.82).

Attach the male tube or hose by screwing it into the female part until the spring on the male tube is behind the socket of the female tube.

Perform operational tests of the cooling circuit.

Note: When replacing the male tube or hose, the indicator ring appearing after connection indicates that the connection is locked.
This article is available at: russian, bulgarian, belarusian, ukrainian, serbian, croatian, romanian, polish, slovak, hungarian
This text was checked by: Evdokia Filimonova
Share with friends on social networks:

Previous
Mazda3 BK » Air conditioning and heater
Next

Removal, installation and checking the capacitor
Checking the overrunning clutch
Adjusting the overrunning clutch
Disassembly and assembly of the overrunning clutch
Removal and installation the air conditioning compressor
Air Conditioning System Troubleshooting Guide
More articles on repairing other Mazda models
Replacement of brake lines and hoses Mazda Familia 6 (1989-1994)
Repair and replacement of fuel lines Mazda Capella 3 and 4 (1982-1992)
Air conditioning refrigerant Mazda6 GG (2002-2008)
Removal and installation of high pressure fuel lines Mazda CX-5KE (2012-2017)
Visual inspection of brake lines Mazda 121 (3) (1996-2003)
Link in different formats to this article
Comments and feedback from visitors
No comments yet


How much will 44 + 30 ?


Mazda3 BK (2003-2009) 
  • User manual
  • Vehicle description
  • Keys, locks and alarms
  • Controls and instruments
  • Air conditioning and heater
  • Seat adjustment
  • Security systems
  • Driving and operation
  • Faults en route
  • Maintenance
  • Power unit
  • Engine device (gasoline)
  • Engine repair (gasoline)
  • Diesel engine (Z6)
  • Lubrication system
  • Cooling system
  • Fuel system
  • Exhaust system
  • Engine electrical equipment
  • Engine management system
  • Transmission
  • Clutch
  • Mechanical gearbox
  • Automatic gearbox
  • Drive mechanism
  • Chassis
  • Suspension and wheels
  • Steering
  • Brake system
  • Body
  • Body elements
  • Doors and windows
  • Air conditioning and heater
  • Electrical equipment
  • Equipment and devices
  • Power devices
  • Lighting system
  • Windshield wipers and washers
  • Equipment checks
MazBook.ru © 2018–2026 · Mobile version · Articles and news · Sitemap: EN BG BY UA RS HR RO PL SK HU · Feedback · Site search · Add to bookmarks Familia 5 (BF) · Familia 6 (BG) · Capella 3 (GC) · Capella 3 and 4 (GC) · Capella 4 (GD) · Capella 5 (GE) · Capella 6 (GF) · Mazda3 BK · Mazda6 GG · CX-5KE · Mazda 121 (3) · Mazda BT-50 (1) ·
By continuing to use the site, you agree to the use of cookies 🔐