


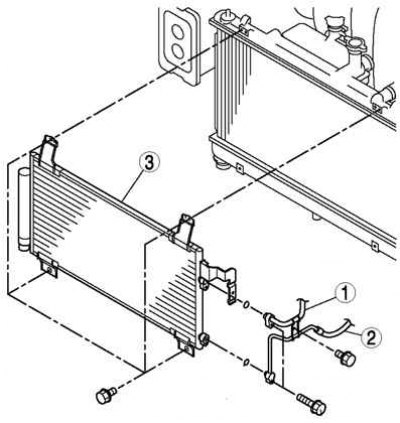
Fig. 8.77. Capacitor: 1 – cooler hose No.1; 2 – cooler hose No.2; 3 – capacitor
Removal
Disconnect the negative cable from the battery.
Discharge the refrigerant.
Drain the coolant from the engine.
Remove the intake air duct cover.
Remove the intake air duct (Z6).
Remove the air filter (LF).
Remove the mudguard.
Drain the automatic transmission fluid (models with automatic transmission).
Disconnect the coolant tube (upper) and coolant hose. Do not allow any remaining compressor oil to spill from the cooling circuit line.
Warning! If moisture or impurities enter the cooling circuit, the cooling capacity of the circuit will be reduced and abnormal noise will be heard.
Caution: Always plug open fittings after removing any cooling circuit components.
Disconnect the radiator hose from the radiator.
Disconnect the oil hose from the oil cooler (models with automatic transmission).
Remove the cooling fan.
Remove the oil cooler (models with automatic transmission).
Remove the radiator with the condenser installed.
Pull the radiator hook back and pull out the condenser, being careful not to spill any remaining oil from the condenser.
Installation
Install in the reverse order of removal.
Perform operational tests of the cooling circuit.
After replacing the condenser, add compressor oil to the cooling circuit.
Amount of oil added (approximate quantity): 20 ml.
Checking the capacitor
Check the condenser for damage and oil leaks.
If there is a fault, replace the capacitor.
Visually inspect the plates for deposits.
If there are deposits, remove them.
Visually check the plates for bending.
If any bending is detected, straighten the plates with a flat-head screwdriver.