
The valve clearance on a 1.3 liter engine must be checked every 30 thousand km, on a diesel engine - every 45 thousand km and, if necessary, corrected.
Required fixtures:
- A set of flat probes with a pitch of 0.05 mm.
- Set of wrenches.
- Diesel: Valve Compressor, Valve Plate Clip.
Required spare parts:
- Valve cover gasket. On 1.25-/1.4L engines, the gasket is tightly connected to the valve cover and cannot be replaced.
- Diesel and 1.25-/1.4L engines: shims in various thicknesses.
To compensate for thermal expansion in the valve actuator, there must be a certain distance between the camshaft cam and the valve lifter or between the valve and the rocker arm.
This valve clearance changes over time due to valve settling and wear of actuator parts.
If the gap is too small, the valve timing changes, sealing deteriorates, engine power decreases, engine operation becomes uneven. In extreme cases, the valves can warp and burn.
If the gap is too large, strong mechanical noises appear, the valve timing changes, the engine power drops due to insufficient filling of the cylinders. Engine operation is uneven.
Valve clearance is checked and adjusted on a cold engine.
1.3L engine
Valve clearance check
Remove the plugs from all spark plugs, numbering them so as not to make a mistake during installation.
Unscrew the spark plugs with a spark plug wrench.
Remove the engine oil filler cap.
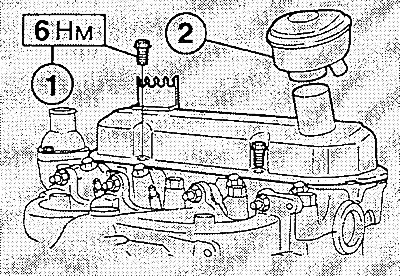
Loosen four screws (I), remove washers. Remove valve cover. (2 - oil filler cap).
Turn the crankshaft pulley in the normal direction of its rotation, i.e. clockwise. This can be done in three ways:
- 1. Shift out of gear on the transmission, apply the parking brake, and slide the ratchet socket onto the pulley center bolt.
- 2. Engage fourth gear, release the parking brake and roll the car.
- 3. Raise and support the vehicle on the right front to hang the wheel, engage fourth gear and turn the right front wheel by hand.
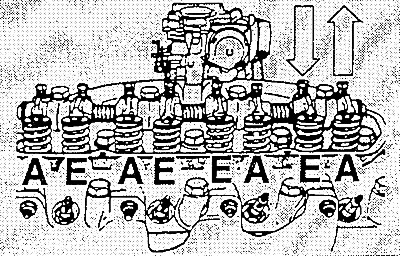
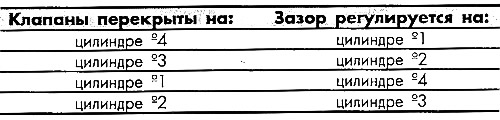
Turn the crankshaft pulley until the valves on the first or fourth cylinder close. This means that when one rocker moves up, the other rocker starts to move down, and when both rockers are at the same height, the valves overlap. When, for example, the valves of the fourth cylinder overlap (arrows), then you can check and adjust the valve clearance on the first cylinder. (A - exhaust valve; B - inlet valve).
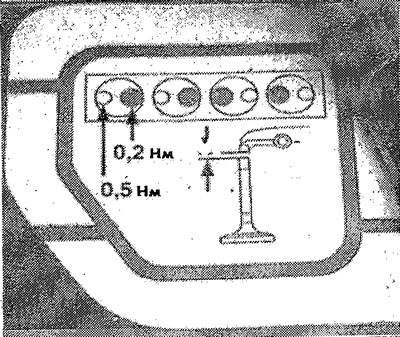
* When there is a sticker on the valve cover that indicates a valve clearance for the exhaust valve of 0.5 mm, then this value should be used as a guide.
Then turn the pulley another half turn and adjust the valve clearances according to the ignition order 1-2-4-3.
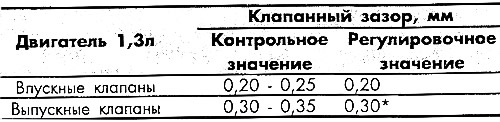
Measure valve clearance with a flat feeler gauge. If the clearance value is within the range of control values, then the valve clearance does not need to be adjusted.
Adjustment
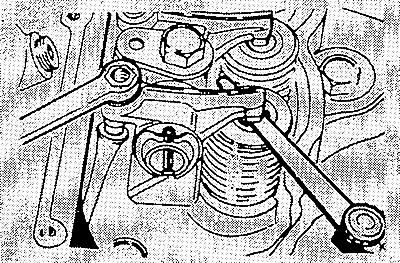
Turn the adjusting bolt so that the probe of the desired thickness (adjustment value) could move with slight pinching.
To check, try to push in the probe, which is 0.05 mm thicker than the upper range of the control value (see table). It must not slide between the valve and the rocker arm. Repeat the adjustment if necessary.
Check and adjust the valve clearances of the remaining cylinders according to the ignition order.
Replace valve cover gasket. Install the valve cover and tighten the cover bolts evenly and lightly (torque 6 Nm).
Screw in spark plugs and tighten to 20 Nm.
Put the plugs on the spark plugs and fix the high voltage wires in the holder on the valve cover.
Diesel engine
Valve clearance check
Remove the engine ventilation valve from the valve cover by loosening the clamp.
Remove valve cover.
Unscrew the four nuts and remove the oil deflector.
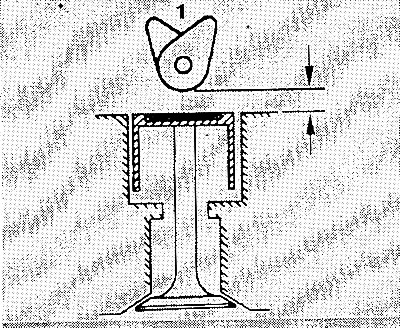
1. Valve in position to check clearance.
Crank the engine until the corresponding cylinder cams point evenly upwards. Engine cranking methods are described in the previous section.
Insert a feeler gauge between cam and poppet and measure valve clearance.

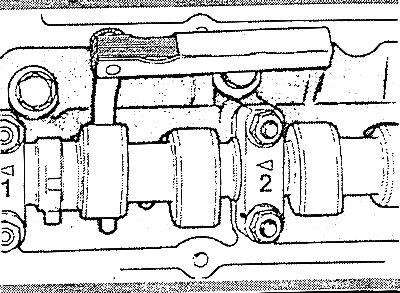
Attention! For all cylinders, valves are located at the front (those. from the toothed belt) so: 1 - inlet valve; 2 - exhaust valve.
A flat feeler gauge of the correct thickness should fit with a slight pinch between the cam and the follower. Write down the obtained value of the valve clearance.
Crank the crankshaft a further half turn and measure the valve clearance on the next cylinder in ignition order (in this case the third). Ignition order: 1-3-4-2.
Adjustment
To adjust the valve clearance, replace the old shim with a shim of a different thickness.
Washer thickness calculation example: Permissible variation: 0.30-0.40 mm (0.35±0.05 mm).
Measured value: 0.45 mm. Valve clearance: increased by 0.05 mm.
If the values obtained are within the acceptable range, then the shim does not need to be changed. If the value is out of range, then when adjusting, you need to achieve the adjusting (middle) values, in this case 0.35 mm. Thickness of the middle shim: 3.85 mm.
Thickness of required shim: 3.95 mm.
When adjusting the valve clearance, the piston must not be at TDC, otherwise the valves and/or pistons may be damaged. At the same time turn the crankshaft 1/4 turn.
Adjust valve clearance. This requires special tools. Without them, adjustment is not possible.
Press the poppet with a tool and pull out the adjusting washer with a special clip. Then insert a new shim so that the lettering is pointing down.
Remove the tool, turn the camshaft further and adjust the clearances on the valves of other cylinders.
Install the oil deflector and tighten its fastening bolts to 20 Nm.
Install the valve cover with a new gasket and tighten the cover bolts slightly (moment - 5 Nm).
Fit the crankcase breather hose and secure with a clamp.
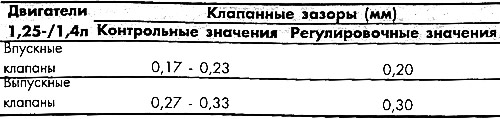
1.25/1.4L engines
Checking/adjusting valve clearance
Attention! Since the service interval (150 thousand km) coincides with the timing of the replacement of the toothed belt and at the same time performs a large amount of work, and also requires many different tools, it is recommended that this operation be carried out in a workshop.
To adjust the valve clearance, just as for a diesel engine, you need to replace the adjusting washer in the poppet pusher with a washer of a different thickness. No valve attachments are known to be used at this time. In this regard, the following sequence of operations is recommended:
Remove valve cover.
Crank engine and check valve clearances on all valves:
If the valve clearance is to be adjusted on several valves, record the measured valve clearances.
Remove the corresponding camshaft.
Pull out the adjusting washer with a clamp or a sharp awl. Then insert a new adjusting washer so that the inscription on it is directed downwards.
Install camshaft (shafts) and a new toothed belt.