
MazBook.ru
English Русский
Български
Беларускі
Український
Српски
Hrvatski
Română
Polski
Slovenský
Magyar
• Bookmark • Sitemap • Contacts •   
Cars Opel Cars Ford Cars Volkswagen Cars Audi Cars Kia Cars Renault Cars Peugeot


Familia Capella Mazda3 Mazda6 CX-? Others Articles
Mazda 121 (3) (1996-2003) Mazda BT-50 (1) (2006-2011)

Removal water from the fuel filter/replacing (Mazda 121 (3))

  • Home
  • Mazda
  • 121 JASM (1996-2003)
  • General information
  • Maintenance
  • Removal water from the fuel filter/replacing
0
Contents: Diesel engine ⇓ Gasoline engine ⇓

Diesel engine


No special equipment is required.

Necessary details:
  • If necessary, a diesel fuel filter.
  • A suitable container is required to collect water.

Caution: If diesel fuel gets on rubber parts, it must be wiped off as quickly as possible, otherwise the rubber will be damaged over time.


Removal water


The fuel filter is located on the side of the cylinder block.
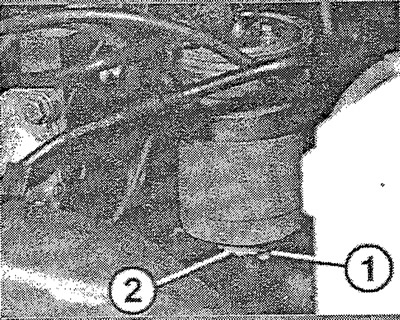
Place a suitable container under the drain nipple (1). To make the job easier, you can put a…


Place a suitable container under the drain nipple (1). To make the job easier, you can put a suitable hose on the nipple and direct it outwards.

Caution: Close the clutch cover to prevent diesel fuel from entering.


Loosen the drain bolt (2) by hand.

If fuel does not flow out, tighten the return hose at the top of the filter by squeezing the tabs on the quick release coupling.

Drain about 200 cm³ of water until clean diesel fuel flows. Tighten the drain bolt by hand.

Tighten the ventilation bolt on top of the filter.

Check the fuel system for tightness. To do this, start the engine. The air from the fuel system will be removed automatically.

Filter replacement
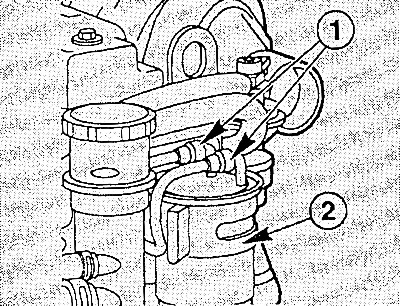


Drain the filter contents completely as if removing water.


Drain the filter contents completely as if removing water.


Tighten the fuel hoses by squeezing the tabs on the quick-release connections (1).

Note: When disconnecting the hoses, collect the leaking fuel with a rag. The fuel supply line connection is marked in white to avoid confusion during installation.


Loosen the clamp bolt on the filter mount (2) and remove the filter completely.

Fill the new filter to the brim with diesel fuel and install the filter.

Put on the fuel hoses without confusing them.

Remove the drain container from under the filter and, if necessary, remove the hose.

After the test drive, check the fuel system for leaks.

Gasoline engine


Replacing the fuel filter


No special equipment is required.

Necessary parts: Fuel filter.
Warning! The fuel system is under pressure. When disconnecting parts, gasoline may splash out, it must be collected with a rag. When removing the fuel filter, a lot of fuel may spill out, so you must place a container under the filter to collect the fuel.


Precautions: Do not use open fire, do not smoke, keep a fire extinguisher at hand. Be sure to provide good ventilation of the workplace and use protective glasses.


Caution! Do not dispose of contaminated gasoline into household sewage systems.


Removal


Disconnect the negative cable from the battery.

Attention! This will erase the data from the electronic memory blocks.


The filter is located under the car in front of the tank, next to the right rear wheel. Raise and support the car from behind.

Place a drain pan under the fuel filter.

Clean fuel line connections thoroughly before removing them, for example with cleaner and a brush.
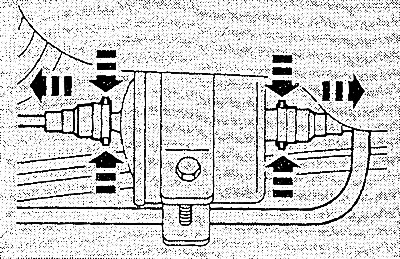


Wrap the fuel line connections with a rag. Remove the fuel lines by squeezing the side clamps of…


Wrap the fuel line connections with a rag. Remove the fuel lines by squeezing the side clamps of the quick-release connections with your fingers.
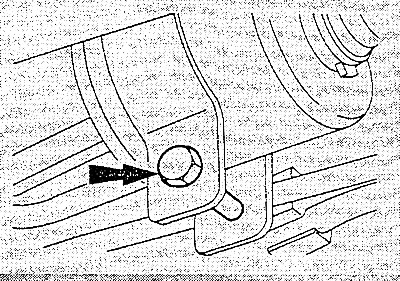
Loosen the filter mounting clamp.


Loosen the filter mounting clamp.

Remove the fuel filter, having first marked its position.

Installation
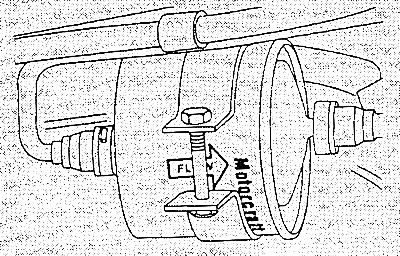


Install a new fuel filter. The direction of fuel flow is shown on the filter housing by an arrow,…


Install a new fuel filter. The direction of fuel flow is shown on the filter housing by an arrow, which should point from the tank to the engine.


Tighten the clamp bolt.

Slide the fuel lines into place to snap the quick release fittings into place.

Connect the negative cable to the battery. Set the clock, enter the radio security code.

Lower the car.

After the test drive, check the tightness of the fuel line connections.
This article is available at: russian, bulgarian, belarusian, ukrainian, serbian, croatian, romanian, polish, slovak, hungarian
This text was checked by: Evgeny Mereshnikov
Share with friends on social networks:

Previous
Mazda 121 (3) » Maintenance
Next

Adding concentrate (antifreeze)
Checking the concentration of coolant
Checking the cooling system for tightness
Checking the coolant level
Cleaning the oil filler cap
Replacing the air filter element
Checking poly V-belts
Replacing the timing belt
Visual inspection of the exhaust system
Replacing spark plugs/checking electrical connections
More articles on repairing other Mazda models
Draining diesel engine fuel filter sediment / replacing fuel filter Mazda Familia 6 (1989-1994)
Replacing the fuel filter Mazda Capella 3 (1982-1992, petrol)
Replacing the oil filter Mazda3 BK (2003-2009)
Replacing the air cleaner filter element Mazda6 GG (2002-2008)
Fuel filter (diesel engines) Mazda CX-5KE (2012-2017)
Link in different formats to this article
Comments and feedback from visitors
No comments yet


How much will 12 + 14 ?


Mazda BT-50 (1) (2006-2011) 
  • General information
  • Introduction to guide
  • User manual
  • Maintenance
  • Power unit
  • Engine repair (diesel)
  • Cooling and lubrication system
  • Fuel injection system
  • Intake and exhaust system
  • Engine electrical equipment
  • Transmission
  • Clutch
  • Mechanical gearbox
  • All-wheel drive system
  • Transfer case and gearboxes
  • Chassis
  • Front suspension
  • Rear suspension
  • Steering
  • Brake system
  • Body
  • Exterior (external elements)
  • Interior (internal elements)
  • Heating and air conditioning
  • Security system SRS
  • Electrical equipment
  • Equipment and devices
  • Electrical circuits
Mazda 121 (3) (1996-2003) 
  • General information
  • User manual
  • Maintenance
  • Power unit
  • Petrol engine 1.3 l
  • Petrol engine 1.25/1.4 l
  • Diesel engine
  • Lubrication system
  • Cooling system
  • Ignition system
  • Supply system
  • Fuel injection (gasoline)
  • Fuel injection (diesel)
  • Exhaust system
  • Transmission
  • Clutch
  • Car gearbox
  • Chassis
  • Front suspension
  • Rear suspension
  • Steering
  • Brake system
  • Wheels and tires
  • Body
  • Exterior (external elements)
  • Interior (internal elements)
  • Doors, windows and locks
  • Heating system
  • Electrical equipment
  • Troubleshooting
  • Equipment and devices
  • Lighting system
  • Power devices
  • Electrical circuits
MazBook.ru © 2018–2026 · Mobile version · Articles and news · Sitemap: EN BG BY UA RS HR RO PL SK HU · Feedback · Site search · Add to bookmarks Familia 5 (BF) · Familia 6 (BG) · Capella 3 (GC) · Capella 3 and 4 (GC) · Capella 4 (GD) · Capella 5 (GE) · Capella 6 (GF) · Mazda3 BK · Mazda6 GG · CX-5KE · Mazda 121 (3) · Mazda BT-50 (1) ·
By continuing to use the site, you agree to the use of cookies 🔐