
MazBook.ru
English Русский
Български
Беларускі
Український
Српски
Hrvatski
Română
Polski
Slovenský
Magyar
• Bookmark • Sitemap • Contacts •   
Cars Opel Cars Ford Cars Volkswagen Cars Audi Cars Kia Cars Renault Cars Peugeot


Familia Capella Mazda3 Mazda6 CX-? Others Articles
Familia 5 (1985-1989) Familia 6 (1989-1994)

Removal and installation door trim (Mazda Familia BG)

  • Home
  • Mazda Familia
  • Familia BG (1989-1994)
  • Body
  • Doors and windows
  • Removal and installation door trim
0
Contents: Removal ⇓ Installation ⇓
Caution! The removal is described for the front door. Removal for the rear door must be carried out accordingly.


Removal


1. Disconnect the ground cable from the battery.

Warning! This will erase the engine fault memory or the radio security code. Before disconnecting the battery, read the instructions in Section Removal and installation the battery.


2. When adjusting the mirror manually, unscrew the drive lever, having first removed the cover with a small screwdriver, see Chapter Body, car painting, car care.

3. Remove the door triangle trim.
3. Remove the door triangle trim.


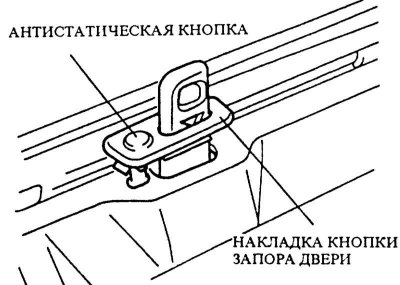
4. Since 3/91 issue: Remove the door lock button cover with a small screwdriver and remove it together with the antistatic button. To avoid damaging the upholstery, place a piece of cardboard under the screwdriver.

Note: The anti-static button is connected to the ground by a metal element. By touching this button before going out, you can avoid electric shock from static charge.

Note: The anti-static button is connected to the ground by a metal element. By touching this button…


[The article is reprinted from the portal mazbook.ru]


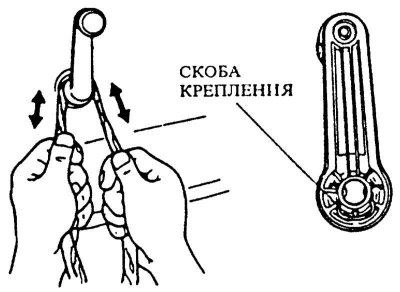
5. Remove the window lift handle. To do this, insert a screwdriver or a piece of cloth between the spacer washer and the handle and press the locking clip. At the same time, remove the handle from the shaft. If you cannot reach the handle, the locking clip can be removed with a bent wire.

6. Unscrew the inner door handle and disconnect it from the drive rod.

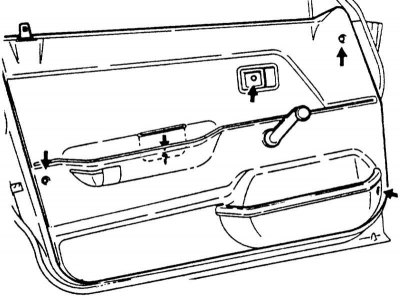
7. Unscrew the door trim and remove it. Disconnect the plug on the electric mirror adjuster switch.
7. Unscrew the door trim and remove it. Disconnect the plug on the electric mirror adjuster switch.


MAZDA 323 from 9/85 to 9/89.


8. Press the door trim away from the frame with a wide polymer or wooden wedge. This will release the fastening buttons from the grips. Remove the trim.

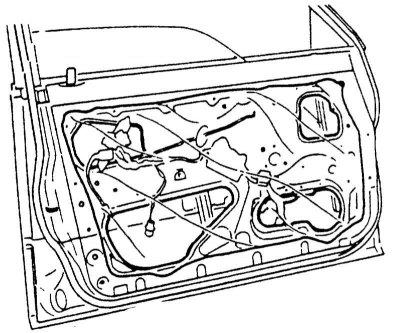
9. If necessary, remove the sealing film from the door, being careful not to tear it.

Installation


Installation


1. Carefully stick the sealing film to the frame from the bottom up. The film serves to isolate the interior from drafts, noise and water. If the adhesive layer is not good enough, use double-sided adhesive tape. Seal torn film with adhesive tape. If there are significant tears, replace the film.


2. Check the door trim fastening buttons. Replace damaged or bent buttons.

3. If available, connect the outside mirror cable.

4. Install the door trim first from the top, then insert it from the bottom and secure it in the area of the fastening buttons by hitting it with the back of your hand.

5. Screw the door trim.

6. Insert and screw in the inner door handle.

7. Place the window lift handle with the locking bracket inserted onto the shaft so that when the window is closed, the handle is positioned in the same way as on the opposite door.

8. When adjusting the mirror manually, screw the drive lever, then install the bolt cover, see Chapter Body, car painting, car care.

9. Install the door triangle trim.

10. Since 3/91 issue: Press and snap the door locking button cover with the antistatic button into the upholstery.

11. Connect the ground cable to the battery.

12. If available, set the time on the clock and set the security code for the radio receiver.
This article is available at: russian, bulgarian, belarusian, ukrainian, serbian, croatian, romanian, polish, slovak, hungarian
This text was checked by: Evdokia Filimonova
Share with friends on social networks:

Previous
Familia 6 » Doors and windows
Next

Door trim / window lifter / door glass
Removal and installation / adjustment of the door
Removal and installation/adjusting the tailgate
Removal and installation / adjustment of the hood
Removal and installation front door glass/window lifter
Door lock / handle / cylinder
Tailgate lock / internal drive
More articles on repairing other Mazda models
Door Trim Panel (Late Models) — removal and installation Mazda Capella 3 (1982-1992, petrol)
Blocking rear door locks from opening from inside the car Mazda3 BK (2003-2009)
Door lock control system Mazda6 GG (2002-2008)
Removal and installation the front door sill trim Mazda CX-5KE (2012-2017)
Removal and installation door trim Mazda 121 (3) (1996-2003)
Link in different formats to this article
Comments and feedback from visitors
No comments yet


How much will 44 + 37 ?


Familia 6 (1989-1994) 
  • General information
  • Introduction to guide
  • User manual
  • Maintenance
  • Power unit
  • Petrol engines
  • Diesel engines
  • Lubrication system
  • Cooling system
  • Ignition system
  • Supply system
  • Carburetor
  • Injection system
  • Exhaust system
  • Transmission
  • Clutch
  • Car gearbox
  • Chassis
  • Front suspension
  • Rear suspension
  • Steering
  • Brake system
  • Wheels and tires
  • Body
  • Body elements
  • Doors and windows
  • Body Care
  • Electrical equipment
  • Equipment and devices
  • Power devices
  • Heating system
  • Lighting and headlights
  • Windshield wipers and washers
  • Wiring diagrams (since 1987)
  • Wiring diagrams (since 1991)
Familia 5 (1985-1989) 
  • General information
  • Vehicle data
  • Model «E» engine
  • Engine repair
  • Cooling and lubrication system
  • Power and ignition system
  • Model «B» engine
  • Engine repair
  • Cooling and lubrication system
  • Ignition system
  • Power system (carburetor)
  • Power system (injector)
  • Transmission
  • Clutch
  • Mechanical gearbox
  • Automatic gearbox
  • Front wheel drive
  • Chassis
  • Steering
  • Front suspension
  • Rear suspension
  • Brake system
  • Electrical equipment
  • Equipment and devices
  • Electrical circuits
  • Wiring diagrams (station wagon)
MazBook.ru © 2018–2026 · Mobile version · Articles and news · Sitemap: EN BG BY UA RS HR RO PL SK HU · Feedback · Site search · Add to bookmarks Familia 5 (BF) · Familia 6 (BG) · Capella 3 (GC) · Capella 3 and 4 (GC) · Capella 4 (GD) · Capella 5 (GE) · Capella 6 (GF) · Mazda3 BK · Mazda6 GG · CX-5KE · Mazda 121 (3) · Mazda BT-50 (1) ·
By continuing to use the site, you agree to the use of cookies 🔐