
MazBook.ru
English Русский
Български
Беларускі
Український
Српски
Hrvatski
Română
Polski
Slovenský
Magyar
• Bookmark • Sitemap • Contacts •   
Cars Opel Cars Ford Cars Volkswagen Cars Audi Cars Kia Cars Renault Cars Peugeot


Familia Capella Mazda3 Mazda6 CX-? Others Articles
Familia 5 (1985-1989) Familia 6 (1989-1994)

Removal and installation/adjusting the tailgate (Mazda Familia BG)

  • Home
  • Mazda Familia
  • Familia BG (1989-1994)
  • Body
  • Doors and windows
  • Removal and installation/adjusting the tailgate
0
Contents: Removal ⇓ Installation ⇓ Adjusting the tailgate ⇓

MAZDA 323 since 10/89.
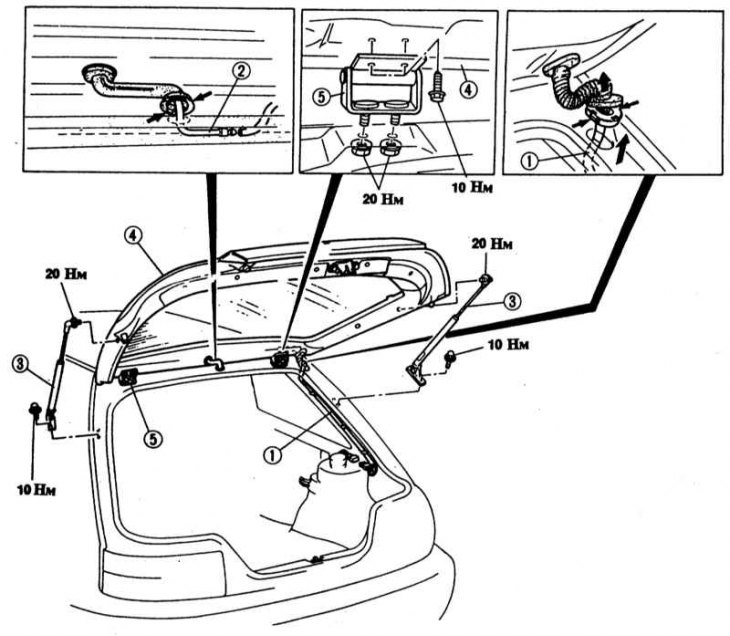


1 - rear cable harness No.2 first remove the rear pillar trim and the upper seat belt mount; 2 -…

1 - rear cable harness No.2 first remove the rear pillar trim and the upper seat belt mount; 2 - rear window washer water hose; 3 - gas-filled strut; 4 - tailgate; 5 - hinge


Remove the parts in sequence. First disconnect the ground cable from the battery.

Warning! This will erase the engine fault memory or the radio security code. Before disconnecting the battery, read the instructions in Section Removal and installation the battery. After installing the battery, connect the ground cable and, if available, set the time on the clock and set the security code for the radio receiver.


Removal


1. Disconnect the windshield washer nozzle hose.

2. Disconnect the plug. First remove the rear pillar trim and seat belt mount.

3. Mark the installation position of the tailgate by tracing the bolts on the hinge with a felt-tip pen.

Caution: If you need to remove the hinges, you must first remove the inner surface of the ceiling to get to the bolt.


4. Support the tailgate.

5. Unscrew the gas-filled strut from the body.


Caution! When replacing a gas-filled strut, the gas must be removed from the old strut before disposal (is done in the workshop). The gas is colorless, odorless and non-toxic.


6. Loosen the hinge bolts and remove the tailgate. To do this, you will need the help of an assistant. Before loosening the hinge bolts, place a cloth between the tailgate and the body to protect the varnished surfaces.

Installation


1. Install the tailgate, screw in the bolts, align the tailgate and tighten the bolts with force 10 Nm.

2. Screw on the gas-filled strut.

Caution! When the stop is fully extended, do not rotate the piston rod and cylinder relative to each other.


3. Attach the windshield washer nozzle hose.

4. Connect the windshield wiper motor and rear window heater plug. Install the rear pillar trim and seat belt mount.

(Content based on information from: MAZBOOK.RU)

Adjusting the tailgate


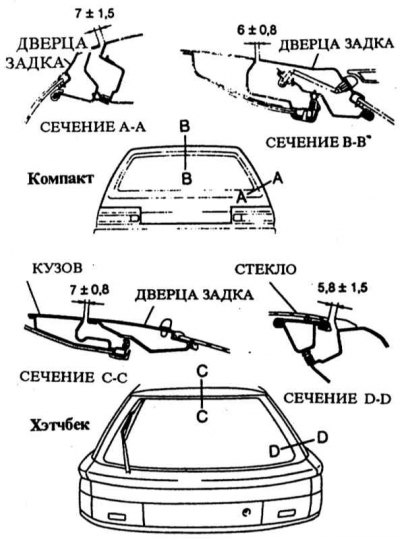
1. Loosen the hinge bolts and tighten them until the door still moves. MAZDA 323 shown since 10/89 issue. Adjust the door according to the dimensions (in mm). On vehicles with 9/85 by 9/89 g. issue. align the door so that it is parallel and at the same distance from other elements.

2. Tighten the hinge bolts or nuts with force 10 Nm.

3. Close the tailgate and check that the tailgate closes easily and does not have too large a gap. Adjust the locking plate if necessary.

4. Loosen both bolts securing the locking plate so that it can still move.
4. Loosen both bolts securing the locking plate so that it can still move.


6. Close the tailgate and align the plate with the lock on the tailgate. Then tighten the bolts with force 20 Nm.
This article is available at: russian, bulgarian, belarusian, ukrainian, serbian, croatian, romanian, polish, slovak, hungarian
This text was checked by: Evdokia Filimonova
Share with friends on social networks:

Previous
Familia 6 » Doors and windows
Next

Removal and installation / adjustment of the hood
Removal and installation / adjustment of the door
Door trim / window lifter / door glass
Removal and installation door trim
Removal and installation front door glass/window lifter
Door lock / handle / cylinder
More articles on repairing other Mazda models
Adjusting the backrest angle Mazda Capella 3 (1982-1992, petrol)
Locking/unlocking doors, trunk lid and tailgate Mazda3 BK (2003-2009)
Locking/unlocking doors, trunk lid and tailgate Mazda6 GG (2002-2008)
Adjusting the level of the working fluid of the automatic transmission Mazda CX-5KE (2012-2017)
Checking and adjusting valve clearance Mazda 121 (3) (1996-2003)
Link in different formats to this article
Comments and feedback from visitors
No comments yet


How much will 34 + 27 ?


Familia 6 (1989-1994) 
  • General information
  • Introduction to guide
  • User manual
  • Maintenance
  • Power unit
  • Petrol engines
  • Diesel engines
  • Lubrication system
  • Cooling system
  • Ignition system
  • Supply system
  • Carburetor
  • Injection system
  • Exhaust system
  • Transmission
  • Clutch
  • Car gearbox
  • Chassis
  • Front suspension
  • Rear suspension
  • Steering
  • Brake system
  • Wheels and tires
  • Body
  • Body elements
  • Doors and windows
  • Body Care
  • Electrical equipment
  • Equipment and devices
  • Power devices
  • Heating system
  • Lighting and headlights
  • Windshield wipers and washers
  • Wiring diagrams (since 1987)
  • Wiring diagrams (since 1991)
Familia 5 (1985-1989) 
  • General information
  • Vehicle data
  • Model «E» engine
  • Engine repair
  • Cooling and lubrication system
  • Power and ignition system
  • Model «B» engine
  • Engine repair
  • Cooling and lubrication system
  • Ignition system
  • Power system (carburetor)
  • Power system (injector)
  • Transmission
  • Clutch
  • Mechanical gearbox
  • Automatic gearbox
  • Front wheel drive
  • Chassis
  • Steering
  • Front suspension
  • Rear suspension
  • Brake system
  • Electrical equipment
  • Equipment and devices
  • Electrical circuits
  • Wiring diagrams (station wagon)
MazBook.ru © 2018–2026 · Mobile version · Articles and news · Sitemap: EN BG BY UA RS HR RO PL SK HU · Feedback · Site search · Add to bookmarks Familia 5 (BF) · Familia 6 (BG) · Capella 3 (GC) · Capella 3 and 4 (GC) · Capella 4 (GD) · Capella 5 (GE) · Capella 6 (GF) · Mazda3 BK · Mazda6 GG · CX-5KE · Mazda 121 (3) · Mazda BT-50 (1) ·
By continuing to use the site, you agree to the use of cookies 🔐