


Contents: Removal ⇓ Installation ⇓
Warning! When removing the carburetor, some fuel may leak out. Fuel vapors are toxic and flammable, so pay special attention to good ventilation of the workplace. Avoid contact of fuel with skin, work in fuel-resistant gloves. Do not work near an open flame.
Removal
1. Disconnect the ground cable from the battery.
Warning! This will erase the engine fault memory or the radio security code. Before disconnecting the battery, read the instructions in Section Removal and installation the battery.
2. Remove the air filter "2", see Chapter Power supply system, carburetor, fuel injection system, Chapter Removal and installation the air filter.
3. If present, unscrew the holder from the air filter.
4. Remove the gas drive "3". First mark the installation position of the cable sheath on the counter support.
Attention! The gas cable must not bend, otherwise it will break during operation. A bent cable must be replaced in any case.
5. Disconnect fuel line "4" and plug it, having first loosened and moved the clamp back. A clean bolt of the appropriate diameter can be used as a plug.
6. Disconnect the vacuum hoses "5" on the carburetor body and mark them with adhesive tape.
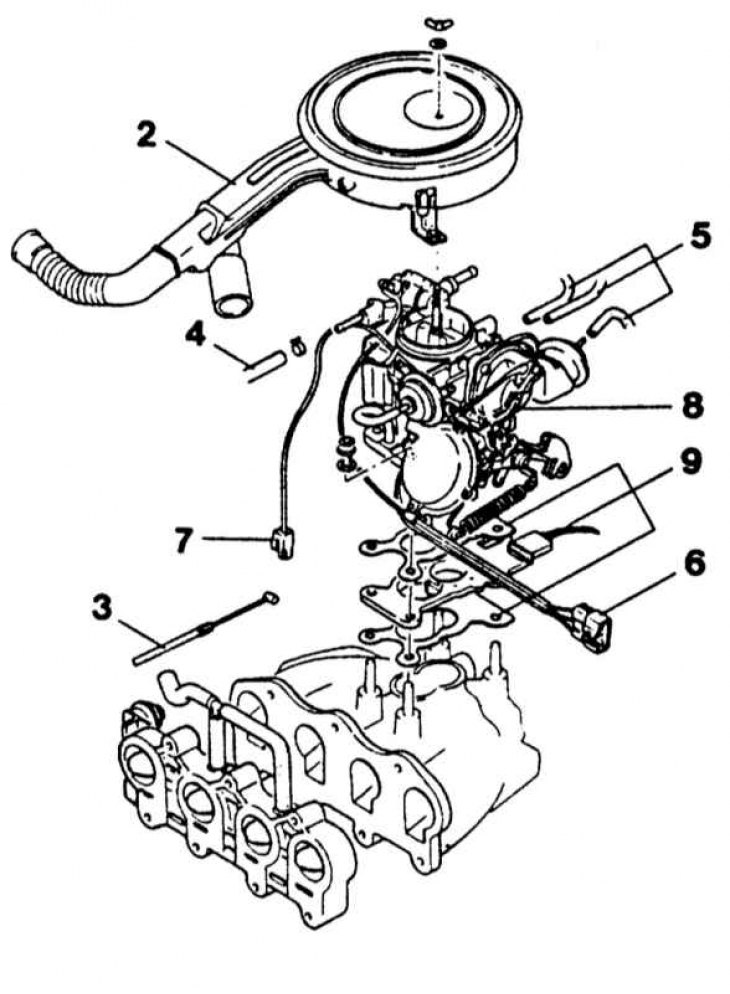
7. Disconnect electrical connections "6" and "7" and mark them with adhesive tape.
8. Unscrew the carburetor mounting nut and lift the carburetor "8".
9. Remove the heating plug.
10. Remove heater "9" and gaskets.
11. Cover the inlet pipe with a clean cloth to prevent dirt from getting in.
Installation
1. Remove the rag, install the carburetor with a new gasket on the flange and screw it on.
2. Connect the vacuum hoses to the carburetor body according to the markings.
3. Connect the fuel hose and secure with a clamp.
The primary source is the website: www.MAZbook.ru
4. Install the gas and starter valve drive. Clamp the cable sheath according to the marking.
5. Attach the throttle lever return spring.
6. If equipped, screw on the air filter holder.
7. Install the air filter, see Chapter Power supply system, carburetor, fuel injection system, Chapter Removal and installation the air filter.
8. Connect the battery ground cable.
9. If available, set the time on the clock and set the security code for the radio receiver.
10. Check idle speed and CO content, adjust if necessary.