
MazBook.ru
English Русский
Български
Беларускі
Український
Српски
Hrvatski
Română
Polski
Slovenský
Magyar
• Bookmark • Sitemap • Contacts •   
Cars Opel Cars Ford Cars Volkswagen Cars Audi Cars Kia Cars Renault Cars Peugeot


Familia Capella Mazda3 Mazda6 CX-? Others Articles
Familia 5 (1985-1989) Familia 6 (1989-1994)

Checking/removing and installing automatic cold start (Mazda Familia BG)

  • Home
  • Mazda Familia
  • Familia BG (1989-1994)
  • Power unit
  • Carburetor
  • Checking/removing and installing automatic cold start
0
Contents: Examination ⇓ Removal ⇓ Installation ⇓
If a cold engine starts poorly or does not accept gas well in the cold phase, the cold start automatics should be checked.

Examination


Verification condition: The engine has cooled to at least room temperature.

1. Unscrew the air filter, see Chapter Power supply system, carburetor, fuel injection system, Chapter Removal and installation the air filter.
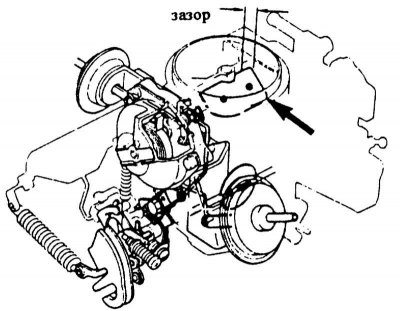
1. Unscrew the air filter, see Chapter Power supply system, carburetor, fuel injection system,…


2. Ask your assistant to fully depress the gas pedal. The starting flap -arrow- should close to a small gap.

3. If the starting flap does not close, check the ease of movement of the starting flap shaft. If the starting flap shaft moves easily, but the flap still does not open, check the starting flap membrane (is done in the workshop).

4. Start the engine and let it idle.

5. Check whether the automatic cold start housing heats up. At the same time, the starting flap in the intake pipe should slowly open.

6. If the housing does not heat up, the cold start automatics should be replaced. If the housing heats up and the damper does not close or closes partially, the membrane of the starting damper should be checked (is done in the workshop).


7. Install the air filter.

Removal


1. Unscrew the air filter, see Chapter Power supply system, carburetor, fuel injection system, Chapter Removal and installation the air filter.

2. Disconnect the cold start automatic plug.

3. Unscrew 3 bolts and remove the mounting plate, bimetallic spring housing and gasket.

Installation
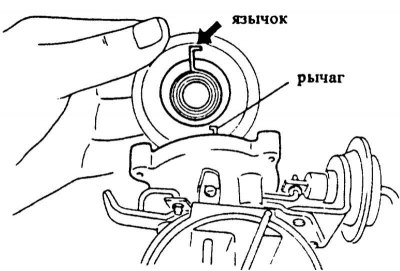


Installation


1. Install a new housing gasket.

2. Install the automatic starter housing so that the tongue of the bimetallic spring enters the starter valve lever.

3. Install the mounting plate and tighten the 3 bolts by hand.
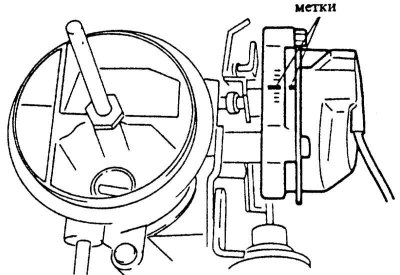
3. Install the mounting plate and tighten the 3 bolts by hand.


4. Align the center line of the scale on the carburetor body with the mark on the automatic starter body. Tighten the mounting bolts.

5. Connect the plug of the starting automatic system.


6. Install the air filter.

[Content based on information from: Mazbook.ru]
This article is available at: russian, bulgarian, belarusian, ukrainian, serbian, croatian, romanian, polish, slovak, hungarian
This text was checked by: Evdokia Filimonova
Share with friends on social networks:

Previous
Familia 6 » Carburetor
Next

Checking/removing and installing the fuel shut-off valve
Checking and adjusting CO content
Sequential chamber downdraft carburetor
Malfunctions in the fuel supply system
Carburetor adjustment
Removal and installation the carburetor
More articles on repairing other Mazda models
Checking, removing and installing electronic control system… Mazda Capella 3 and 4 (1982-1992)
Checking the automatic drive belt tensioner Mazda3 BK (2003-2009)
Checking the automatic drive belt tensioner Mazda6 GG (2002-2008)
Checking, removing and installing the vacuum hose Mazda CX-5KE (2012-2017)
Checking, removing and installing the fuel pump relay Mazda 121 (3) (1996-2003)
Link in different formats to this article
Comments and feedback from visitors
No comments yet


How much will 41 + 29 ?


Familia 6 (1989-1994) 
  • General information
  • Introduction to guide
  • User manual
  • Maintenance
  • Power unit
  • Petrol engines
  • Diesel engines
  • Lubrication system
  • Cooling system
  • Ignition system
  • Supply system
  • Carburetor
  • Injection system
  • Exhaust system
  • Transmission
  • Clutch
  • Car gearbox
  • Chassis
  • Front suspension
  • Rear suspension
  • Steering
  • Brake system
  • Wheels and tires
  • Body
  • Body elements
  • Doors and windows
  • Body Care
  • Electrical equipment
  • Equipment and devices
  • Power devices
  • Heating system
  • Lighting and headlights
  • Windshield wipers and washers
  • Wiring diagrams (since 1987)
  • Wiring diagrams (since 1991)
Familia 5 (1985-1989) 
  • General information
  • Vehicle data
  • Model «E» engine
  • Engine repair
  • Cooling and lubrication system
  • Power and ignition system
  • Model «B» engine
  • Engine repair
  • Cooling and lubrication system
  • Ignition system
  • Power system (carburetor)
  • Power system (injector)
  • Transmission
  • Clutch
  • Mechanical gearbox
  • Automatic gearbox
  • Front wheel drive
  • Chassis
  • Steering
  • Front suspension
  • Rear suspension
  • Brake system
  • Electrical equipment
  • Equipment and devices
  • Electrical circuits
  • Wiring diagrams (station wagon)
MazBook.ru © 2018–2026 · Mobile version · Articles and news · Sitemap: EN BG BY UA RS HR RO PL SK HU · Feedback · Site search · Add to bookmarks Familia 5 (BF) · Familia 6 (BG) · Capella 3 (GC) · Capella 3 and 4 (GC) · Capella 4 (GD) · Capella 5 (GE) · Capella 6 (GF) · Mazda3 BK · Mazda6 GG · CX-5KE · Mazda 121 (3) · Mazda BT-50 (1) ·
By continuing to use the site, you agree to the use of cookies 🔐