
MazBook.ru
English Русский
Български
Беларускі
Український
Српски
Hrvatski
Română
Polski
Slovenský
Magyar
• Bookmark • Sitemap • Contacts •   
Cars Opel Cars Ford Cars Volkswagen Cars Audi Cars Kia Cars Renault Cars Peugeot


Familia Capella Mazda3 Mazda6 CX-? Others Articles
Mazda6 GG (2002-2008)

Assembly of the balancing unit (L3 with variable valve timing mechanism (Mazda 6 GG)

  • Home
  • Mazda 6
  • Mazda6 GG (2002-2008)
  • Power unit
  • Engine repair
  • Assembly of the balancing unit (L3 with variable valve timing mechanism
0
Make sure that the balancing unit gear is not damaged and that the shaft rotates smoothly.

Attention! The balancing unit cannot be disassembled, as it has a high manufacturing precision.


Turn the crankshaft clockwise and set the piston of the first cylinder to the TDC position.

Install the adjusting shim onto the balancing block seating surface.
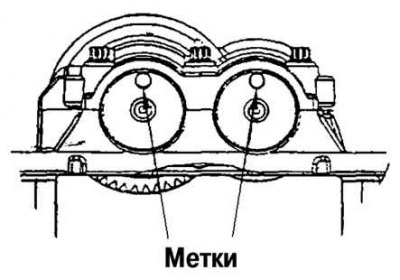
Fig. 2.177. Balancing block marks

Fig. 2.177. Balancing block marks


Install the balancing block on the cylinder block, having previously set the balancing block marks at the top in the center (fig. 2.177).
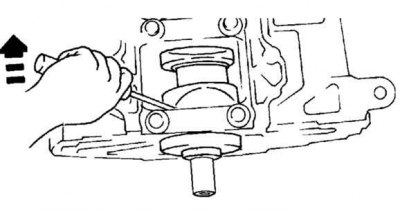
Fig. 2.178. Rotating the balance shaft with a screwdriver

Fig. 2.178. Rotating the balance shaft with a screwdriver


Insert a screwdriver into the crankshaft in the area of the first counterweight, rotate and apply axial force to the crankshaft using the screwdriver, acting as a lever, as shown in Figure 2.178.
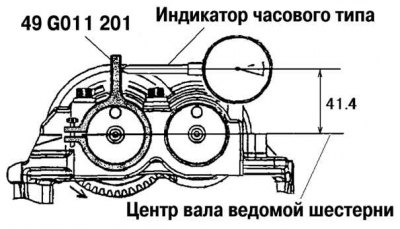


Fig. 2.179. Measuring the clearance in the gear engagement of the driven gear shaft

Fig. 2.179. Measuring the clearance in the gear engagement of the driven gear shaft


Install the special fixture as shown in Figure 2.179, then measure the gear clearance using a dial indicator.

If the clearance exceeds the specified value, measure it again and, using the shim selection chart, select the appropriate shim according to the following procedure.

Caution! When measuring the clearance, rotate the crankshaft one full revolution and check the clearance compliance in the following six positions: 10°, 30°, 100°, 190°, 210°, 280° after TDC.


The gap size in the gear engagement: 0.005–0.101 mm.

Using the main adjusting shim (number 50), install the balancing block on the cylinder block, and then measure the clearance.

Select the adjusting shim according to the measurement result.

Install the selected adjusting shim onto the balancing block, then install the balancing block onto the cylinder block.

Install and press in the rear crankshaft oil seal.

Table 2.23. Balancing block adjusting shims, engines with installed variable valve timing mechanism
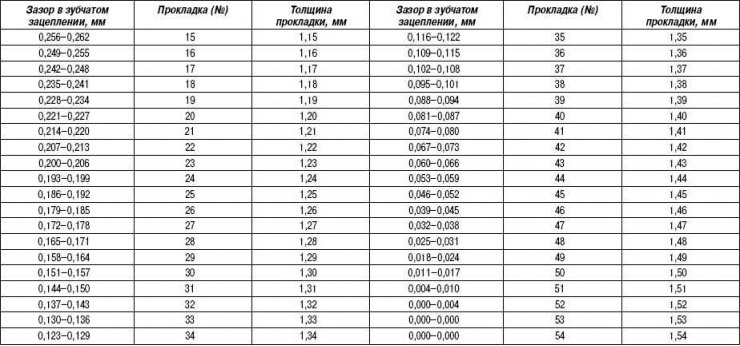


Table 2.23. Balancing block adjusting shims, engines with installed variable valve timing mechanism

(The full text is on the website: «www.mazbook.ru»)
This article is available at: russian, bulgarian, belarusian, ukrainian, serbian, croatian, romanian, polish, slovak, hungarian
This text was checked by: Evdokia Filimonova
Share with friends on social networks:

Previous
Mazda6 GG » Engine repair
Next

Installing the connecting rod bearing and cover
Piston assembly
Installing piston rings
Installing main bearing caps
Checking the cylinder head bolts
Installing the drive disk (with automatic transmission), flywheel…
Installing the oil pan
Cylinder head assembly
Assembly of the timing mechanism drive
Technical data of the mechanical part of engines of models L8, LF, L3
More articles on repairing other Mazda models
Technical characteristics of the valve timing mechanism Mazda Familia 5 (1985-1989)
Removal and installation the timing belt/setting the valve timing of… Mazda Capella 3 and 4 (1982-1992)
Assembly of the balancing unit (L3 with variable valve timing… Mazda3 BK (2003-2009)
Checking/repairing the valve seat of the timing mechanism Mazda CX-5KE (2012-2017)
Camshaft/Diesel Valve Drive Mechanism Mazda 121 (3) (1996-2003)
Link in different formats to this article
Comments and feedback from visitors
No comments yet


How much will 41 + 20 ?


Mazda6 GG (2002-2008) 
  • User manual
  • Vehicle description
  • Keys, locks and alarms
  • Controls and instruments
  • Air conditioning and heater
  • Seat adjustment
  • Security systems
  • Driving and operation
  • Faults en route
  • Maintenance
  • Power unit
  • Engine device
  • Engine repair
  • Lubrication system
  • Cooling system
  • Fuel system
  • Exhaust system
  • Electrical equipment of engines
  • Control system
  • Transmission
  • Clutch
  • Mechanical gearbox
  • Automatic gearbox
  • Drive shafts and hubs
  • Chassis
  • Suspension and wheels
  • Steering
  • Brake system
  • Body
  • Exterior (external elements)
  • Interior (internal elements)
  • Doors and windows
  • Air conditioning and heater
  • Electrical equipment
  • Equipment and devices
  • Power devices
  • Lighting system
  • Windshield wipers and washers
MazBook.ru © 2018–2026 · Mobile version · Articles and news · Sitemap: EN BG BY UA RS HR RO PL SK HU · Feedback · Site search · Add to bookmarks Familia 5 (BF) · Familia 6 (BG) · Capella 3 (GC) · Capella 3 and 4 (GC) · Capella 4 (GD) · Capella 5 (GE) · Capella 6 (GF) · Mazda3 BK · Mazda6 GG · CX-5KE · Mazda 121 (3) · Mazda BT-50 (1) ·
By continuing to use the site, you agree to the use of cookies 🔐