
MazBook.ru
English Русский
Български
Беларускі
Український
Српски
Hrvatski
Română
Polski
Slovenský
Magyar
• Bookmark • Sitemap • Contacts •   
Cars Opel Cars Ford Cars Volkswagen Cars Audi Cars Kia Cars Renault Cars Peugeot


Familia Capella Mazda3 Mazda6 CX-? Others Articles
CX-5KE (2012-2017)

Removal and installation the coupling (Mazda CX-5KE)

  • Home
  • Mazda CX-?
  • CX 5 KE (2012-2017)
  • Transmission
  • Drive shafts and cardan
  • Removal and installation the coupling
0
Contents: Removal the coupling sleeve ⇓ Installing the coupling ⇓
Attention. When replacing the coupling, read the special character string before installing the new coupling and write it in the all-wheel drive control unit after replacement. The special character string is located at two points on the coupling (see picture).
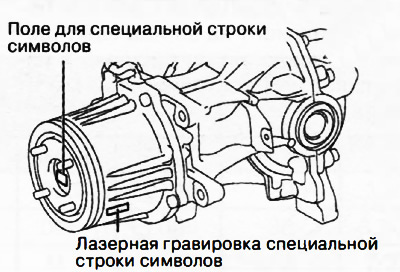

Attention. When replacing the coupling, read the special character string before installing the new…


Removal the coupling sleeve


1. Drain the oil from the rear final drive into a suitable container.

2. Remove the propeller shaft.

3. Disconnect the all-wheel drive solenoid connector.
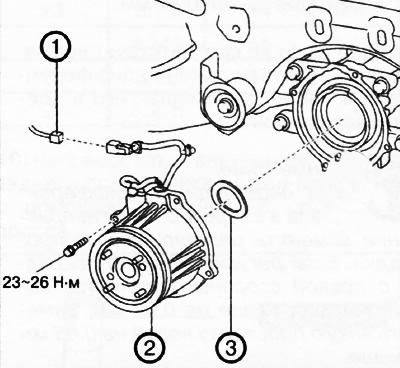
1. All-wheel drive solenoid connector.

1. All-wheel drive solenoid connector.
2. Coupling sleeve.
3. Washer.


4. Support the coupling with a transmission jack.

5. Disconnect the coupling sleeve using a cutter to remove the oil pan from the engine.
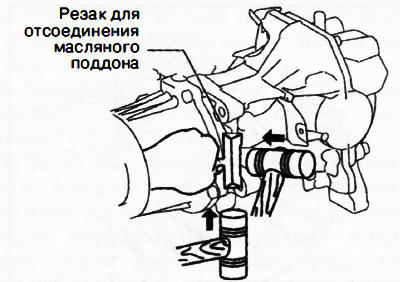


5. Disconnect the coupling sleeve using a cutter to remove the oil pan from the engine.


6. Remove the coupling sleeve with the washer from the rear final drive.

The original article is on (www.MazBook.ru)

Installing the coupling


Note:
  • Before applying new sealant, it is necessary to thoroughly remove any remaining old sealant.
  • Install the coupling before the applied sealant begins to harden.
  • Wait at least 30 minutes after installation to allow the sealant to dry sufficiently before adding oil to the rear final drive.


1. Apply sealant to the contact surfaces of the coupling housing with the rear final drive housing.

2. Install the coupling sleeve on the rear final drive and tighten the mounting bolts to a torque of 23-26 Nm.

3. Fill the rear final drive with oil.
This article is available at: russian, bulgarian, belarusian, ukrainian, serbian, croatian, romanian, polish, slovak, hungarian
This text was checked by: Evgeny Mereshnikov
Share with friends on social networks:

Previous
CX-5KE » Drive shafts and cardan
Next

Assembling the rear final drive
Disassembling the rear final drive
Removal and installation the rear final drive assembly
Rear main gear oil seals
Rear final drive oil
Rear Final Drive Oil Temperature Sensor
Checking the all-wheel drive solenoid
Checking the all-wheel drive control unit
Removal and installation the all-wheel drive control unit
Special tools and accessories
Link in different formats to this article
Comments and feedback from visitors
No comments yet


How much will 27 + 31 ?


CX-5KE (2012-2017) 
  • General information
  • Introduction to the guide
  • User manual
  • Maintenance
  • Power unit
  • Petrol engines 2.0 l
  • Petrol engines 2.5 l
  • Diesel engines 2.2 l
  • Cooling system
  • Lubrication system
  • Supply system
  • Control system
  • Intake and exhaust system
  • Engine electrical equipment
  • Transmission
  • Clutch
  • Mechanical gearbox
  • Automatic gearbox
  • Transfer case
  • Drive shafts and cardan
  • Chassis
  • Wheels and tires
  • Front suspension
  • Rear suspension
  • Brake system
  • Steering
  • Body
  • Exterior (external elements)
  • Interior (internal elements)
  • Security systems
  • Heating and air conditioning
  • Electrical equipment
  • Equipment and devices
  • Electrical circuits
MazBook.ru © 2018–2026 · Mobile version · Articles and news · Sitemap: EN BG BY UA RS HR RO PL SK HU · Feedback · Site search · Add to bookmarks Familia 5 (BF) · Familia 6 (BG) · Capella 3 (GC) · Capella 3 and 4 (GC) · Capella 4 (GD) · Capella 5 (GE) · Capella 6 (GF) · Mazda3 BK · Mazda6 GG · CX-5KE · Mazda 121 (3) · Mazda BT-50 (1) ·
By continuing to use the site, you agree to the use of cookies 🔐