
MazBook.ru
English Русский
Български
Беларускі
Український
Српски
Hrvatski
Română
Polski
Slovenský
Magyar
• Bookmark • Sitemap • Contacts •   
Cars Opel Cars Ford Cars Volkswagen Cars Audi Cars Kia Cars Renault Cars Peugeot


Familia Capella Mazda3 Mazda6 CX-? Others Articles
CX-5KE (2012-2017)

Diesel engine oil pan (Mazda CX-5KE)

  • Home
  • Mazda CX-?
  • CX 5 KE (2012-2017)
  • Power unit
  • Lubrication system
  • Diesel engine oil pan
0
Contents: Removal and installation the oil pan ⇓ Removal the oil pan ⇓ Installing the oil pan ⇓
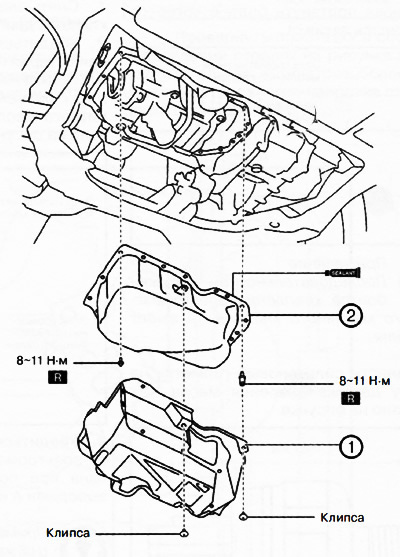
Removal and installation the oil pan


1. Facing casing.

1. Facing casing.
2. Oil pan.


Note.

: replace the part with a new one after each removal.

: apply sealant.


Attention.
  • A hot engine and engine oil can cause various burns. It is necessary to turn off the engine and wait until it cools down.
  • A vehicle raised on a lift but not supported by safety stands is dangerous. It may jump off and fall, causing death or serious injury. Do not work around or under a raised vehicle that is not supported by safety stands.
  • Prolonged skin contact with used motor oil can cause skin cancer. Wash your hands thoroughly with soap and water immediately after handling motor oil.


Removal the oil pan


1. Remove the front engine oil pan No.2.

2. Drain the engine oil.

3. Remove the clips and remove the oil pan cover.

4. Loosen the oil pan mounting bolts.

5. Using a special cutter and a hammer, separate the oil pan from the engine cylinder block.
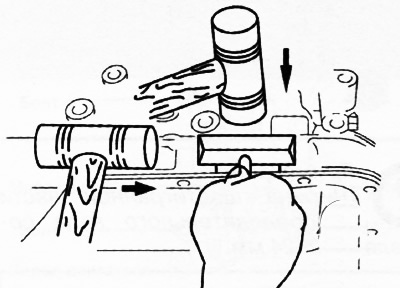
5. Using a special cutter and a hammer, separate the oil pan from the engine cylinder block.


6. Remove the oil pan from the engine.

Installing the oil pan


1. Thoroughly clean and remove any remaining sealant, oil and other contaminants from the contact surfaces of the cylinder block and oil pan.

Attention.
  • Apply silicone sealant in an even, continuous strip.
  • To prevent premature hardening of the silicone sealant, install the front cover on the engine within 10 minutes after applying the sealant. Tighten the mounting bolts immediately.
  • Tightening a bolt with cured sealant may cause a crack in the cylinder head or cylinder block.
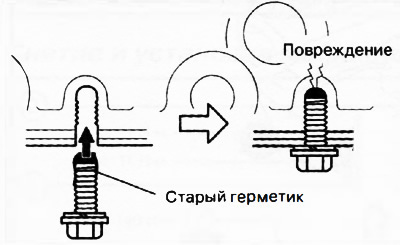

Tightening a bolt with cured sealant may cause a crack in the cylinder head or cylinder block.


2. Apply silicone sealant to the edge of the oil pan on the inside of the bolt holes as shown in the figure.


(Based on website data: www.MazBook.ru)
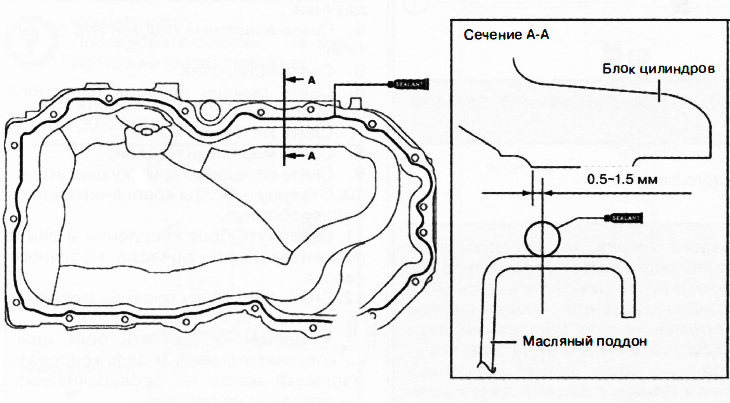
2. Apply silicone sealant to the edge of the oil pan on the inside of the bolt holes as shown in…


Note: Thickness of sealant bead: 3.0-7.0 mm.


3. Install the oil pan onto the cylinder block.

Caution: There are two types of oil pan mounting bolts, each with a different length and shape. Install all bolts in their proper locations as described below. Also, use new bolts as oil pan mounting bolts are not reusable.


4. Tighten the oil pan mounting bolts as shown in the figure.
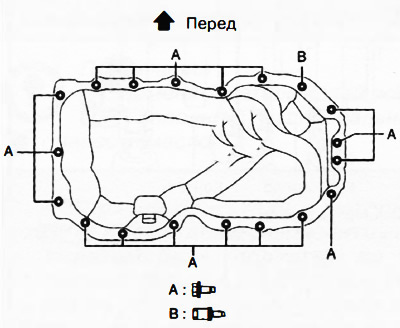
4. Tighten the oil pan mounting bolts as shown in the figure.


5. Tighten the two bolts shown in the figure.
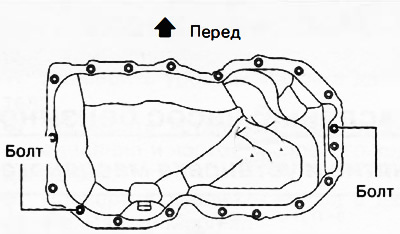
5. Tighten the two bolts shown in the figure.


6. Tighten all oil pan mounting bolts in the sequence shown in the figure to a torque of 8-11 Nm.
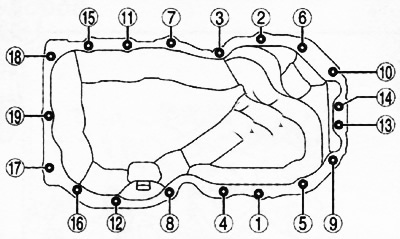


6. Tighten all oil pan mounting bolts in the sequence shown in the figure to a torque of 8-11 Nm.


7. Place the oil pan cover onto the engine and install the mounting clips in the sequence shown in the figure.
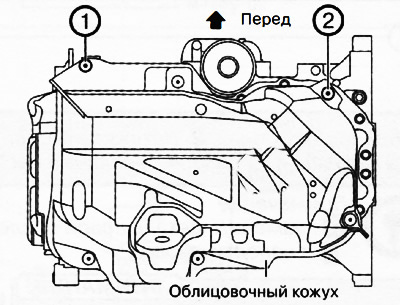
7. Place the oil pan cover onto the engine and install the mounting clips in the sequence shown in…


8. Install the remaining oil pan trim cover retaining clips.
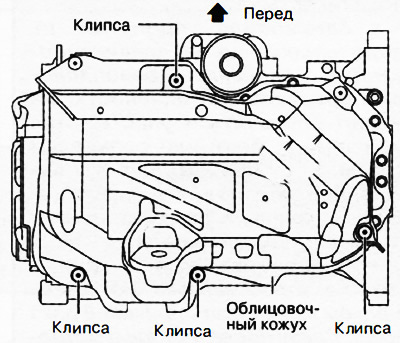
8. Install the remaining oil pan trim cover retaining clips.


9. Install the front engine oil pan No.2.

10. Add the required amount of motor oil of the required grade to the engine.

11. Start the engine and check for oil leaks. If oil leaks are detected, repair or replace the relevant component.

12. Check the engine oil level.
This article is available at: russian, bulgarian, belarusian, ukrainian, serbian, croatian, romanian, polish, slovak, hungarian
This text was checked by: Evgeny Mereshnikov
Share with friends on social networks:

Previous
CX-5KE » Lubrication system
Next

Petrol engine oil pan
Checking the electromagnetic oil valve
Removal and installation the electromagnetic oil valve
Removal and installation an oil radiator
Checking oil pressure
Oil pump for gasoline engines
Diesel engine oil pump
Special tools and accessories
More articles on repairing other Mazda models
Description of diesel engine Mazda Familia 6 (1989-1994)
Starting the engine (diesel vehicle) Mazda Capella 3 (1982-1992, petrol)
Engine Cooling System Components (Diesel) Mazda3 BK (2003-2009)
Engine number Mazda6 GG (2002-2008)
Diagnostics of diesel engine faults Mazda 121 (3) (1996-2003)
Link in different formats to this article
Comments and feedback from visitors
No comments yet


How much will 34 + 29 ?


CX-5KE (2012-2017) 
  • General information
  • Introduction to the guide
  • User manual
  • Maintenance
  • Power unit
  • Petrol engines 2.0 l
  • Petrol engines 2.5 l
  • Diesel engines 2.2 l
  • Cooling system
  • Lubrication system
  • Supply system
  • Control system
  • Intake and exhaust system
  • Engine electrical equipment
  • Transmission
  • Clutch
  • Mechanical gearbox
  • Automatic gearbox
  • Transfer case
  • Drive shafts and cardan
  • Chassis
  • Wheels and tires
  • Front suspension
  • Rear suspension
  • Brake system
  • Steering
  • Body
  • Exterior (external elements)
  • Interior (internal elements)
  • Security systems
  • Heating and air conditioning
  • Electrical equipment
  • Equipment and devices
  • Electrical circuits
MazBook.ru © 2018–2026 · Mobile version · Articles and news · Sitemap: EN BG BY UA RS HR RO PL SK HU · Feedback · Site search · Add to bookmarks Familia 5 (BF) · Familia 6 (BG) · Capella 3 (GC) · Capella 3 and 4 (GC) · Capella 4 (GD) · Capella 5 (GE) · Capella 6 (GF) · Mazda3 BK · Mazda6 GG · CX-5KE · Mazda 121 (3) · Mazda BT-50 (1) ·
By continuing to use the site, you agree to the use of cookies 🔐