


Attention.
- A hot engine and engine oil can cause various burns. It is necessary to turn off the engine and wait until it cools down.
- A vehicle raised on a lift but not supported by safety stands is dangerous. It may jump off and fall, causing death or serious injury. Do not work around or under a raised vehicle that is not supported by safety stands.
- Prolonged skin contact with used motor oil can cause skin cancer. Wash your hands thoroughly with soap and water immediately after handling motor oil.
Petrol engine versions
1. Disconnect the negative battery terminal.
2. Remove the front protective tray No.2.
3. Remove the oil pressure sensor.
Note: Checking the engine oil pressure is performed using pressure gauge 49 0019 908, hose 49 0019 909 and adapters 49 0019 910 and 49 0019 911.
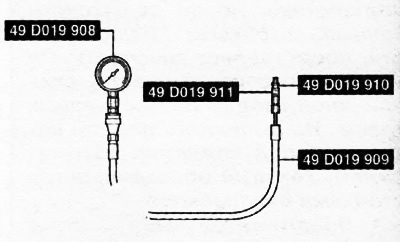
4. Connect the pressure gauge with a hose to the installation hole of the oil pressure sensor:
- Pre-assemble hose 49 0019 909, adapter 49 0019 911 and pressure gauge 49 0019 908 outside the engine compartment.
- Insert adapter 49 0019 910 into the installation hole of the oil pressure sensor.
- Connect adapter 49 0019 911 to adapter 49 0019 910.
5. Connect the negative battery terminal.
6. Warm up the engine to normal operating temperature.
7. Increase the engine speed to the required value, record the pressure gauge readings. If the obtained values do not correspond to the norm, find out the cause and eliminate the malfunction by repair or replacement.
Note.
Oil pressure may vary depending on viscosity, temperature and engine speed.
Oil pressure (approximate value) at a coolant temperature of 80-90°C:
- Low (1,500 rpm): 110-175 kPa (1.13-1.78 kg/cm²).
- High (4,500 rpm): 300-430 kPa (3.06-4.38 kg/cm²).
8. Stop the engine and wait until it cools down.
9. Disconnect the negative battery terminal.
10. Remove the pressure gauge with the hose and adapters.
11. Install the oil pressure sensor.
12. Connect the negative battery terminal.
13. Start the engine and check for oil leaks. If oil leaks are detected, repair or replace the relevant component.
14. Install front protective tray No.2.
Diesel engine versions
Note: Checking the engine oil pressure is performed using pressure gauge 49 0019 908, hose 49 0019 909 and adapters 49 0019 910 and 49 0019 911.
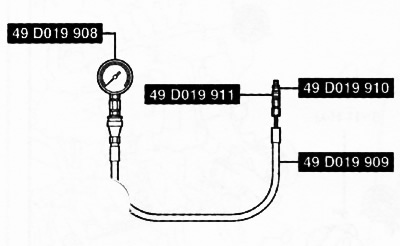
1. Disconnect the negative battery terminal.
2. Remove the expansion tank of the cooling system.
3. Disconnect the oil temperature/pressure sensor connector:
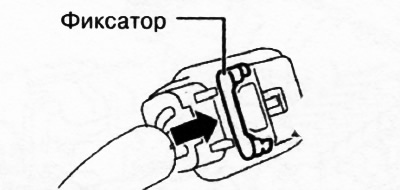
Remove the connector retainer in the direction of the arrow (1) in the figure.
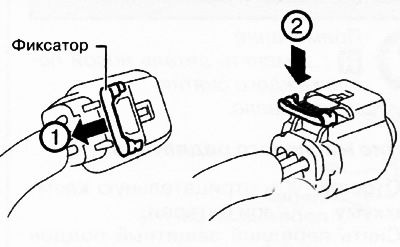
Press the lock down in the direction of the arrow (2) to disconnect the connector.
4. Disconnect terminal B of the starter and move the wire aside.
5. Remove the oil temperature sensor from the engine.
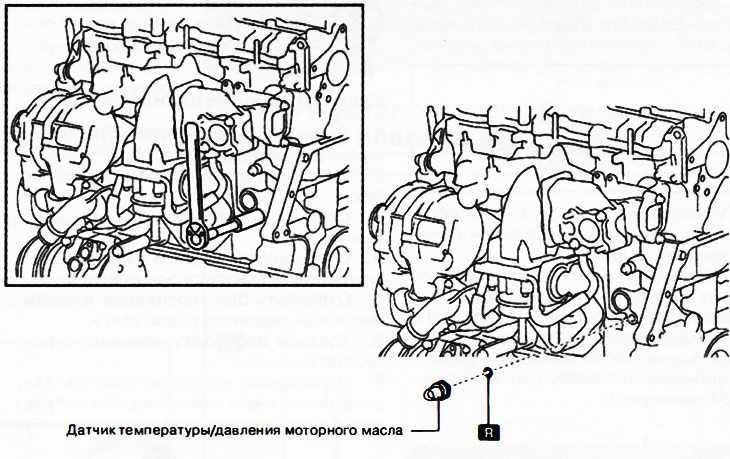
Note.: replace the part with a new one after each removal.
6. Connect the pressure gauge with a hose to the installation hole of the oil pressure sensor:
- Pre-assemble hose 49 0019 909, adapter 49 0019 911 and pressure gauge 49 0019 908 outside the engine compartment.
- Insert adapter 49 0019 910 into the installation hole of the oil pressure sensor.
- Connect adapter 49 0019 911 to adapter 49 0019 910.
7. Connect terminal B of the starter.
8. Install the expansion tank of the cooling system.
9. Connect the negative battery terminal.
10. Warm up the engine to normal operating temperature.
11. Increase the engine speed to the required value, record the pressure gauge readings. If the obtained values do not correspond to the norm, find out the cause and eliminate the malfunction by repair or replacement.
Note.
Oil pressure may vary depending on viscosity, temperature and engine speed.
Oil pressure (approximate value) at a coolant temperature of 80-90°C:
- Low (1,500 rpm): 140-190 kPa (1.43-1.93 kg/cm²).
- High (4,500 rpm): 300-440 kPa (3.06-4.48 kg/cm²).
12. Stop the engine and wait until it cools down.
13. Disconnect the negative battery terminal.
14. Remove the expansion tank of the cooling system.
15. Disconnect terminal B of the starter and move the wire to the side.
16. Remove the pressure gauge with the hose and adapters.
17. Install the oil pressure temperature sensor and tighten to 14-18 Nm.
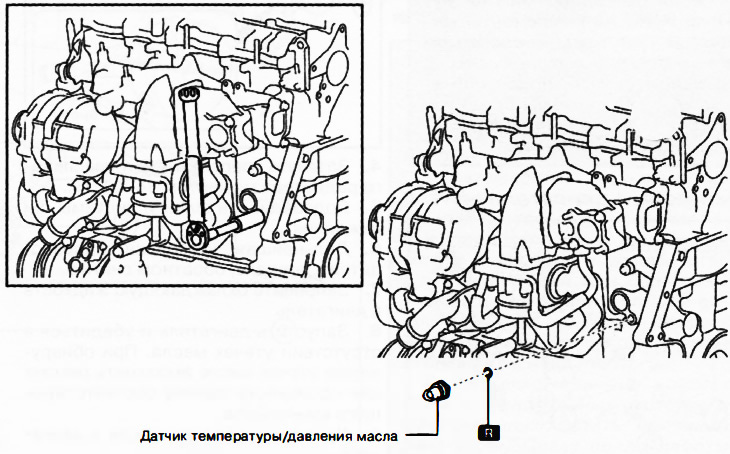
Note.: replace the part with a new one after each removal.
18. Connect the oil temperature/pressure sensor connector and press the lock in the direction of the arrow in the figure.
19. Connect the starter terminal B.
20. Install the expansion tank of the cooling system.
21. Connect the negative battery terminal.
22. Start the engine and check for oil leaks. If oil leaks are detected, repair or replace the relevant component.