


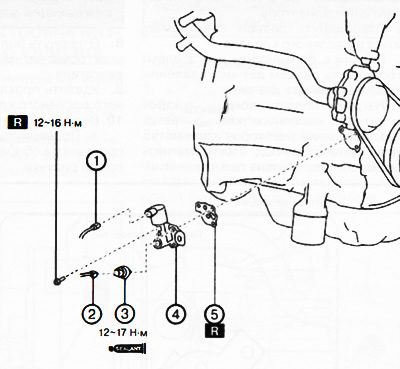
Petrol engine:
1. Solenoid oil valve connector.
2. Oil pressure sensor connector.
3. Oil pressure sensor.
4. Engine electromagnetic oil valve.
5. Gasket.
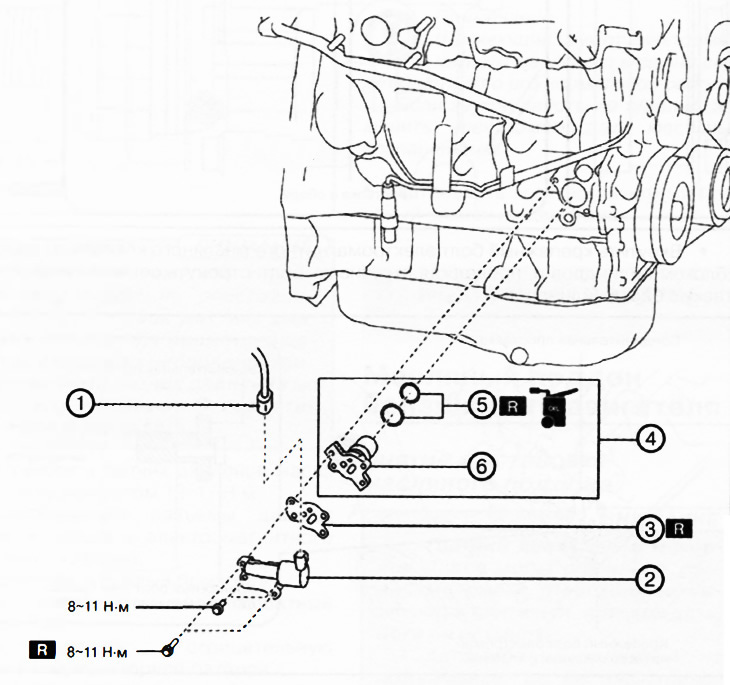
Diesel engine:
1. Solenoid oil valve connector.
2. Engine electromagnetic oil valve.
3. Gasket.
4. Connecting spacer assembly.
5. O-ring with circular cross-section.
6. Spacer.
Note.
: replace the part with a new one after each removal.
: places where sealant is applied.
Attention.
- A hot engine and engine oil can cause various burns. It is necessary to turn off the engine and wait until it cools down.
- A vehicle raised on a lift but not supported by safety stands is dangerous. It could come off and fall, causing death or serious injury. Do not work around or under a raised vehicle that is not supported by safety stands.
- Prolonged skin contact with used motor oil can cause skin cancer. Wash your hands thoroughly with soap and water immediately after handling motor oil.
Removal the electromagnetic oil valve
1. Disconnect the negative battery terminal.
2. Remove the front protective tray No.2.
3. Remove the right mudguard.
4. Diesel versions: Remove the lower bracket of the catalytic converter.
5. Disconnect the oil solenoid valve connector.
6. Petrol engine versions: disconnect the oil pressure sensor connector and unscrew the sensor.
7. Cover the area around the oil solenoid valve with a rag because some oil will leak out from under the oil solenoid valve when it is removed.
Caution: Do not allow engine oil to come into contact with the adjacent water pump gasket and the O-ring of the cooling system inlet pipe. Otherwise, the sealing material may be damaged, resulting in coolant leaks.
8. Loosen the mounting bolts and remove the electromagnetic oil valve from the engine.
9. Remove the solenoid oil valve gasket.
10. Diesel engine versions:
Turn the connecting spacer assembly in the direction of the arrows in the figure.
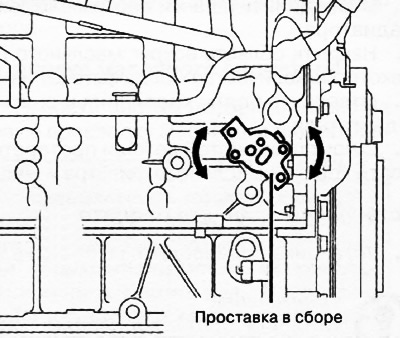
Turn the spacer assembly in the direction of the arrows in the figure and position it so that the threaded hole is positioned against the cylinder block wall.
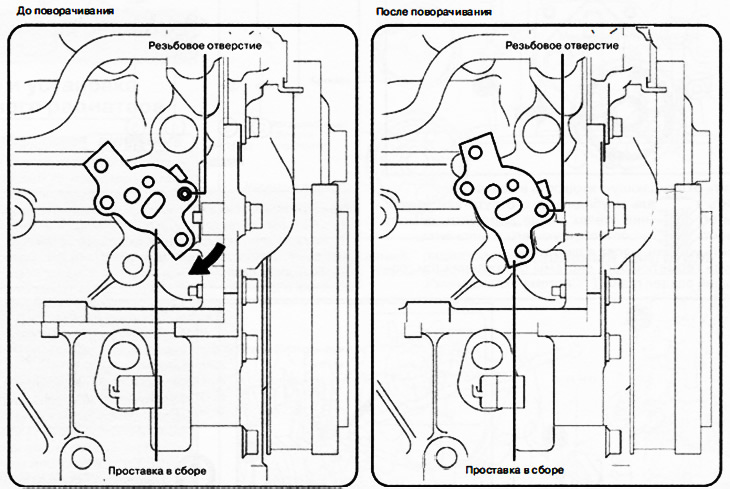
Install the removed oil solenoid valve mounting bolt into the threaded hole in the connecting spacer as shown in the figure.
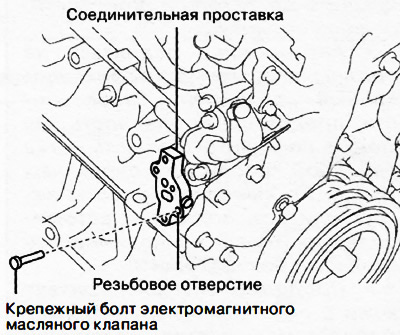
Caution: Do not use the same bolt that will be used during installation.
Screw in the electromagnetic oil valve mounting bolt until it contacts the cylinder block and, continuing to screw in the bolt, remove the connecting spacer from the cylinder block.
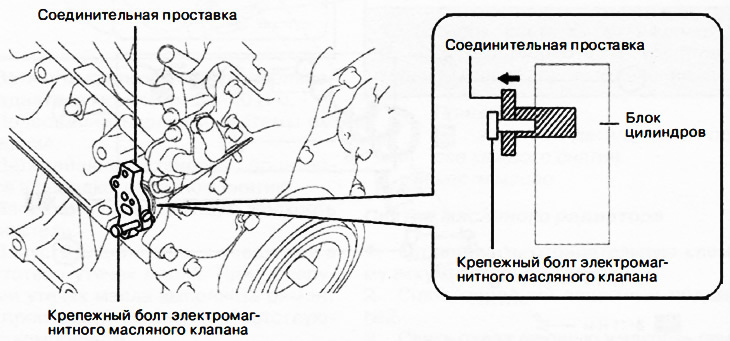
After the connecting spacer has been moved, remove it from the engine manually.
Note: Remove the O-rings from the coupling spacer.
Installing an electromagnetic oil valve
Gasoline engine
1. Clean the mounting surfaces of the electromagnetic oil valve and cylinder block and install a new gasket.
2. Install the electromagnetic oil valve and tighten the three mounting bolts shown in the figure to a torque of 12-16 Nm. After tightening the three bolts, tighten the bolt from which tightening began again.
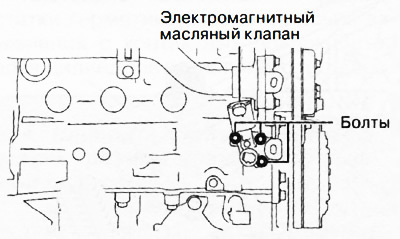
Note: The tightening sequence of the oil solenoid valve mounting bolts does not matter.
3. Apply silicone sealant to the threads of the oil pressure sensor as shown in the figure.
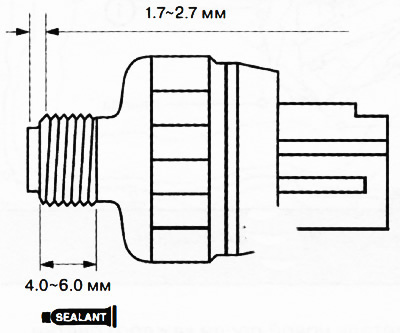
Attention.
- Make sure there is no sealant within 1.7-2.7 mm from the edge of the oil pressure sensor to prevent possible malfunctions.
- Install the pressure sensor before the applied sealant begins to harden.
4. Install the oil pressure sensor and tighten to 12-17 Nm.
5. Connect the connectors of the oil pressure sensor and the electromagnetic oil valve.
6. Install the right mudguard.
7. Install front protective tray No.2.
8. Connect the negative battery terminal.
9. Start the engine and check for oil leaks. If oil leaks are detected, repair or replace the relevant component.
Diesel engine
Installation is carried out in the reverse order of removal.
[Article is based on website data www.mazbook.ru]
Start the engine and check for oil leaks. If oil leaks are detected, repair or replace the relevant component.